Beginner PvE Combat Vulture Build

An Elite Dangerous ship build for beginner players. See PvE Combat Vulture Build for an end-game version.

Goals

The goals are:

  1. Create a build that excels at early PvE combat, such as Low- and Medium-Intensity Resource Extraction Sites and Low-Intensity Conflict Zones.
  2. The build must be accessible to early-game commanders. It should be cheap and require no engineering, rank, reputation or unlockable ships or modules.

Build

Vulture Blueprint by CMDR-Arithon (https://swat-portal.com/forum/gallery/image/9464-vulture/)

Links: EDSY and Coriolis (have your preferred one open as you read the guide for easy reference)

When only considering combat, the Vulture is a giant among small ships. An unengineered Vulture is faster, more agile, has better shields, harder and thicker armour and more firepower than any other similarly outfitted and unengineered small ship, including the Viper Mk III. 

Unfortunately, this build costs around 20 million credits. This cost might seem high for a beginner build. You can outfit a combat Viper Mk III for 2.5 million credits, a figure much easier to attain for an early-game player. This Vulture build’s rebuy is also high at about 1 million credits. 

However, you want the best odds when you are new to combat. A Viper Mk III will struggle against all but the weakest enemies. Its smaller hardpoints have lower Armour Piercing. It has fewer utility points, so you have to sacrifice shield boosters for chaff.

You also want to be established enough to afford rebuys. The Viper mentioned above is cheap but, at that stage, a new commander may not have the experience or ships to quickly earn it back. In this build, you can earn the Vulture’s rebuy cost in under an hour of fighting in a Low-Intensity Resource Extraction Zone.

If cost is a limiting factor, B-rating the Frame Shift Drive, Thrusters and Power Distributor saves 5 million credits. You can sell the B-rated modules with no loss and upgrade when you have the credits.

Finding a station that sells everything can be a challenge. Early- to mid-game players will not have access to Jameson Memorial station in Shinrarta Dezhra. Thankfully, both EDSY and Coriolis can locate nearby stations selling this build’s ship and modules in Inara. 

This build is far from original. Unengineered Vulture builds go as far back as 2015. However, the discussion below should help new pilots understand why this build works and useful variations.

Offence:

  1. Gimballed weapons: Gimballed weapons auto-aim, but chaff confuses them. They are a good compromise between the more difficult aiming with fixed weapons versus the lower damage output of turreted weapons.
  2. Burst Lasers: Burst Lasers compromise between the low power, damage and heat Pulse Lasers and the high power, damage and heat beam lasers. They do not require ammunition, so you can focus on flying and combat instead of watching ammunition counts. 
  3. Heat management: With four pips to weapons, these Burst Lasers can fire for 18 seconds. This time is usually more than long enough for the enemy to pass by. The weapons’ heat build-up is slow, making them quite forgiving. It is difficult to self-inflict heat damage with this build.
  4. FSD Interdictor: An FSD Interdictor is useful for interdicting assassination mission targets, wanted ships for bounty vouchers or even powerplay ships for merits.
  5. Kill Warrant Scanner: A Kill Warrant Scanner gives about 25% bonus credits for each kill. It generates additional, needed cash early on. Assign it to the same fire group as your Burst Lasers. The scan takes ten seconds, and the range of the 0E version is only 2000 m. However, this build fights best when up close, so that range is acceptable.

Defence:

  1. Power management: The biggest challenge with outfitting a Vulture is its small Power Plant. It is a class too low given the power demands of its other modules. Without the Overcharged engineering blueprint, you need to make tradeoffs with your outfitting. This build moves the Frame Shift Drive and Cargo Hatch to a low power priority. They are unpowered when deploying hardpoints, meaning you have to stow them before scooping engineering materials or jumping out. The Fast Boot engineering blueprint on the Frame Shift Drive would also help with fast get-a-ways.
  2. Shields: Bi-weave shields are generally weak when unengineered. However, they are sufficient given this build’s power constraints and the likely weak enemies. Two D-rated shield boosters give the best shield increase considering the remaining available power.
  3. Chaff: A Chaff Launcher is the best choice for the remaining utility slot. It requires minimal power and works against all gimballed weapons. 

Variations

  1. Laser and Multi-cannons: Burst Lasers are sufficient for weaker enemies. However, Expert and better NPC pilots have noticeably better armour. This build’s pure thermal damage from lasers is less effective against them. Replace one Burst Laser with a 3C Multi-Cannon to swap some thermal for kinetic damage. Keep everything on the same fire button for simplicity or use separate fire buttons to micromanage ammunition.
  2. Fixed weapons: If you back your flying skills, replace the gimballed weapons with fixed versions. It can be frustrating at first, particularly against smaller or agile craft, but you will improve with practice.
  3. More hull: Replace the FSD Interdictor with a 1D Hull Reinforcement Package if you do not plan to use it. However, it is worth experimenting on a few wanted targets at supercruise, if not just to familiarise yourself with how interdictors work.
  4. Fighting without life support: Equip a 3A Life Support, then give it a low power priority. Deploying hardpoints means fighting without oxygen. However, A-rated life support gives you 25 minutes of oxygen, which is more than long enough for an engagement. It means you have more power for better Shield Boosters or whatever you prefer. This change is an interesting take on power management, but I find no life support’s altered soundscape distracting.

Solo Tactics

  1. Finding targets: The short sensor range required more flying around to locate targets than builds with better sensors. Look for telltale distant laser fire or explosions or follow system authority ships. Scan potential targets first to ensure you only fire on wanted ships.
  2. Point and shoot: Flying this build is pretty basic. Speed up to get close to the target, throttle down to 50% when they get within one km, and then fire. Pulse lasers are most effective within 800 m. Turn as they fly past, then repeat the process. Experiment with thrusters and pre-turning to increase time on target.
  3. Power (pip) management: This build works fine with the default two pips in every category. However, it comes alive when you actively manage your pips, moving points into what you need at the time.
  4. Shield management: Start every fight with shields at 50% or better integrity. Put four pips in systems to maximize the shield protection and rebuild/regeneration rate between fights or when not firing. Putting pips in systems is faster than doing a reboot/repair when shields are down for this build.
  5. Chaffing: Chaff when shields get low, multiple targets engage you, or you need to escape. 
  6. Fun: Once I reset my expectations for an unengineered ship, I found flying this Vulture surprisingly fun. It can almost continually kill Novice-piloted or easier ships. The multi-cannon variant can take down wings of Expert- or Master-piloted NPC ships without too much hassle.
  7. Upgrade path: Consider the Alliance Chieftain or, reputation willing, the Federal Assault Ship or Imperial Clipper as the logical next step in combat ships. See PvE Combat Vulture Build for an end-game version of this build.

Team or Wing Tactics

  1. Unchanged: Fly in a wing or team as you would in solo. Whether you tank depends on your teammate’s ships and builds.

Beginner Passenger Mission Type-6 Transporter Build

An Elite Dangerous ship build aimed at beginner players.

Goals

The goals are:

  1. Create a ship specialized for evacuating survivors from burning stations. The game loop is described below. These missions efficiently increase reputation with the Federation or Empire, useful for unlocking ships or system permits. Evacuation missions are usually offered the first week after stations are attacked.
  2. The build should be accessible by an early-game player. This means a cheap ship with no engineering, unlockable ships or modules.

The high-level game loop for burning station passenger missions is:

  1. Dock at the burning station. Manoeuvring can be tricky. You cannot use a docking computer and the station’s interior is dimly lit and full of debris. Heat increases quickly inside the station, so use heat sinks to prevent heat damage.
  2. Accept passenger missions. This is pretty standard if not for the atmospheric flakey holographic display and the station interior’s fiery glow.
  3. Undock and leave the station. The same challenges with docking apply to undocking.
  4. Supercruise to the nearby rescue ship, usually a few megameters away.
  5. Hand in the passenger missions, disembarking your passengers.
  6. Rearm heat sinks and repair any damage.
  7. Travel back to the burning station and repeat.

Build

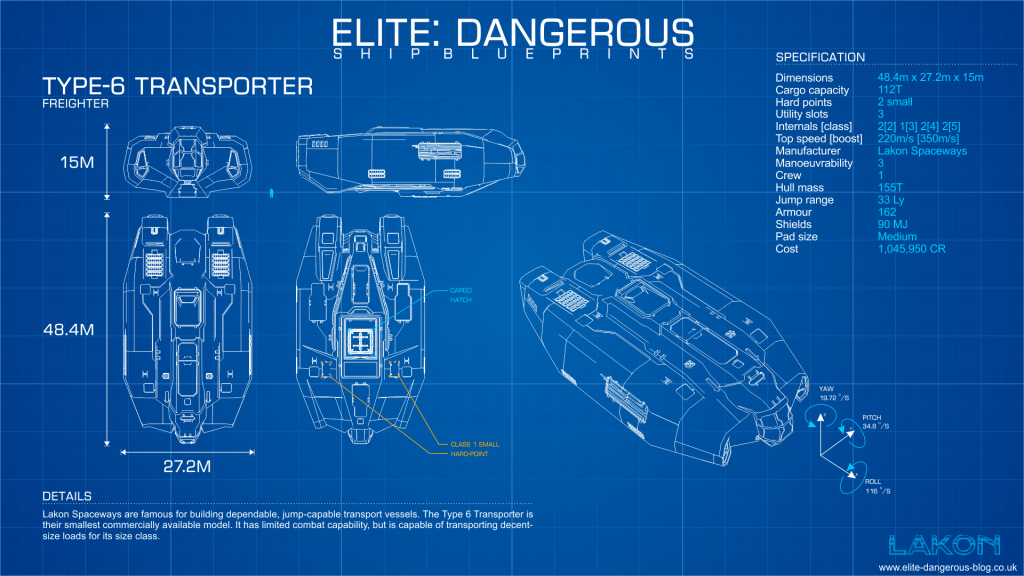
Type-6 Transporter Blueprint by CMDR-Arithon (https://swat-portal.com/forum/gallery/image/9476-type6/)

Link: EDSY and Coriolis (have your preferred one open as you read the guide for easy reference)

The Type-6 Transporter sits at an optimal price point, carrying 52 economy class passengers with a shield generator. The build linked above costs just over one million credits before discounts, including outfitting. See the table below for a comparison.

ShipCost (CR)Size 2 SlotsSize 3 SlotsSize 4 SlotsSize 5 SlotsSize 6+ SlotsSmallest Shield SizeTotal Economy Passengers
Cobra Mk III349,72030300326
Cobra Mk IV764,72022400340
Type-6 Transporter1,045,95021220352
Dolphin1,337,32031210338
Diamondback Explorer1,894,76022200324
Asp Explorer6,661,16022011356
Economy passenger capacity of selected beginner ships

The next highest economy passenger capacity ship is the Asp Explorer, carrying 56 passengers with a shield generator and costing over 6 million credits before outfitting. Some ships, like the Dolphin, carry fewer passengers but are more expensive.

Finding a station that sells everything for a build can be a challenge. Thankfully, both EDSY and Coriolis link to EDDB, locating nearby stations selling this build’s ship and modules.

Passengers:

  1. Economy class passenger cabins: The survivors from burning stations are not fussy about their accommodation. Pack as many economy class passenger cabins as possible.
  2. Smallest shields possible: Docking at a burning station is challenging. You cannot use a docking computer, the station’s inside is filled with debris, and the occasional dramatic explosion may slam your ship against a wall. Shields protect your ship.
  3. Heat sinks: As its name suggests, the inside of a burning station is hot and will quickly cause heat damage to your ship. Fire off heat sinks to minimize such damage.
  4. Docking computer: Passenger cabins do not come in a class one version. While not usable inside the burning station, a docking computer can help to dock with the rescue megaship.

Variations

  1. Better core internals: This build intentionally skimps on core internal modules to save credits. However, a better Frame Shift Drive means fewer jumps to the burning station. Better Thrusters make manoeuvring easier. Improving these is strongly recommended if you have the credits. That said, an E-rated Type-6 handles surprisingly well.
  2. Shieldless: Removing the Shield Generator squeezes in even more passengers at the risk of hull damage.
  3. Gather materials and cargo: Swap out two passenger cabins for one Collector Limpet Controller and a Cargo Rack. Grab a few limpets then, once you enter the station interior, use the limpets to gather engineering materials and cargo inside the station. Such cargo can also be handed in to complete missions from the rescue ship or sold for a small profit. Passengers are easier and more time-efficient for reputation but this can be a fun diversion.

Tactics

  1. Getting to the burning station: Burning stations are present in systems selected by Elite’s ongoing story. They have often been some distance from the bubble but always have a nearby rescue megaship. One way to get there is to take a ship with a longer jump range and then transfer this ship over. Another is temporarily equipping a fuel scoop, travelling there and then transferring over the replaced module. The rescue megaship sometimes has a shipyard, meaning you can transfer ships and modules to it. Otherwise, a nearby station may have a shipyard.
  2. Game mode: Play in a private group or solo to minimize interruptions. Gankers congregate where lots of players will be, like burning stations. It gives them more targets. The rescue megaship has limited landing pads and you may wait on other players offloading their passengers.
  3. Maximize reputation gain: Go for as many applicable missions as possible. Prioritize missions transporting the fewest passengers to maximize the number of missions accepted per round-trip. Prioritize missions from Federation- or Empire-aligned factions. Some minor factions may be independent. Select the highest reputation reward when completing the mission. The credit and other rewards are often small.

Shield-light PvE Combat Federal Assault Ship Build

Goals

Create a ship to:

  1. Use with Internal Impact pulse lasers. These shift the damage from 100% thermal to 50% thermal and kinetic. This shift equalizes the damage to shields and hull, meaning the ship can damage both with a single weapon. However, they have a 3% jitter, drastically reducing accuracy.
  2. See whether a shieldless build is viable. You can direct the unused power for systems towards weapons and engines.
  3. Try something a bit crazy. Suboptimal builds can be fun due to the increased challenge.

Build

Federal Assault Ship Blueprint by CMDR-Arithon (https://swat-portal.com/forum/gallery/image/9461-federal-assault-ship/)

Links: EDSY and Coriolis (have your preferred one open as you read the guide for easy reference)

Pilots love the Federal Assault Ship for two reasons. The first is its manoeuvrability which recaptures the joy of flight for many pilots used to flying larger, less agile ships. The second reason is ramming things. The Federal Assault Ship’s mass and manoeuvrability give it a lot of momentum. Both are useful here.

Another alternative for these goals is the Alliance Chieftain. It even has slightly higher Armour Hardness and is more agile. The Federal Assault Ship is marginally faster and has more Armour. More consequentially, the Alliance Chieftain substitutes one of the medium hardpoints for three smaller ones. Smaller weapons have lower Armour Piercing values, meaning lower overall damage to the intended targets. The Chieftain’s engines are also exposed, making them prone to damage-induced malfunction.

Offence:

  1. Sturdy Inertial Impact: At first glance, Short Range would be an ideal blueprint for the lasers. However, the hardpoints will be damaged quickly without shields. Instead, the Sturdy blueprint increases integrity. It also increases Armour Penetration, making this build more effective against its intended, highly armoured targets.
  2. Weapon Focused Power Distributor: This build requires firing at enemies for as long as possible. The Weapon Focused blueprint means you can keep firing for 26 seconds with four pips in weapons.
  3. Long Range Sensors: Using Long Range on A-rated sensors helps find ideal targets in expansive resource extraction sites, conflict zones and navigation beacons.

Defence:

  1. Shieldless is impractical: Despite my efforts, any build that lacked a shield was worse than a minimally shielded one. Even a thin shield significantly increased combat longevity. It also makes landing with low hull integrity less stressful.
  2. Shields: For this build’s frail shields, a Shield Generator’s regeneration (0% to 50%) time is more important than recharge (50% to 100%). Regular Shield Generators are ideal because bi-weaves’ faster recharge is not significant. Prismatic shields have a longer regeneration time. The Thermal Resistant blueprint also helps mitigate shields’ innate weakness to thermal weapons.
  3. Shielded blueprint: Given this build’s lack of power-guzzling shield boosters and most modules and hardpoints need additional integrity, this build uses the Shielded blueprint frequently.
  4. Strong armour and hull: Reactive Surface Composite bulkheads coupled with Hull Reinforcements, one with Thermal Resistant and the rest with Deep Plating, maximize integrity. The ratio of hull to module protection is a trade-off.
  5. Advanced Field Maintenance Unit (AFMU): The AFMU is engineered to grade four to not overload the Power Plant.

Variations

  1. Shieldless: Replace the 5A Shield Generator with another 5D Hull Reinforcement Package. The combat longevity shortens without a shield. However, you can place more pips in engines and weapons.
  2. ECM: Swap two of the Chaff Launchers for ECMs for missile protection. ECMs require effort to time but can be effective. Remember, ECMs affect all nearby missiles and limpets, including your teammates’ ones. Change the blueprint on the Power Distributor from Weapon Focused to Charge Enhanced to help power the ECMs.

Solo Tactics

  1. Point blank range: The Inertial Impact Pulse Laser’s massive jitter makes firing at anything over 500 m less effective. This build’s effectiveness is proportional to your ability to keep close to a target.
  2. Ram: Do not be afraid to ram your target, even if your shields are down. All but the most formidable NPC enemies will come off second best.
  3. Strobing shields: Your shields will go down and up frequently during the fight. The telltale ping of damage on weak shields and their subsequent falling evokes almost Pavlovian fear in many pilots. Fight that reflex. Your Power Distributor’s systems capacitor has just enough charge to regenerate your shields in thirty seconds with two pips to systems. 
  4. Live with damage: Seeing your hull on 50% integrity causes panic in most pilots. However, modules willing, this build is still capable until about 15%. Your hardpoints and canopy are the most likely to be damaged. Use your AMFU between fights to keep them above 80% integrity to prevent malfunctions.
  5. Fear missiles: All weapon and utility hardpoints are on the underside of the Federal Assault Ship except one large hardpoint. A ventral missile hit can affect all of them. Point Defense is ineffective due to the Federal Assault Ship’s hardpoints’ restricted fire arcs.
  6. Chaff: With 40 chaff refills spread across four launchers, you should chaff whenever the shields are down. Unfortunately, it does not help against missiles.
  7. Ideal targets: The ideal targets are large, less agile ships. You can get close and have a big target for the build’s inaccurate weapons, even if they chaff. Try to get above or below them because these are the most prominent profiles. Jitter makes targeting modules pointless. 
  8. No ammunition: Ammunition constrains the combat longevity of most builds. Module damage usually curbs this build.
  9. Power (pip) management: Put four pips in weapons and two pips in systems. However, the Weapon Focused Power Distributor means you will need to frequently shift pips from weapons into engines, particularly to boost frequently.

Team or Wing Tactics

  1. Get someone else to tank: You do not have the shields to tank, particularly against teams or wings. Having someone else draw attention means you can get close to the target and above or below it, maximizing the target’s profile. If you are not taking damage, this build can fight for as long as you can.
  2. Getting too close: Getting close to targets when fighting in a wing or team means you often get hit by friendly fire. It is an occupational hazard for this build.

Python Mining Build

An Elite Dangerous ship build.

Goals

Create a ship to:

  1. Subsurface (using a Sub-Surface Displacement Missile), surface (Abrasion Blaster) and core (Seismic Charge Laucher) mine asteroids.
  2. Reach distant stations and outposts to sell refined minerals at the best price. This goal requires a medium ship but is not relevant if you have a fleet carrier. 
  3. Be manoeuvrable enough to efficiently mine rotating asteroids. Subsurface mining a rotating asteroid is particularly challenging. This goal precludes most large ships. 
  4. Laser mine when a prospector limpet shows the asteroid contains desirable minerals. A large ship with its copious cargo capacity is better suited for laser mining. However, this goal can help before purchasing one or when being opportunistic.
  5. Survive a pirate attack long enough to outrun them or escape to supercruise. This goal does not include mining in a resource extraction site. It is more for accidents or logging back in during a mining session.
  6. Unlike previous builds, can require unlockable modules.

Build

Python Blueprint by CMDR-Arithon (https://swat-portal.com/forum/gallery/image/9457-python/)

Links: EDSY and Coriolis (have your preferred one open as you read the guide for easy reference)

Once again, the Python is the best general-purpose medium ship. Its additional size six slot over a Krait Mk II gives 64 T of extra cargo space when the Krait’s greater speed and agility are not needed. It has ample hardpoints for mining tools and optional internal slots for limpet controllers.

This build is not a good choice for mining in resource extraction sites. The Python cannot equip a fighter bay. The build would need to sacrifice some hardpoints for weapons, limiting the types of mining it could do.

Mining:

  1. Mining tools: This build has two mining lasers and one of everything else.
  2. Weapon Focused Power Distributor: Most mining tools cannot be engineered. However, a Weapon Focused Power Distributor allows Mining Lasers to fire longer. This reduces the time it takes to deplete an asteroid, meaning faster laser mining.
  3. Collector Limpet Controllers: Three collector limpets per large mining laser is a good “rule of thumb” for efficient fragment collection. This build has the slots for lighter, separate limpet controllers instead of a single multi-limpet controller.
  4. Cargo space: Use the larger slots for Cargo Racks and the smaller slots for limpet controllers and a refinery. The 196 T cargo space should be enough to exhaust the ammunition of the mining hardpoints.
  5. Refinery: Most mining is for a specific mineral, so this build uses a 2A Refinery. You do not need a large Refinery unless you mine for multiple minerals simultaneously.
  6. Detailed Surface Scanner: A Detailed Surface Scanner probes rings for hotspots or to see hotspots revealed previously.
  7. Fuel Scoop: Used to get to remote mining locations or sell at distant stations and outposts.

Defence:

  1. Prismatic Shields: Unless you slow down by hitting asteroids, this ship only needs shields when attacked. A Prismatic Shield Generator provides the best protection.
  2. Poor Armour: This build eschews bulkheads and hull reinforcements for agility and other internal modules.
  3. Run: This ship does not fight. It runs, using its shields to protect it long enough to high wake out or jump to supercruise. It boosts up to 474 meters per second with a full cargo hold, outrunning all NPC pirates.

Variations

  1. Mining tools: Adjust the hardpoints as needed. For example, if you plan to core mine only, replace the Sub-Surface Displacement Missile with a second Seismic Charge Launcher. Firing two provides no benefit, but switching from one to the other after exhausting the first’s ammunition keeps you mining longer.
  2. Lazy Engineering: You could use the guardian hybrid versions instead of engineering the Power Plant and Power Distributor. The Guardian Hybrid Power Distributor will not allow the Mining Lasers to fire as long. The Guardian Hybrid Power Plant will generate more heat, making fuel scooping harder. However, neither are critical for this build and it saves the engineering materials and effort.
  3. Sensors: If you want more visibility on pirates when you jump into a ring, consider upgrading the sensors to a class A.
  4. Short Range: Replace the 4A Fuel Scoop with a 4E Cargo Rack if you have a fleet carrier or will otherwise not be jumping far.

Tactics

  1. Fire groups: Have one fire group for laser mining. Put the Prospector Limpet Controller on one button and both the Collector Limpet Controller and Mining Lasers on the other. Putting both collector limpets and mining lasers together means collector limpets are released when you fire the mining lasers. Create fire groups for different mining activities, such as one with a Pulse Wave Analyzer and Prospector Limpet Controller, then one with an Abrasion Blaster and Seismic Charge Launcher.
  2. Mining: Mining is covered by guides from elsewhere. Mining with team- or wingmates can make the otherwise repetitive mining more enjoyable.
  3. Pip management: Mining is best with four pips to weapons and two in engines. You should not need shields. Just be careful not to outrun or crash into your prospector limpets.

Fer-de-Lance Fixed Weapon PvE Combat Build

An Elite Dangerous ship build.

Goals

Create a ship that:

  1. Relies on fixed weapons. Unaffected by chaff and with a higher damage output than comparable gimballed weapons, fixed weapons force the commander to earn kills by better piloting and shot timing.
  2. Unlike previous builds, can require unlockable modules.

Build

Fer-de-Lance Blueprint by CMDR-Arithon (https://swat-portal.com/forum/gallery/image/9459-fer-de-lance/)

Links: EDSY and Coriolis (have your preferred one open as you read the guide for easy reference)

The Fer-de-Lance’s close, centred hardpoints, collectively called “convergence”, and manoeuvrability make it ideal for fixed weapons. It is the archetypical dedicated combat ship. With styling reminiscent of the Flash Gordon era, its V8-like engine purr is unmistakable.

There are few comparable ships. The Mamba’s hardpoints are further apart, making landing all weapons on small targets difficult. It sacrifices the required agility for speed. The Vulture, Chieftain and Federal Assault Ship all have good hardpoint placement but are lighter ships.

When outfitting, use the two top medium hardpoints for Plasma Accelerators, not the lower ones. The two lower medium hardpoints are too wide. Use them for Rail Guns.

I demonstrate an early version of this build in a Low Intensity Conflict Zone below. The build shown in the video, about two years old complete with Horizons era graphics, had Long Range Rail Guns with Multi-Services for rapid, long range tagging and Bi-Weave shields. My pip management is also lacklustre.

Offence:

  1. Plasma Accelerators: As with the Python mission build, Plasma Accelerators are equally wonderful and frustrating weapons. They do a mix of thermal, kinetic and absolute damage. This mix means they damage shields and hull similarly. It is hard to mitigate their damage via increasing resistances. Plasma Accelerators have an “Armour Piercing” value of 100, meaning they do full damage to all existing playable ships. However, Plasma Accelerator shot speed is slow, requiring deflection shooting. Their reload times are long, and ammunition is limited and expensive. They generate lots of heat, making repeated firing dangerous, and pull a lot of energy from the Power Distributor.
  2. Efficient blueprint: Using the Efficient blueprint on Plasma Accerlators counters their heat and power problems while giving a slight damage increase. It means reload times constrain Plasma Accelerator use, not heat, so you can use them like more common weapons. They become beginner friendly.
  3. Rail Guns: Like the Plasma Accelerators, Rail Guns do thermal and kinetic damage and have an “Armor Piercing” value of 100. They require a short warm-up before firing but are “hit scan” weapons, meaning they hit whatever the gunsight points. They are similar to Guardian Gauss if you are used to sniping Thargoid Interceptor hearts.
  4. Short Range blueprint: Rail guns’ damage is comparatively low. Short Range increases their damage by around 75%, turning them into viable weapons. It limits their range, but this build already has to get close to be effective.
  5. Rail Gun experimental effects: Feedback Cascade disrupts the use of shield cell banks. Hitting a target’s shields using a shield cell bank damages the shield cell bank and decreases its regeneration time. Super Penetrator damages all modules on the shot’s trajectory on a breach, not just the first one. It is particularly effective when hitting the front or back of a target, usually when soloing.
  6. Thermal Conduit experimental effect: Plasma Accelerators with Thermal Conduit do more damage the hotter you are. Balancing heat and the resulting damage versus damage output is a challenging but rewarding metagame for this build.
  7. Power (Pip) management: Getting the most from the Fer-de-Lance requires active pip management, such as putting pips to engines when pursuing enemies, then into systems when not firing. Continuously firing the three Plasma Accelerators requires three pips in weapons. Otherwise, I use one pip in engines and the rest spread equally between systems and weapons.
  8. Graphics: This build demonstrates the different graphics used to show engineered weapons, such as the blue Feedback Cascade rounds or the sun-like plasma globes from hot Thermal Conduit Plasma Accelerators. Apart from looking cool, they help show which weapon hits or misses or when experimental effects occur.

Defence:

  1. Prismatic shields: Assuming you are not engaging too many wings or small ships, ammunition will usually run out before shields. A reinforced Prismatic Shield Generator with Hi-Cap is ideal.
  2. Resistances: Two Thermal Resistance Shield Boosters with Thermo Block counteract shields’ innate weakness to thermal weapons. The build is effectively immune to explosive and kinetic weapons.
  3. Chaff sparingly: Use chaff if you engage a wing, must disengage, or shields are low. Otherwise, your shields should protect you.
  4. Speed and agility: This build can boost to 540 meters per second. While not as fast as the Mamba build, it will still outrun most ships when things get hairy.

Variations

  1. Focused or Long Range Plasma Accelerators: Changing the blueprint on the Plasma Accelerators to one that increases shot speed is tempting. This change makes aiming easier. However, the increased heat build-up means repeatedly firing the Plasma Accelerators will quickly overheat the ship, causing lots of module damage. These blueprints risk turning the build into a single engagement build.
  2. Phasing Sequence: If you prefer not fighting at high heat levels needed to leverage Thermal Conduit, consider Phasing Sequence (10% damage bypasses shields). 
  3. Automated Field Maintenance Unit (AFMU) and Heat Sinks: If you regularly use high heat levels, consider swapping one of the Hull Reinforcement modules for an AFMU. This module can repair damaged modules between fights, increasing longevity. Replace a Heavy Duty Shield Booster with a Heat Sink for fast cooling, if needed.
  4. FSD Interdictor: Swap out the FSD Interdictor if you are not doing assassination missions or Power Play merit farming.
  5. Advanced Plasma Accelerators and Imperial Hammers: The Power Play versions of both weapons are interesting but not better. Advanced Plasma Accelerators have a higher rate of fire. Imperial Hammers are better if you must land an experimental effect. However, you must land all three shots to get the increased damage output.
  6. PvP builds: PvP is not my expertise. However, this build is not too far from a PvP build. You can use different experimental effects on the Plasma Accelerators, such as Dispersal Field (reduce gimballed weapons accuracy) and Target Lock Breaker (break target lock). 

Solo Tactics

  1. Different fire groups: Place the Rail Gains and Plasma Accelerators in separate fire groups. You rarely fire the hit scan rail guns and deflection shooting Plasma Accelerators simultaneously.
  2. Favour larger or less agile targets: Fixed weapons are harder to aim. The slow shot speed of Plasma Accelerators makes them impractical at long ranges. Choose targets that emphasize the build’s strengths. The Long Range Sensors can help find them.
  3. Close range brawler: Get close to the target, throttling up if they are far away, then down into the blue once they are in range. The closer you are, the less time your target has to dodge. Leverage the default jousting behaviour to line up a rail gun shot then a plasma shot each pass. If you cannot get a plasma shot off, pre-turn to reveal the target’s larger-profile top or below view. Getting behind a target and matching their speed is ideal but challenging to maintain.
  4. Same weapons against shields and hull: Unlike most ship builds, this build does not require using different weapons against shields and hulls. The Plasma Accelerators and Rail Guns have the same damage profile against both.
  5. Patience: Fixed weapons are more difficult to use than gimballed weapons. Plasma Accelerators have a long reload time, so only take shots when confident. You will improve with time. 
  6. Heat management: The Thermal Conduit experimental effect on the Plasma Accelerators gives you an option to increase damage output at the expense of heat and resulting heat damage. To increase your heat and, therefore Plasma Accelerator damage output, alternate rail gun and plasma rounds. If you do not hear heat warning sirens, your heat is too low. 
  7. Watch ammunition: All weapons on this build require ammunition, and Plasma Accelerators have a low ammunition capacity. For example, this build should have enough when soloing a low-intensity conflict zone but may be insufficient for soloing medium- or high-intensity ones. While synthesizing it is possible, the material cost is high. The Plasma Slug experimental effect is not worth it due to the Fer-de-Lance’s small fuel tank. 
  8. Shorter sessions: Many previous builds allowed an almost constant stream of fighting, like the Healing Krait Mk II PvE healing build. This build shifts to more intense sessions with frequent breaks between them. 

Team or Wing Tactics

  1. Damage dealer” role: Fixed weapons are less reliable than gimballed for damage output. Therefore, this build is better suited to damage dealing than tanking. A teammate can draw an enemy’s attention, allowing you to get above or below the target. This angle reveals their larger, easier to hit profile. Go full Thermal Conduit if your team engages one too many larger ships.
  2. Anti-shield cell bank: Teammates will appreciate you using the Feedback Cascade experimental effect against enemies using shield cell banks. 

Python Mission Build

Goals

Create a ship to handle solo mission running, usually to move minor faction influence or increase superpower reputation. This build needs to:

  1. Land at stations and outposts. This effectively requires a medium-sized ship.
  2. Handle cargo loads of at least 196 T. This size is the largest a non-wing cargo mission requires. It also makes a viable, if suboptimal, medium pad trader.
  3. Complete non-cargo missions, including smuggling, theft and scanning, in space and on planet surfaces. This means various limpet controllers and a planetary vehicle hanger. 
  4. Defeat pirates likely sent after a high-rank pilot. These are usually large, sluggish targets like Anacondas or Federal Corvettes. This requires weapons and shields, unlike many weapon-less and shield-less builds.
  5. Handle high-end assassination missions against the same targets as mentioned above. If you can defend against elite pirates, why not add a few assassination missions? This requires an FSD interdictor and, possibly, a wake scanner.
  6. Gather engineering materials, such as from High Grade Emission signal sources or scanning wake signals at Distribution Centres. This is a bonus use emerging out of the above requirements.

Build

Python Blueprint by CMDR-Arithon (https://swat-portal.com/forum/gallery/image/9457-python/)

Links: EDSY or Coriolis (have your preferred one open as you read the guide for easy reference)

The Python is an excellent choice. It can land on a medium pad but has ample optional internal slots, high firepower and strong armour. A Krait Mk II lacks a class six slot, hurting its cargo carrying capacity. Combat-focused medium ships lack sufficient internal space, such as the Fer-de-Lance or Mamba.

However, general or multi-purpose builds are more challenging than specific purpose builds. Prioritization is vital because you rarely can do everything. The missions available in your favourite systems or personal preference also may dictate change. 

Utility:

  1. Cargo: Cargo racks dominate the optional internal slots, totalling 200 T. This is enough to carry the required 196 T and a few limpets or extra cargo.
  2. Operations Multi Limpet Controller: Surprisingly, the cargo racks constrain the optional internal slots. The 3B Operations Multi Limpet Controller provides collector, hatch breaker and recon limpets in a single slot. It facilitates a broad range of missions and material gathering uses. The choice of 3B versus 3C is not clear cut, but I prefer the 3B for its longer range.
  3. Assassination: The 3A Frame Shift Drive Interdictor and 0A Frame Shift Wake Scanner allow pulling targets out of supercruise, such as for assassination or theft missions, and following them if they high wake out, respectively. The Expanded Capture Arc blueprint on the FSD interdictor can interdict targets from the side, but Longer Range can also be effective. Long Range on the Frame Shift Wake Scanner makes it much easier to scan wake signals with such a relatively slow ship, including encoded material gathering.
  4. Planetary Vehicle Hanger: SRVs are vital for surface missions or surface material gathering. Carry a spare or both a Scarab and a Scorpion.
  5. Advanced Docking Computer: This module is worth it when repeatedly docking or playing when distracted.
  6. Power Priorities: The fitted modules exceed the Power Plant’s capacity. This build moves the Planetary Vehicle Hanger, FSD interdictor and Advanced Docking Computer to the lowest priority, meaning deploying hardpoints shuts down modules not needed during combat.

Offence:

  1. Broad choice: Just about every weapon loadout is viable. However, given the intended targets, this is a chance to try out something fun and unusual. Adjust to taste or your place in the game’s progression. For example, consider a laser/multicannon build if you fight smaller or more agile opponents.
  2. Plasma accelerators: Plasma Accelerators with Efficient are highly effective at damaging large ships. The intended targets cannot dodge, chaff and ECM are ineffective, and plasma’s high Armour Piercing values negate their high armour. Plasma Accelerators are effective against turrets for surface missions but struggle against agile skimmers. Many Plasma Accelerator experimental effects are only consequential in PVP, so Oversized is a good fallback choice.
  3. Seeker missiles: This is an arbitrary but fun choice. High Capacity ensures it takes a while to run out of ammunition and the Thermal Cascade experimental effect does something impactful on a shield hit. Useful for smaller targets or at range. Remember that missiles take time to lock on and a have minimum range of 500m. Consider the double engineered versions from a technology broker. Drag Munitions are also a useful option.

Defence:

  1. Bi-Weave shields: Nothing special here. This build still has a class six shield generator, despite the temptation to use a smaller shield to free up larger slots for cargo racks.
  2. Weak without shields: This build lacks hull and module reinforcements. It is vulnerable when its shields drop, particularly to explosive damage. Flee if outnumbered or outgunned.

Variations

  1. Swap surface capability for longer operational range: Replace the planetary vehicle hanger with a 4A Fuel Scoop, then use the Plasma Slug experimental effect on the Plasma Accelerators. This change gives the build a longer reach, useful for long-distance cargo missions or accessing engineers. It also extends the build’s combat life and reduces ammunition costs. Use this variation if you have an alternate ship for surface missions.
  2. Plasma accelerators: Focused is an alternate blueprint, unincreasing their shot speed and, therefore, accuracy. However, heat management may be a problem.

Solo Tactics

  1. Choose when to fight: Apart from assassination missions, fighting is optional in most missions. NPC interdictions are easily escapable. However, combat can be fun or lucrative. Redeeming bounty vouchers improves minor faction influence. This build is not a dedicated combat ship but gives you options.
  2. Ignore lighter ships and fighters: Plasma accelerators will have difficulty hitting faster or more agile targets. Ignore them. Missiles can help but it takes a lot of missiles to take down even a small target.
  3. Batch missions to the same location for efficiency: For example, if you have a cargo mission delivering to a particular station, look for missions going to the same station to minimize travel time.
  4. Batch similar mission types for efficiency: For example, elections often spawn missions to capture cargo from other ships. Repeating the same mission type means you will not forget limpets and your time efficiency will increase.

Wing or Team Tactics

  1. None: This build is for running missions solo. Large ships are better for wing missions. This build does not need other commanders protecting it. You can wing up, such as for casual conversation or sharing trade dividends, but other builds are usually superior for the wing’s purpose.

“Raised by Wolves” Season 1 and 2 Review

Raised by Wolves is a science fiction drama series developed by HBO and streamed on HBO Max. Famously proposed by Ridley Scott, it was intended as an introspective, almost arthouse masterwork.

The show’s premise is two androids, Mother and Father, crash land on planet Kepler-22b. They are atheists, fleeing an Earth ravaged by a war between atheists and the Mithraic, worshippers of the deity Sol. The androids carry human embryos, intending to start afresh. The first season opens as Mother, Father and Campion, their one surviving child, juggle the impending arrival of the Mithraic ark, survival and learning the mysteries of their new world. 

Early episodes of season one establish the characters and the bleak but not inhospitable world. The later episodes focus more on the Mithraic and emerging mysteries. Flashbacks expand characters’ backgrounds, such as Mother’s interaction with her creator, and develop the setting. The second season introduces an atheist ark. 

While there is a large ensemble cast, Raised by Wolves focuses on three main characters: Mother, Campion and Marcus, an atheist who replaced an ark crew member to escape Earth. Each is the focus of a theme.

Mother explores the ethics of artificial life, along with Father and later Vrille and Grandmother. She struggles with the human demands of raising children and defending atheist beliefs and her in-human capabilities as a necromancer, a military android impervious to most weapons and capable of gruesome and graphic destruction. She is the target and instrument of humanity’s negativity. Most humans see androids as disposable tools in Raised by Wolves. However, Mother has the firepower to demand respect. 

Mother also contrasts with Father. They invert the stereotyped sexual roles, unlike Marcus and his partner. Mother is the protector while Father is compassionate. She is single-minded and devoted to the atheist cause. He is more pragmatic. Both actors give great performances, personifying a slight unease amongst humans without the autism-like portrayals of yesteryear.

Campion explores self-determination. Without the biases from old Earth, Campion views Mother’s atheism and the Mithraic religion with fresh eyes. 

Campion is inclusive, as expected by contemporary culture. He eventually admires the Mithraic optimism and dedication but rejects their exclusory dogma. He concludes androids have souls and deserve an equal place with humans in society, although the story arc with Vrille feels superficial and rushed. 

Marcus follows the most circuitous route, exploring the impact of blind faith and the dangers of relying on things you do not understand. Raised as a child soldier, Marcus’s experience and trauma always emphasized pragmatism and survival. 

After arriving on Kepler-22b, Marcus is subject to apparently religious revelations and visions. Unprepared, he succumbs and villanizes Mithraism. We slowly learn the mysterious force guiding him may not be coherent or benevolent, mainly by looking through his eyes.

All three characters explore the meaning and implications of family. Whether it be Campion’s relationship with his android “parents” or Marcus’s love for his adopted child, the characters constantly weigh up competing demands. Mother and Father have similar goals but their different approaches drive tension. It shows how parents’ histories impact their children but also childrens’ resilience.

Unfortunately, while introducing many wonderful opportunities to examine these themes, Raised by Wolves comes to few conclusions or answers. The resolutions are either driven by short term goals like survival or complicated by the wider deus ex machina.

Raised by Wolves relies heavily on symbolism and imagery. However, the show avoids offence by not veering too close to any real-world religion or entity and keeping references varied.

Abrahamic religious symbolism is frequent, like serpents, virgin birth, resurrection, the tree of knowledge, the ark concept and Mother’s crucifixion-like flying pose. This imagery gives the show a tinge of credibility and biases our initial reactions subtly, particularly Western audiences.

Other references invoke a romanticism for myths and legends. Mithraism was a religion observed in the Roman Empire before Christianity, and Sol (the sun) was one of its deities. Mother feeding her embryos is reminiscent of a wolf feeding her cubs. This is just like the mythical founding of Rome, where a she-wolf suckled Romulus and Remus, and is a direct reference to the show’s title.

Lamia, Mother’s other name, is the name of a child-eating monster from Greek mythology, and who could also remove her eyes. This dichotomy questions Mother’s motives, especially as she makes a few dubious decisions in season one.

The use of symbolism goes on. The message cards left by ancient humans are traditional symbols of chance or luck. Mithraic vehicles and clothing are always white, a colour of purity and good contrasting with its genocidal view of atheists. The Mithraic dodecahedron is more reminiscent of science fiction, reminding us this is futuristic.

The technology in Raised by Wolves is also magic or mythic, capable of creating life-like human androids, holographic displays, exhaustless flight and immersive, realistic simulations. Interaction is through voice or hand gestures. There are no buttons, dials or switches and nothing mechanical like gears, levers or wheels. Even medicine is automated. Technology falls into the “uncanny valley”, where objects are recognisable but unusual enough to be unsettling. Its presence constantly removes the characters from the present day.

Raised by Wolves is a stream of “Genesis moments,” as if humanity is playing God by creating and manipulating life. Technology in Raised by Wolves is almost organic, like androids’ fuel blood, the internals of the Trust or repairing Grandmother. No character is a technology expert. While it can be damaged or destroyed, the show’s technology does not need regular maintenance. When we see repairs, they are done by a medic, not by a technician. Perhaps humanity’s utilitarian view of its life-like technology mimic’s the entity’s view of humanity.

Unfortunately, both seasons sometimes seem directionless. The character interactions and world-building consume a lot of screen time. In a world where Raised by Wolves’ contemporary shows demonstrate strict economy, Raised by Wolves either gets frequently distracted or focuses on seemingly less important or relevant points.

Raised by Wolves also abuses strawmen arguments by asserting that atheists would always create new gods to follow, like the Trust in season two. Rather than being a benevolent dictator, like the minds of Ian M. Bank’s Culture series, the Trust is manipulative and insincere. Without the Trust, the second season depicts atheists as ill-disciplined rabble and incapable of populating a new world. Perhaps the writers wanted to be even-handed, but they missed the mark if the writers intended metaphors for real-world religious conflict.

It is almost as if Raised by Wolves is a future Mithraic bible dramatization. It deemphasizes details the unseen author feels unimportant and focuses on parables to emphasize subtle points of wisdom.

Raised by Wolves frustrates me. It deals with relevant, timely themes in a novel setting that allows safe exploration. However, the sometimes meandering plot, reliance on strawman arguments and situational conclusions mean it does not realize its potential. Perhaps there is more to come, which will tie it all together, or its point is there are no easy answers to difficult questions.

However, Raised by Wolves excels at promoting thought. The symbolism and imagery are deliberate and the layers deep. I find myself constantly reevaluating what I watched. Maybe its real achievement is promoting discussion into its real intent and meaning via our introspection.

Cobra Mk III On-Foot Support Build

Goals

Create a ship to:

  1. Get the commander to/from on-foot missions introduced with Odyssey. This requirement includes transporting an SRV (for mission support or raw material gathering) and a Detailed Surface Scanner (for finding points of interest).
  2. Endure a sustained assault from on-foot enemies. This requirement ensures you can complete mission goals rather than rushing back to defend your ship.
  3. Land at every surface settlement, outpost or station, effectively requiring a small ship. 
  4. Provide fire support to kill scavengers and other ground enemies.
  5. Have a fast boost speed. The build should reach supercruise distance quickly for material farming or escaping hostile ships.
  6. Have a reasonable jump range and a Fuel Scoop for travelling to on-foot engineers or distant missions.

Build

Cobra Mk III Blueprint by CMDR-Arithon (https://swat-portal.com/forum/gallery/image/9445-cobra-mk-3/)

Links: EDSY and Coriolis (have your preferred one open as you read the guide for easy reference)

An iconic Elite Dangerous ship, the Cobra Mk III tends to get left behind once bigger or more specialized ships are available. However, its small size, ample optional internal space and speed make it ideal.

If you lack a Diamondback Explorer, this build’s reasonable jump range (30 LY, more with the double engineered 4A FSD), high supercruise manoeuvrability, and ability to land anywhere make it a good “taxi” build. 

Defence:

  1. Prismatic Shields: This build will not need shields until it desperately needs them. A Prismatic Shield with Reinforced and Hi-Cap boosted with Guardian Shield Reinforcement Packages provides the highest protection. Engineered Shield Boosters counteract the usual shield thermal weakness. These give just under 1000 absolute shield strength, a behemoth for its size.
  2. Overcharged Power Plant: This build uses the Overcharged blueprint on the Power Plant to power the Prismatic Shields and, even then, only if many modules are unpowered when deploying hardpoints. Power priority management is essential.
  3. Heat: This build uses the Thermal Spead experimental effect on the Power Plant instead of Monstered to minimize heat when fuel scooping. However, avoiding overheating still requires care.
  4. Minimize weight: This is not a combat ship. While it uses a single 2D Hull Reinforcement package, Lightweight Alloy bulkheads maximize its speed.

Offence:

  1. Ground attack: The Advanced Missile Racks can provide area explosive damage when your ground mission area is swarming with scavengers or guards. The Cobra Mk III’s two medium hardpoints are surprisingly far apart, compared to a human scale, but usable. No experimental effects are consequential, but Flow Control can help with the power deficit.
  2. Beam Lasers: The beam lasers are helpful against skimmers or SRVs but little else. Grade 1 Long Range is all that is required to keep you out of range, but Efficient is also an option. No experimental effects are consequential, but Flow Control can help with the power deficit.

Utility:

  1. Double SRV bay: This can transport both a Scarab and a Scorpion or two of your favourite kind of SRV. Dropping down to a 2G does not give any significant advantage.
  2. Advanced Docking Computer: Odyssey added the ability to auto-land on planet surfaces. This module allows easy landing when distracted or on uneven terrain near surface points of interest.

Variants

  1. Attainability: This build is cheap at only around 12 million credits before any discount. Substituting a regular Shield Generator for the Prismatic Shield Generator and removing the Guardian Shield Reinforcement Package creates a build most commanders can attain.
  2. Collection missions: Swap one or both of the 2D Guardian Shield Reinforcement Packages for 2E Cargo Bays. While this build will never be an efficient cargo runner, you could use it for surface collection missions.
  3. Mines: Swap the 1E Beam Lasers for 1I Mine Launchers. These can rain mine “bombs” on surface targets. They are not as effective as missiles, but they can be fun.

Solo Tactics

  1. Flee: This build runs, not fights. Its prismatic shields protect it long enough for it to escape and, at 600+ m/s boost speed, this build will outrun almost everything. Most enemies will mass lock this build, so the high speed is welcome.
  2. Power (pip) management: Place four pips in systems and two in engines when landing to maximize shield protection. Otherwise, do the reverse to maximize boost frequency, speed and agility.

Wing or Team Tactics 

  1. Pairing: This build can transport two commanders to and from an on-foot mission location, providing each with an SRV.
  2. Rescue: This build can rescue an on-foot commander who has lost their ship or would otherwise wait for an Apex. Use missiles to kill any ground targets, land to pick the commander up, then boost to supercruise before enemy ships take down the shields.

Krait Mk II PvE Healing Build

An Elite Dangerous ship build.

Goals

Create a ship to:

  1. Support other ships by healing shields and hulls. Elite is a game with few niches, but engineering opens a few more.
  2. Heal teammates in Thargoid interceptor fights.
  3. Be a viable PvE combat ship when not healing.
  4. Require no unlockable modules, reputation or rank. 

Build

Krait Mk II blueprint by Martind Forlon (https://swat-portal.com/forum/gallery/image/9624-krait-mk-ii/)

Links: Coriolis or EDSY (have your preferred one open as you read the guide for easy reference)

While it sits beneath the firepower and shields of the Fer-de-Lance or Mamba, the Krait Mk II’s huge class 7 Power Distributor and copious optional internal module space make it ideal for less combat-specific roles like healing. It is faster and more manoeuvrable than the Python, and the Python’s extra class six slot matters little for this use.

To heal:

  1. Power Distributor: The Power Distributor is probably the most critical module for healing ships. It is essentially three large capacitors, one for systems (including shields), engines and weapons. The larger the weapon capacitor, the longer weapons can fire. Hence this build uses Weapon Focused (blueprint) with Super Capacitors (an experimental effect that increases the recharge rate).
  2. Regenerative Sequence on Large Lasers: This build has beam lasers, all with Regenerative Sequence. Instead of damaging teammates’ shields, this experimental effect heals them by the weapon’s damage output. It damages hulls and other targets’ shields. 
  3. Efficient Large Lasers: This build uses the Efficient blueprint. This blueprint significantly reduces their power requirements and heat production while giving a slight damage increase.
  4. Healing: The power distributor and beam weapon engineering create a ship that can fire all five lasers at a target for 24 seconds, assuming four pips to weapons and a full capacitor. At 800 m or less range, this heals or does almost 100 damage per second. 
  5. Repair limpet controller: Limpets launched by a Repair Limpet Controller heal hull damage. The limpets are slow, flying around 250 m/s, so the teammate may have to slow or stop for the limpet to catch up. Between fights is the best time to use them. Unfortunately, they cannot repair module damage or canopies. Teammates will have to use AMFUs for that. Do not forget your limpets!

Defensively, this build is pretty standard:

  1. Lo-Draw Shield: The shield has Lo-Draw rather than Fast Charge. Fast Charge draws too much power, resulting in a slower shield recharge than Lo-Draw.

Variants

The same variations with the Mamba apply here, such as replacing Module Reinforcement Packages with the guardian versions, Prismatic Shields and cost reduction. 

  1. Alternative laser experimental effect: Another option is Concordant Sequence, which increases shield regeneration to ten times its usual value for ten seconds. However, this is less effective on ships with Prismatic Shields due to Prismatic Shields’ low regeneration rate. If you regularly wing with ships that do not use Prismatic Shields, replace the experimental effect on one of the Medium Lasers with Concordant Sequence. The Concordant Sequence buff is unrelated to the weapon’s damage and does not stack, so use the smallest weapon possible.
  2. Alternative laser blueprint: Long Range instead of Efficient will allow healing over long distances. It can help a spread-out team. However, the increased distributor draw and heat generation mean you cannot fire for nearly as long.
  3. Anti-xeno healing: Replace the Repair Limpet Controller or 5D Hull Reinforcement with a Decontamination Controller. Replace the 4E Cargo Rack with a 4E Corrosion Resistant Cargo Rack if you want to pick up Thargoid hearts. If healing larger ships like Federal Corvettes and Imperial Cutters, swap the gimballed lasers for fixed for higher heal or damage rates.
  4. Fighter: Equip a fighter hanger for more firepower, particularly one with plasma weapons for better hull damage. A fighter also provides an alternate target when engaging wings of smaller ships. It may cause lag or “rubber-banding” when in a team but is useful when soloing.

Solo Tactics

  1. Close combat: As the damage fall-off of a large laser is only 800m, you need to get close to get the full damage. Throttle up if the target is over 1.5 km away to get close, then throttle back into the blue when they do so you can turn faster to maximise time on target. Use pre-turning or “landing gear turns” if needed.
  2. Favour smaller ships: Your beam lasers, being purely thermal damage and having moderate Armour Piercing values, will be most effective against medium and smaller ships. Vaporing small ships and fighters with this build is fun. If you must fight larger ships, target sensitive modules like Power Plants to avoid drawn-out fights.
  3. Longevity: Without ammunition, the limiting factor to combat with this build is hull damage. Engaging medium or light targets means you can fight indefinitely.
  4. Power (Pip) management: Put two pips in systems and four pips on weapons to maximise the laser firing duration. You will need three or four pips in shields to avoid draining the system capacitor after they drop.

Team or Wing Tactics

  1. Healing: Keep an eye on your teammates’ shields and top them up when needed. Unengineered or lighter ships will require more attention. Use a hotkey to select the teammate, get their location from your radar, put pips to engines, turn toward them and throttle up. Do not fly directly at them because you may run into them. Put pips into weapons to heal for longer. 
  2. Anti-Thargoid interceptor healing: Ensure you are in a team with the tanks or those you want to heal. Keep the weapon distributor topped up and ready to heal a teammate through a lightning attack. Four pips are required when healing against a thargoid interceptor’s lightning attack. Outrun caustic missiles or use a decontamination limpet on yourself when needed. If you get attacked by a thargoid interceptor, fly to the nearest tank and hide behind them while the tank regains the interceptor’s attention.
  3. Anti-shield: As mentioned above, five beam lasers are an unbalanced weapon loadout. Having to get close to targets also risks drawing attention. Therefore, focus on shielded targets, particularly those using Shield Cell Banks, then fire sparingly on hulls. Focusing keeps your weapon capacitor charged for healing or the next shielded target.

Mamba PvE Combat Build

A departure from my normal reviews, this post and the next few will focus on interesting Elite Dangerous ship builds, as requested by my squadron mates. Please indulge me.

Goals

Build a ship with the following aims:

  1. General-purpose, engineered PvE combat ship.
  2. Require no unlockable modules, reputation or rank. 
  3. Effective against all targets, from small, nimble fighters to lumbering Anacondas. 
  4. Effective in any non-Thargoid combat, from a Navigation Beacon to a Pirate Attack.
  5. A fuel scoop to access remote combat community goals or engineers.

Build

Elite Dangerous Mamba ship blueprint
Elite Dangerous Mamba ship blueprint by Martind Forlon (https://swat-portal.com/forum/gallery/image/9816-mamba/)

Links: Coriolis and EDSY (have your preferred one open as you read the guide for easy reference)

The Mamba combines the firepower of a Fer-de-Lance, the modest manoeuvrability of a Krait Mk II and an Eagle’s speed on arguably Elite’s best-looking ship. It requires no reputation or rank unlock. I also have a soft spot for playing less popular ships.

Offensively, this build relies on the tried-and-true lasers and multicannons formula:

  1. Gimballed weapons: Perhaps obvious but gimballed weapons are the ideal trade-off between damage and accuracy. It makes it easier to hit small or fast-moving targets, frees you up to manoeuvre more freely and makes hitting modules on larger ships easier.
  2. Huge hardpoint: This build’s Huge Multicannon has Overcharged (blueprint) with Oversized (experimental effect), giving a 70% damage increase. Simple but effective.
  3. Large hardpoints: The large beam lasers have Long Range with Thermal Vent. Long Range means the beam lasers can hit targets up to 3.6 km away with no damage loss. Otherwise, lasers’ damage starts to drop at 800m. The Thermal Vent experimental effect decreases instead of increasing heat on a hit, eliminating heat issues. 
  4. Avoid over-engineering: The large beam lasers only have grade 1 Long Range. Higher grades have diminishing returns due to gimballed weapons’ increasing inaccuracy at range. Engineering everything to grade 5 is not always the best solution.
  5. Small hardpoints: Compared to the other hardpoints on a Mamba, the small hardpoints are there to apply experimental effects instead of doing damage. This build uses Emissive and Corrosive. Neither effect stacks. Both are available on Small Multicannons. This build uses the High Capacity blueprint to double their ammunition capacity, almost matching the firing time of the Huge Multicannon. Unfortunately, Small Multicannons churn through ammunition quickly. Corrosive also decreases the ammunition capacity by twenty percent.
  6. Emissive experimental effect: Emissive increases gimballed weapons’ accuracy against that target for a few seconds. This accuracy increase is most evident when the target’s heat drops, like when using a heat sink.
  7. Amour piercing and hardness: When a weapon hits a ship, the weapon’s “Armour Piercing” is compared to the ship’s “Armour Hardness”. When the Armour Piercing is lower than Armour Hardness, some of the damage is diverted to the ship’s “Armour” value until “Armour” ablates to zero. Larger ships generally have higher Armour Hardness and Armor values. Larger weapons also tend to have higher Armour Piercing values. That is why large ships are harder to damage with small weapons. That is also why most builds put high Armour Piercing weapons in the largest hardpoint slots, like the Huge Multicannon in this build.
  8. Corrosive experimental effect: Corrosive reduces a ship’s Armour Hardness value for a few seconds. This allows this build’s weapons to do more damage to heavier ships’ hulls. Even the Huge Multicannon benefits against ships with the hardest armour (Fer-de-Lance, Mamba, Imperial Cutter, Federal Corvette and Type-10 Defender).
  9. Sensors: The 4A Sensors with Long Range are essential. The best weapons are only effective if you can find suitable targets in large Conflict Zones, Resource Extraction Sites or Navigation Beacons.

Defensively and ignoring speed, this build relies on Bi-weave shields and strong armour:

  1. Bi-weave shields: Bi-weave shields sacrifice raw strength for a fast rebuild (recharge from nothing to 50%) and regenerate (50% to 100%). This build emphasizes the recharge speed using Reinforced (increase strength) and Fast Charge (increase regeneration rate). You can engage weak to moderate targets without pause. 
  2. Shield boosters: The shield boosters use two Heavy Duty (increase strength), two Thermal Resistance (counter shield’s innate weakness against thermal weapons like lasers) and one Resistance Augmented blueprint. This build is resistance-heavy, further emphasizing the recharge rate without losing too much to resistance’s diminishing returns. 
  3. Armour: This build uses Reactive Surface Composite with Heavy Duty and Deep Plating, both increasing strength. Reactive Surface Composite inverts the usual strengths and weaknesses of armour, resisting explosive (missiles) and kinetic (multicannons) damage but weakening against thermal damage (lasers).
  4. Hull and module reinforcement: This weakness against thermal damage is corrected with Thermal Resistant engineering on the 4D Hull Reinforcement Package. The 2D Module Reinforcement Package protects against module damage when weapons breach the hull and potentially damage the core internal modules.
  5. Power priorities: Power priorities are not required for this build but keep core internals and Shields operating if the Power Plant is ever significantly damaged.

Variations

  1. Guardian modules: Replace the Module Reinforcement Package with a Guardian Module Reinforcement Package if you have access to that module. It has slightly better module protection.
  2. Cost: If cost or rebuy is a factor, replace the Reactive Surface Composite with Military Grade Composite. Adjust the engineering on Hull Reinforcement Packages accordingly. A Mamba’s Reactive Surface Composite costs around 120 million credits before any discount, over half the initial purchase cost. This ratio is the same for most ships, so this advice is helpful for any build.
  3. Prismatic Shields: If you prefer Prismatic Shields, replace the 5C Bi-Weave Shield Generator with a 5A Prismatic Shield Generator with Reinforced and Hi-Cap. You will need to replace the engineering on the Power Plant with Overcharged grade 2 or higher to ensure sufficient power.

Solo Tactics

This build works fine for simple “point and shoot” but you can do a lot more with it:

  1. “Circle Strafe” tactic: The ideal tactic is circle-strafing the target, keeping a 1 to 1.5 km distance. Fly toward the target at 50% throttle, thrust down while gently turning the nose up. It can be difficult initially, but practice helps. Dodge slow, unguided munitions like plasma accelerator shots and non-seeker missiles using lateral or vertical thrusters.
  2. “Reverski” tactic: Fly to long range, match the speed of an enemy, toggle flight assist off, turn toward the target, and then blast away with impunity. This tactic is cheesy but effective against slow targets. Unless the target has long range weapons, you will do more damage than they will.
  3. Pursuit and fleeing: If you need to chase down a fleeing enemy or disengage, put four pips in engines and two in shields, then boost. While faster ships are possible, such as some Imperial Clipper or small ship builds, none will match this build’s shields or firepower. 
  4. Weapon use: Use lasers on shields or chaffing targets, then everything against ships’ hulls. Avoiding multicannons on shields conserves ammunition. Corrosive only works when hitting a ship’s hull.
  5. Power (Pip) management: Put two pips in systems and four pips on weapons to permanently keep at least one Large Laser firing. A Mamba is fast and manoeuvrable enough to generally not need pips in engines when engaged. Boosting tends to overshoot the target. Just keep the SYS capacitor topped up and the throttle in the blue. 
  6. Large target tactics: Get closer to large, lumbering targets. You can circle strafe faster than they can turn when close, staying out of their firing arcs. Target sensitive modules like Power Plants.
  7. Small target tactics: Combat with smaller, faster ships will often revert to jousting. Use your Long Range weapons to damage them for most of the attack run, then pre-turn or “landing gear turn” to maximize time on target as they fly past.
  8. Chaff sparingly: Chaff when facing an enemy wing because sufficient fire will exceed the Bi-Weave Shield Generator’s regeneration rate. While this build has strong armour, sustained explosive damage on the hull will start to render hardpoints inoperable (when their integrity drops below 80%).
  9. Hardpoint placement: All of a Mamba’s weapons are on top of the ship. Pitch the nose down slightly when engaging a target. This preempts a ship diving underneath the Mamba. It also keeps the target visible through the Mamba’s copious canopy.

Wing or Team Tactics

  1. “Pulling” role: Use the Long Range, A-rated sensors to find suitable targets, boost to them, “tag” targets with the Large Lasers, and then flee back to the wing. The enemies will follow, allowing better-shielded ships to engage and draw enemy attention. Time the pull to keep a constant stream of enemies engaged.
  2. “Tanking” role: Even without heavier ships in the wing, the Mamba is still in the top tier of combat ships and more than capable of tanking (getting enemy attention and taking the damage).
  3. “Rescue” role: Put pips into engines, then boost to a wingmate in trouble. Draw the attention of enemy ships by doing lots of damage when closest to the target.
  4. Experimental effects: After everyone engages, the Corrosive and Emissive experimental effects on the small multicannons buff everyone’s damage output, not just this ship. However, they do not stack, so consider other experimental effects if you frequently wing with others that use them.