Laser Mining Imperial Cutter Build

An Elite Dangerous ship build for end-game laser mining.

Goals

Create a ship to:

  1. Laser mine Platinum, Painite and bulk community goal minerals in planetary rings for long periods.
  2. Be fast and agile enough to escape pirates or manoeuvre around asteroids easily. Surviving in Low- or Medium-Intensity Resource Extraction sites is a bonus.
  3. Operate close to a fleet carrier or friendly station, and so does not require a fuel scoop.

Build
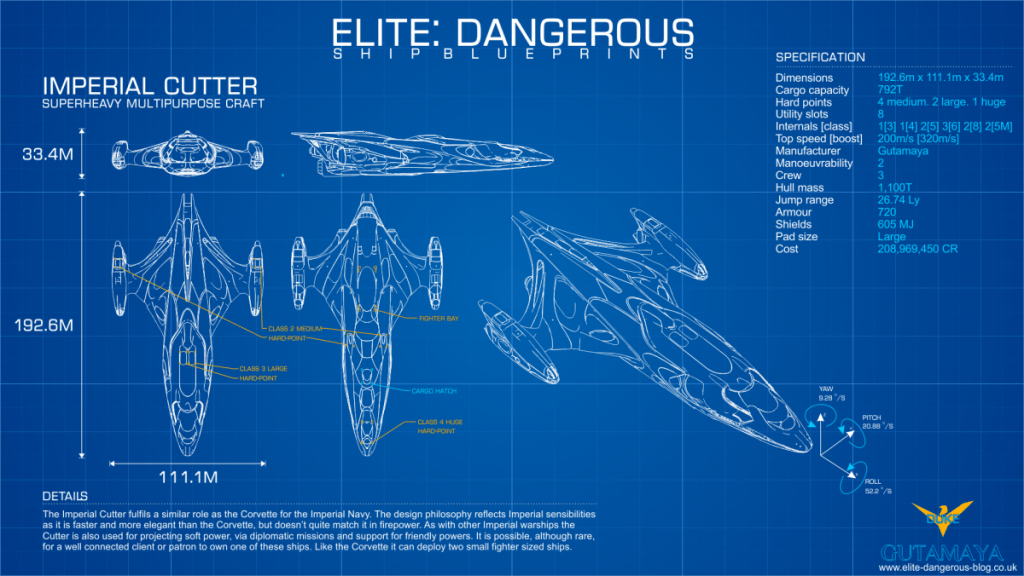
Imperial Cutter Blueprint by CMDR-Arithon (https://swat-portal.com/forum/gallery/image/9463-imperial-cutter/)

Links: EDSY and Coriolis (have your preferred one open as you read the guide for easy reference)

While a Type-9 Heavy is a cheap and effective bulk laser miner, the Imperial Cutter is faster, more agile, has a better Power Distributor and is in a different class regarding weapons, shields and armour. Unfortunately, the Imperial Cutter requires a mountainous rank unlock and comes with an eye-watering price tag.

Other contenders include the Federal Corvette, which has a better Power Distributor and better manoeuvrability but lacks the Imperial Cutter’s cargo space. The Anaconda is similarly light on cargo space.

The laser mining aspects of this build are similar to the Python Mining Build I described previously.

Laser Mining:

  1. Mining Lasers and Power Distributor: This build has four 2D Mining Lasers and uses a Weapon Focused blueprint on the Power Distributor. This means it can comfortably deplete an asteroid without exhausting its weapon capacitor. Equip the mining lasers in the top and bottom hardpoints and not the nacelle hardpoints to make mining smaller asteroids easier.
  2. Collector Limpet Controllers: Three collector limpets per 2D mining laser is a good guide for efficient fragment collection. A-rated Collector Limpet Controllers have a longer lifetime while B-rated have a longer range. A longer lifetime means fewer limpets are required. Most laser mining occurs at close range, so A-rated Collector Limpet Controllers are preferred. Use the Lightweight blueprint for a small boost to speed and agility.
  3. Prospector Limpet Controller: These tell you an asteroid’s composition and increase the number of fragments mining lasers can burn off. A-rated Prospector Limpet controllers provide more fragments than B-rated, B-rated more than C-rated and so on. Once again, use the Lightweight blueprint for a small boost to speed and agility.
  4. Avoid Mining Multi-Limpet Controllers: Multi-limpet controllers are great for multi-purpose builds or ships with constrained slots. However, dedicated limpet controllers are less effective for mining. Their lower rating means prospector limpets produce fewer fragments and their collector limpets have shorter lifetimes.
  5. Cargo space: Use the larger slots for Cargo Racks and the smaller slots for limpet controllers and a refinery. The 512 T cargo space should be ample. Fill it with between 25% to 75% capacity with limpets before heading out, with lower values if you are using a mining map or are otherwise familiar with the area.
  6. Refinery: A 4A Refinery is more than large enough for most mining tasks, particularly if you have to wait for the occasional “Refinery Full” bug to clear.
  7. Detailed Surface Scanner: A Detailed Surface Scanner probes rings for hotspots or to see hotspots revealed previously.

Defence:

  1. Shields and armour to taste: Mining does not require particularly strong shields. The eight utility slots coupled with a size six shield generator, the smallest an Imperial Cutter can practically fit, are overkill for mining. Impact or “physics” damage is absolute so resistances are not important. This build uses Bi-Weaves due to the lower power requirements and faster regeneration speeds when fighting in lower-intensity resource extraction zones.
  2. Military slots: Use Guardian Shield Reinforcement Packages to bolster shields. Hull and Module reinforcements are good substitutes if you have not unlocked those modules. The two military slots can be left empty if cost or mass are tight.
  3. Point Defence: Equip a Point Defence on the lower hull near the cargo hatch to protect against hatch breaker limpets. However, deactivate it if mining in a wing or with friends. Otherwise, it may target others’ collector and prospector limpets.
  4. Weapons to taste: The three remaining hardpoints can be left empty or filled with your preferred weapons. Medium Lasers and a Huge Multicannon are an effective pairing.

Variations

  1. Resource Extraction Site Mining: This build can handle itself against most pirates and in Low- and Medium-Intensity Resource Extraction zones. To improve the build’s effectiveness, consider replacing one of the 5A Collector Limpet Controllers with a fighter bay. Swap the sensors to Long Range A-rated Sensors to see what is coming. Wingmates are ideal. Flee if your shields drop.
  2. Fuel Scoop: If you want to operate without a carrier or in remote locations, swap one of the 5A Collector Limpet Controllers for a 5A Fuel Scoop.

Tactics

  1. Fire groups: Have one fire group for laser mining. Put the Prospector Limpet Controller on one button and both the Collector Limpet Controller and Mining Lasers on the other. Putting both collector limpets and mining lasers together means collector limpets are released when you fire the mining lasers.
  2. Laser Mining: Laser mining is covered by guides from elsewhere. To summarize, fly close to an asteroid then fire a prospector limpet at it. When it hits the asteroid, select the prospector limpet to see the asteroid’s composition in the info panel. If it contains sufficient minerals, move close to the asteroid near the pole of its rotation Fire mining lasers at it to melt off fragments, which the collector limpets will pick up. Open your cargo hatch for the limpets to drop the fragments into your refinery. When the asteroid is depleted, move to another asteroid and repeat. Ignore minerals you are not interested in. Abandon limpets in groups of 10 to 20 if your cargo racks are full.
  3. Pip management: Mining is best with four pips to weapons and two in engines. Unless you want to lazily boost into each asteroid instead of breaking, shields should only be needed for accidental bumps or pirates. Avoid boosting unless you are running from pirates or jumping out because an Imperial Cutter requires kilometers to slow down.
  4. Pirates: Waiting for the initial pirate to spawn, scan you and move on is the easiest plan. It may spawn outside sensor range so be patient. However, This build’s copious shields and huge hardpoint give the option of defeating most pirates if you are impatient.
  5. Resource Extraction Zones: Choose a resource extraction site within a hotspot if you want to mine a particular mineral. Start about 20 km away from the centre of the zone to avoid most of the traffic. Have the fighter deployed and set to “Defensive”.

Elite Dangerous Racing Builds: Eagles, Vipers, Couriers and More

This post outlines various Elite Dangerous ship builds for racing. Racing is an emergent gameplay loop in Elite Dangerous – there are no missions or similar activities requiring such a ship. However, many players create their own courses around settlements or canyons. The rules and location determine exactly what build you need so this post focuses on the fundamentals and design decisions.

Goals

The goals are:

  1. Build a ship for racing. This requires maximizing thruster speed and manoeuvrability. Like an exploration ship, this requires minimizing everything else down to the thruster’s minimum mass.
  2. Handle a few bumps. Racing along a course will often involve bumping into the sides or obstacles along the way. Strong shields or armour help survive a few of these.
  3. Assume that the ship can travel to the racing system via a fleet carrier or a shipyard on in-system station. Once the ship is outfitted and engineered, there is no need for a long jump range.

Build

Imperial Courier Blueprint by CMDR-Arithon (from https://swat-portal.com/forum/gallery/image/9483-imperial-courier/)

The table below lists racing builds for different ships, each designed to maximize their speed and agility:

NameSizeLinksMax Speed AT 2 pips/Boost
(m/s)
Boost Frequency (seconds)Pitch/Roll/Yaw
(degrees per second)
Comments
SidewinderSmallCoriolis EDSY373/7457.772/208/30Small core internals leaves lots of mass. A racing sidewinder needs to sacrifice little.
EagleSmalCoriolis EDSY489/8158.885/227/34The most manoeuvrable ship in Elite Dangerous.
Viper Mk IIISmallCoriolis EDSY606/9321162/170/28The fastest ship in Elite Dangerous.
Imperial EagleSmallCoriolis EDSY594/9321166/189/28Similar to the Viper Mk III in speed with slightly better manoeuvrability.
Imperial CourierSmallCoriolis EDSY582/8855.166/170/30A good compromise between speed and agility with frequent boosting, strong shields and strong armour.
Alliance ChieftainMediumCoriolis
EDSY
321/5575 (capped)59/152/27The most agile medium-sized ship, just pipping the Fer-de-Lance.
Fer-de-LanceMediumCoriolis
EDSY
405/5915 (capped)57/152/20A good compromise between speed and agility.
MambaMediumCoriolis EDSY524/6425 (capped)48/127/17The fastest medium-sized ship but has low manoeuvrability.
Imperial ClipperLargeCoriolis EDSY405/6425 (capped)59/135/30Very manoeuvrable for a large ship. Size 6 thrusters give a high minimum weight.
OrcaLargeCoriolis
EDSY
422/6425 (capped)38/92/30The fastest large-sized ship. However, its poor agility makes it unsuited for racing.
Imperial CutterLargeCoriolis
EDSY
304/5405 (capped)27/76/14Possibly good for a demolition derby but not much else.
Speed and Agility Comparison of Speed-Focused Builds

The Viper MK III is the fastest ship in the game at a maximum possible boost of 932 m/s. The Eagle is the most agile. They are bolded in the table above and, deservedly, get a lot of attention. The Imperial Eagle matches the Eagle’s boost speed but not the unboosted speed.

However, these Viper Mk III, Eagle and Imperial Eagle builds sacrifice just about everything else to attain those speeds. They have a minute jump range, heat problems, can boost infrequently and a modest bump will destroy them.

Getting these ships to engineers is also challenging. Using a fleet carrier to jump the ship to each engineer will be easier for those with patience. Otherwise, fitting a temporary Frame Shift Drive to jump to engineers is a good idea.

Heat is also a challenge. Grade 5 Overcharged on the Power Plant means the ship will often overheat when jumping, fuel scooping or boosting frequently. Use the lowest grade Overcharged on the Power Plant that you can get away with. Temporarily equipping more fuel tanks reduces the need to fuel scoop, too.

Instead, the Imperial Courier is a good compromise between speed and agility while sacrificing little. You can adjust the components to taste, like having a larger frame shift drive to get to engineers or racing tracks unaided or stronger shields. Heat management is also much better.

Outfitting and Engineering for Racing

  1. Thrusters and minimum mass: Thrusters in Elite Dangerous roughly follow a real-world physics model. They provide a certain amount of thrust that is divided by the ship’s mass to determine speed and agility. However, unlike frame shift drives, thrusters have a minimum mass, meaning reducing the ship’s mass below that value provides no benefit. Therefore, the design goal with a racing ship is to equip and engineer the best thrusters possible, reduce the mass as much as possible then add necessities and “nice to haves” until just below the minimum mass.
  2. Enhanced Performance Thrusters: Only available from engineers that provide thruster blueprints and only available in sizes 1 to 3, these thrusters provide the most thrust but have low minimum, optimal and maximum mass values.
  3. Lightest core internals: Fill every other core internal slot with the lightest component possible, usually the D-rated version of the lowest equipable class. Engineer Sensors and Life Support with Lightweight and everything else with the blueprints that do not increase mass and Stripped Down experimental effect. This means using Overcharged blueprint on the Power Plant and the Fast Boot blueprint on the Frameshift Drive. Lower engineering grades than 5 are viable for this build if materials are scarce or overheating is a problem with the Overcharged Power Plant.
  4. Power Distributor: The Power Distributor is the exception to minimizing core internals.. Using a larger Power Distributor reduces the time between boosts by a few seconds. Engine Focused or Charge Enhanced are both viable blueprints, although Charge Enhanced provides slightly faster recharge, meaning you can boost a tad more often. Charge Enhanced also helps with shield regeneration. Use the Super Conduits experimental effect instead of Stripped Down if you have the mass available.
  5. Fuel tank: If the mass is still too high, reduce the fuel tank size. While you do not have to completely fill your fuel tank, there is no easy way to vent fuel. Therefore, a smaller fuel talk is the easiest way to minimize fuel mass. This is normally a dangerous trade-off but acceptable for this build.
  6. Bump protection: You can apply the Heavy Duty blueprint and Deep Plating experimental effect to Lightweight Alloy without worrying about the mass multiplier. Lightweight Alloy has zero mass. A D-rated Shield Generator with the Enhanced, Lower Power blueprint and Stripped Down experimental effect gives reasonable protection at a negligible mass and power cost.
  7. Optional internals are optional: As long as you have sufficient power and they do not add mass, you can add whatever you want. A Fuel Scoop can help keep the small fuel tank topped up. An Advanced Docking Computer and Supercruise Assist are nice to have.
  8. Empty hardpoints and utility mounts: As with optional internals, nothing is required here. This build runs from fights and is well equipped to do so.

Variations

  1. Lots of tweaking: Expect to experiment with and adjust these builds a lot to match your play style and different racing tracks and environments.
  2. Too fast or fragile: These builds may be too quick or too brittle when hitting obstacles. Add Hull Reinforcement Package(s) to solve both problems.
  3. Mines and chaff launchers: Depending on the rules of your races, limited weapons may be equipped for a “Mario Kart”-style race. Mines and Proximity Mines are hazardous for those following you. Chaff can disorient those nearby or celebrate a win. Seeker Missiles can take out those ahead of you, assuming you can get a lock
  4. Wake scanning: Outside of racing, fit a 0D Wake Scanner and better sensors to make a ship for scanning wakes for encoded materials.
  5. Hit and Run: Make this into a hit-and-run ship, e.g. with torpedo tubes, but you are unlikely to destroy anything other than the lightest ships.
  6. Mosquito: Fit an FSD Interdictor then interdict pirates then stay out of their firing arc or boost away for a fun challenge.

Tactics

  1. Racing: Shift pips between engines and shields to control velocity and minimize the damage from hitting obstacles. Deploy the cargo scoop or landing gear temporarily for easier turns. Boost laterally to avoid or mitigate an impending collision or get around that tight corner.
  2. Practice: Racing is a skill. Without a course, the training simulations available under “Training” on the main menu can help.
  3. The thrill of speed: Casually boosting to 800+ m/s low over a planet’s surface or around a settlement is fun. This ship may also be effective a Buckyball racing (flying over a planet with flight assist off to find the fastest possible speed).
  4. Combat: If you are attacked, clearly racing ships are well equipped to escape.

Beginner Diamondback Explorer (DBX) Exploration Build

An Elite Dangerous ship build for beginner players.

Goals

The goals are:

  1. Build a ship for exploring. Exploration requires a long jump range to reach distant star systems, a Fuel Scoop for refuelling, a Detailed Surface Scanner (DSS) to map planets and a Planetary Vehicle Hangar to house a Surface Reconnaissance Vehicle (SRV).
  2. The build must be accessible to early-game commanders. It should be cheap and require no engineering, rank, reputation or unlockable ships or modules.

Exploring can easily and quickly earn millions of credits, a huge boost early in the game. While not action-oriented like combat or as lucrative as trade, exploration has the lowest barrier of entry of all the main game loops. It appeals to those looking for a relaxed, self-paced playstyle motivated by seeing and discovering new things. It also gets the player out of their comfort zone by travelling long distances.

Build

Diamondback Explorer Blueprint by CMDR-Arithon (https://swat-portal.com/forum/gallery/image/9458-diamondback-explorer/)

Links: EDSY and Coriolis (have your preferred one open as you read the guide for easy reference)

The Diamondback Explorer is the cheapest of the four best exploration ships, the others being the Anaconda, Krait Phantom and Asp Explorer. 

This build can jump around 37 LY. While jump range is not the only indicator of a good exploration build, it helps. Unlike similar games, exploring in Elite Dangerous requires travelling long distances. Fewer jumps mean reaching the destination sooner.

If the just over 10 million credit cost is too high, B-rate the Frame Shift Drive and Fuel Scoop. This change halves the cost but significantly reduces the jump range. Upgrade as soon as you can afford to do so.

Finding a station that sells everything can be a challenge. Early- to mid-game players will not have access to Jameson Memorial station in Shinrarta Dezhra. Thankfully, both EDSY and Coriolis link to EDDB, locating nearby stations selling this build’s ship and modules. 

Exploration:

  1. Frame Shift Drive: The 5A Frame Shift Drive grants the longest jump range possible. Once you can, add the Increased Range blueprint and Mass Manager experimental effect. Even a grade one will have a marked improvement. The double engineered version from a human technology broker is even better but requires harder to find materials. The Fuel Scoop means you can keep jumping as long as scoopable stars are within range.
  2. Lightest core internals: The rest of the core internals are as light as possible (D-rated) or even lower classes. This decision has little noticeable effect except for only boosting every 28 seconds.
  3. Exploration essentials: A Detailed Surface Scanner (DSS) maps planets for credits, identifies points of interest and creates the geological/biological heatmap. A Planetary Vehicle Hanger facilitates surface activities like material gathering.
  4. Empty optional internals: This build intentionally leaves several optional slots empty. They are not needed and can add weight. 
  5. Empty hardpoints and utility mounts: As with optional internals, this build runs from fights.
  6. Artemis suit for exobiology: Not technically part of the build, but grab an Artemis suit before setting out. Exobiology is a great excuse to get out of your ship, earn a few extra credits and watch the sunrise on alien worlds. 

Variations

  1. Longer exploration trips: Add a Heat Sink Launcher to minimize heat damage when caught in a star’s exclusion zone. Advanced Field Maintenance Units (AFMU) can repair module damage caused by heat or Frame Shift Drive damage caused by fuel scooping neutron stars or white dwarfs. Two AFMUs mean they can fix each other if needed.
  2. Rare commodity hauler: Fill the empty slots with cargo racks. This change turns this build into a passable long-distance hauler, suitable for rare commodities. The selling price of rare commodities increases the further you sell them from their point of sale. It can also help with long-distance cargo hauling for community goals.
  3. Rescue ship: Add a Rescue Multi Limpet Controller and a Cargo Rack for limpets. This variant can refuel or repair other commanders.

Tactics

  1. Initial exploration: If the goal is to learn exploration mechanics or early cash, find high population systems in the bubble and map earthlike words and anything terraformable using the DSS. While many systems’ bodies are already in the navigation computer, no bodies are pre-mapped. You can earn over a million credits per mapped earthlike world.
  2. Seeing the sights: Elite Dangerous’s galaxy has many natural wonders. For example, visit a nearby black hole, like at Maia. Travel to the nearest neutron star, Jackson’s Lighthouse, then neutron jump back. Visit the famed red giant Beetlegeuse and fuel scoop outside the orbit of the innermost planet. The codex has many suggestions.
  3. Find the lore: Elite Dangerous has lots of lore but finding it requires effort. Abandoned settlements, ghost megaships and tourist beacons are plentiful. EDDB (https://eddb.io/attraction) has an easily searchable list.
  4. Exploration rank and credits: Following lists of high-value star systems can quickly earn exploration rank and credits. These include the Alpha Orbital “Road to Riches” (https://www.alpha-orbital.com/pathfinder) and Spansh (https://spansh.co.uk/riches).
  5. Engineer unlocks: Travelling long distances away from your starting location unlocks some engineers. Elvira Martuuk requires 300 LY and Professor Palin requires 5000 LY. An exploration build such as this is ideal for such long trips. 

Beginner PvE Combat Vulture Build

An Elite Dangerous ship build for beginner players. See PvE Combat Vulture Build for an end-game version.

Goals

The goals are:

  1. Create a build that excels at early PvE combat, such as Low- and Medium-Intensity Resource Extraction Sites and Low-Intensity Conflict Zones.
  2. The build must be accessible to early-game commanders. It should be cheap and require no engineering, rank, reputation or unlockable ships or modules.

Build

Vulture Blueprint by CMDR-Arithon (https://swat-portal.com/forum/gallery/image/9464-vulture/)

Links: EDSY and Coriolis (have your preferred one open as you read the guide for easy reference)

When only considering combat, the Vulture is a giant among small ships. An unengineered Vulture is faster, more agile, has better shields, harder and thicker armour and more firepower than any other similarly outfitted and unengineered small ship, including the Viper Mk III. 

Unfortunately, this build costs around 20 million credits. This cost might seem high for a beginner build. You can outfit a combat Viper Mk III for 2.5 million credits, a figure much easier to attain for an early-game player. This Vulture build’s rebuy is also high at about 1 million credits. 

However, you want the best odds when you are new to combat. A Viper Mk III will struggle against all but the weakest enemies. Its smaller hardpoints have lower Armour Piercing. It has fewer utility points, so you have to sacrifice shield boosters for chaff.

You also want to be established enough to afford rebuys. The Viper mentioned above is cheap but, at that stage, a new commander may not have the experience or ships to quickly earn it back. In this build, you can earn the Vulture’s rebuy cost in under an hour of fighting in a Low-Intensity Resource Extraction Zone.

If cost is a limiting factor, B-rating the Frame Shift Drive, Thrusters and Power Distributor saves 5 million credits. You can sell the B-rated modules with no loss and upgrade when you have the credits.

Finding a station that sells everything can be a challenge. Early- to mid-game players will not have access to Jameson Memorial station in Shinrarta Dezhra. Thankfully, both EDSY and Coriolis can locate nearby stations selling this build’s ship and modules in Inara. 

This build is far from original. Unengineered Vulture builds go as far back as 2015. However, the discussion below should help new pilots understand why this build works and useful variations.

Offence:

  1. Gimballed weapons: Gimballed weapons auto-aim, but chaff confuses them. They are a good compromise between the more difficult aiming with fixed weapons versus the lower damage output of turreted weapons.
  2. Burst Lasers: Burst Lasers compromise between the low power, damage and heat Pulse Lasers and the high power, damage and heat beam lasers. They do not require ammunition, so you can focus on flying and combat instead of watching ammunition counts. 
  3. Heat management: With four pips to weapons, these Burst Lasers can fire for 18 seconds. This time is usually more than long enough for the enemy to pass by. The weapons’ heat build-up is slow, making them quite forgiving. It is difficult to self-inflict heat damage with this build.
  4. FSD Interdictor: An FSD Interdictor is useful for interdicting assassination mission targets, wanted ships for bounty vouchers or even powerplay ships for merits.
  5. Kill Warrant Scanner: A Kill Warrant Scanner gives about 25% bonus credits for each kill. It generates additional, needed cash early on. Assign it to the same fire group as your Burst Lasers. The scan takes ten seconds, and the range of the 0E version is only 2000 m. However, this build fights best when up close, so that range is acceptable.

Defence:

  1. Power management: The biggest challenge with outfitting a Vulture is its small Power Plant. It is a class too low given the power demands of its other modules. Without the Overcharged engineering blueprint, you need to make tradeoffs with your outfitting. This build moves the Frame Shift Drive and Cargo Hatch to a low power priority. They are unpowered when deploying hardpoints, meaning you have to stow them before scooping engineering materials or jumping out. The Fast Boot engineering blueprint on the Frame Shift Drive would also help with fast get-a-ways.
  2. Shields: Bi-weave shields are generally weak when unengineered. However, they are sufficient given this build’s power constraints and the likely weak enemies. Two D-rated shield boosters give the best shield increase considering the remaining available power.
  3. Chaff: A Chaff Launcher is the best choice for the remaining utility slot. It requires minimal power and works against all gimballed weapons. 

Variations

  1. Laser and Multi-cannons: Burst Lasers are sufficient for weaker enemies. However, Expert and better NPC pilots have noticeably better armour. This build’s pure thermal damage from lasers is less effective against them. Replace one Burst Laser with a 3C Multi-Cannon to swap some thermal for kinetic damage. Keep everything on the same fire button for simplicity or use separate fire buttons to micromanage ammunition.
  2. Fixed weapons: If you back your flying skills, replace the gimballed weapons with fixed versions. It can be frustrating at first, particularly against smaller or agile craft, but you will improve with practice.
  3. More hull: Replace the FSD Interdictor with a 1D Hull Reinforcement Package if you do not plan to use it. However, it is worth experimenting on a few wanted targets at supercruise, if not just to familiarise yourself with how interdictors work.
  4. Fighting without life support: Equip a 3A Life Support, then give it a low power priority. Deploying hardpoints means fighting without oxygen. However, A-rated life support gives you 25 minutes of oxygen, which is more than long enough for an engagement. It means you have more power for better Shield Boosters or whatever you prefer. This change is an interesting take on power management, but I find no life support’s altered soundscape distracting.

Solo Tactics

  1. Finding targets: The short sensor range required more flying around to locate targets than builds with better sensors. Look for telltale distant laser fire or explosions or follow system authority ships. Scan potential targets first to ensure you only fire on wanted ships.
  2. Point and shoot: Flying this build is pretty basic. Speed up to get close to the target, throttle down to 50% when they get within one km, and then fire. Pulse lasers are most effective within 800 m. Turn as they fly past, then repeat the process. Experiment with thrusters and pre-turning to increase time on target.
  3. Power (pip) management: This build works fine with the default two pips in every category. However, it comes alive when you actively manage your pips, moving points into what you need at the time.
  4. Shield management: Start every fight with shields at 50% or better integrity. Put four pips in systems to maximize the shield protection and rebuild/regeneration rate between fights or when not firing. Putting pips in systems is faster than doing a reboot/repair when shields are down for this build.
  5. Chaffing: Chaff when shields get low, multiple targets engage you, or you need to escape. 
  6. Fun: Once I reset my expectations for an unengineered ship, I found flying this Vulture surprisingly fun. It can almost continually kill Novice-piloted or easier ships. The multi-cannon variant can take down wings of Expert- or Master-piloted NPC ships without too much hassle.
  7. Upgrade path: Consider the Alliance Chieftain or, reputation willing, the Federal Assault Ship or Imperial Clipper as the logical next step in combat ships. See PvE Combat Vulture Build for an end-game version of this build.

Team or Wing Tactics

  1. Unchanged: Fly in a wing or team as you would in solo. Whether you tank depends on your teammate’s ships and builds.

Beginner Passenger Mission Type-6 Transporter Build

An Elite Dangerous ship build aimed at beginner players.

Goals

The goals are:

  1. Create a ship specialized for evacuating survivors from burning stations. The game loop is described below. These missions efficiently increase reputation with the Federation or Empire, useful for unlocking ships or system permits. Evacuation missions are usually offered the first week after stations are attacked.
  2. The build should be accessible by an early-game player. This means a cheap ship with no engineering, unlockable ships or modules.

The high-level game loop for burning station passenger missions is:

  1. Dock at the burning station. Manoeuvring can be tricky. You cannot use a docking computer and the station’s interior is dimly lit and full of debris. Heat increases quickly inside the station, so use heat sinks to prevent heat damage.
  2. Accept passenger missions. This is pretty standard if not for the atmospheric flakey holographic display and the station interior’s fiery glow.
  3. Undock and leave the station. The same challenges with docking apply to undocking.
  4. Supercruise to the nearby rescue ship, usually a few megameters away.
  5. Hand in the passenger missions, disembarking your passengers.
  6. Rearm heat sinks and repair any damage.
  7. Travel back to the burning station and repeat.

Build

Type-6 Transporter Blueprint by CMDR-Arithon (https://swat-portal.com/forum/gallery/image/9476-type6/)

Link: EDSY and Coriolis (have your preferred one open as you read the guide for easy reference)

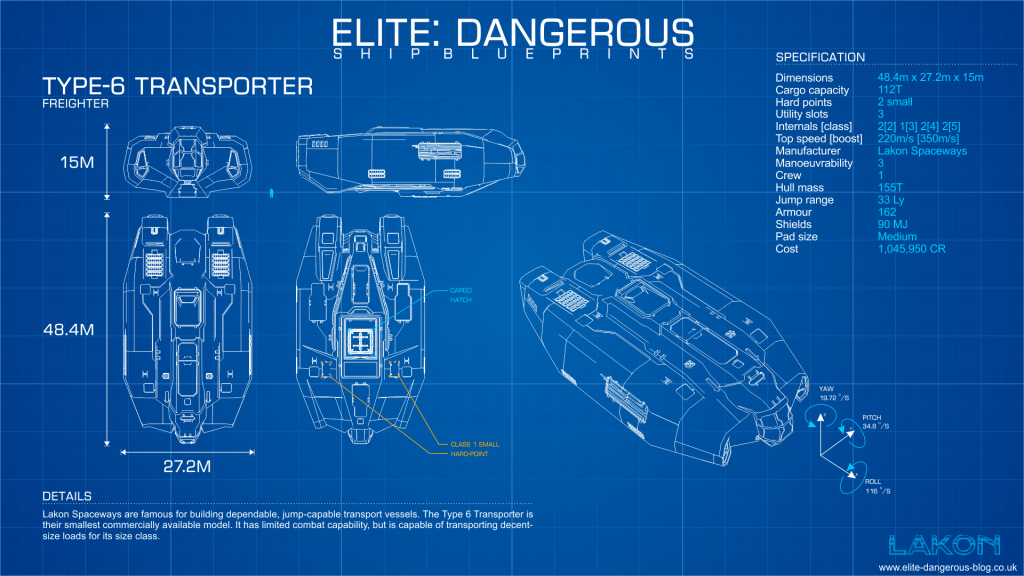
The Type-6 Transporter sits at an optimal price point, carrying 52 economy class passengers with a shield generator. The build linked above costs just over one million credits before discounts, including outfitting. See the table below for a comparison.

ShipCost (CR)Size 2 SlotsSize 3 SlotsSize 4 SlotsSize 5 SlotsSize 6+ SlotsSmallest Shield SizeTotal Economy Passengers
Cobra Mk III349,72030300326
Cobra Mk IV764,72022400340
Type-6 Transporter1,045,95021220352
Dolphin1,337,32031210338
Diamondback Explorer1,894,76022200324
Asp Explorer6,661,16022011356
Economy passenger capacity of selected beginner ships

The next highest economy passenger capacity ship is the Asp Explorer, carrying 56 passengers with a shield generator and costing over 6 million credits before outfitting. Some ships, like the Dolphin, carry fewer passengers but are more expensive.

Finding a station that sells everything for a build can be a challenge. Thankfully, both EDSY and Coriolis link to EDDB, locating nearby stations selling this build’s ship and modules.

Passengers:

  1. Economy class passenger cabins: The survivors from burning stations are not fussy about their accommodation. Pack as many economy class passenger cabins as possible.
  2. Smallest shields possible: Docking at a burning station is challenging. You cannot use a docking computer, the station’s inside is filled with debris, and the occasional dramatic explosion may slam your ship against a wall. Shields protect your ship.
  3. Heat sinks: As its name suggests, the inside of a burning station is hot and will quickly cause heat damage to your ship. Fire off heat sinks to minimize such damage.
  4. Docking computer: Passenger cabins do not come in a class one version. While not usable inside the burning station, a docking computer can help to dock with the rescue megaship.

Variations

  1. Better core internals: This build intentionally skimps on core internal modules to save credits. However, a better Frame Shift Drive means fewer jumps to the burning station. Better Thrusters make manoeuvring easier. Improving these is strongly recommended if you have the credits. That said, an E-rated Type-6 handles surprisingly well.
  2. Shieldless: Removing the Shield Generator squeezes in even more passengers at the risk of hull damage.
  3. Gather materials and cargo: Swap out two passenger cabins for one Collector Limpet Controller and a Cargo Rack. Grab a few limpets then, once you enter the station interior, use the limpets to gather engineering materials and cargo inside the station. Such cargo can also be handed in to complete missions from the rescue ship or sold for a small profit. Passengers are easier and more time-efficient for reputation but this can be a fun diversion.

Tactics

  1. Getting to the burning station: Burning stations are present in systems selected by Elite’s ongoing story. They have often been some distance from the bubble but always have a nearby rescue megaship. One way to get there is to take a ship with a longer jump range and then transfer this ship over. Another is temporarily equipping a fuel scoop, travelling there and then transferring over the replaced module. The rescue megaship sometimes has a shipyard, meaning you can transfer ships and modules to it. Otherwise, a nearby station may have a shipyard.
  2. Game mode: Play in a private group or solo to minimize interruptions. Gankers congregate where lots of players will be, like burning stations. It gives them more targets. The rescue megaship has limited landing pads and you may wait on other players offloading their passengers.
  3. Maximize reputation gain: Go for as many applicable missions as possible. Prioritize missions transporting the fewest passengers to maximize the number of missions accepted per round-trip. Prioritize missions from Federation- or Empire-aligned factions. Some minor factions may be independent. Select the highest reputation reward when completing the mission. The credit and other rewards are often small.

Shield-light PvE Combat Federal Assault Ship Build

Goals

Create a ship to:

  1. Use with Internal Impact pulse lasers. These shift the damage from 100% thermal to 50% thermal and kinetic. This shift equalizes the damage to shields and hull, meaning the ship can damage both with a single weapon. However, they have a 3% jitter, drastically reducing accuracy.
  2. See whether a shieldless build is viable. You can direct the unused power for systems towards weapons and engines.
  3. Try something a bit crazy. Suboptimal builds can be fun due to the increased challenge.

Build

Federal Assault Ship Blueprint by CMDR-Arithon (https://swat-portal.com/forum/gallery/image/9461-federal-assault-ship/)

Links: EDSY and Coriolis (have your preferred one open as you read the guide for easy reference)

Pilots love the Federal Assault Ship for two reasons. The first is its manoeuvrability which recaptures the joy of flight for many pilots used to flying larger, less agile ships. The second reason is ramming things. The Federal Assault Ship’s mass and manoeuvrability give it a lot of momentum. Both are useful here.

Another alternative for these goals is the Alliance Chieftain. It even has slightly higher Armour Hardness and is more agile. The Federal Assault Ship is marginally faster and has more Armour. More consequentially, the Alliance Chieftain substitutes one of the medium hardpoints for three smaller ones. Smaller weapons have lower Armour Piercing values, meaning lower overall damage to the intended targets. The Chieftain’s engines are also exposed, making them prone to damage-induced malfunction.

Offence:

  1. Sturdy Inertial Impact: At first glance, Short Range would be an ideal blueprint for the lasers. However, the hardpoints will be damaged quickly without shields. Instead, the Sturdy blueprint increases integrity. It also increases Armour Penetration, making this build more effective against its intended, highly armoured targets.
  2. Weapon Focused Power Distributor: This build requires firing at enemies for as long as possible. The Weapon Focused blueprint means you can keep firing for 26 seconds with four pips in weapons.
  3. Long Range Sensors: Using Long Range on A-rated sensors helps find ideal targets in expansive resource extraction sites, conflict zones and navigation beacons.

Defence:

  1. Shieldless is impractical: Despite my efforts, any build that lacked a shield was worse than a minimally shielded one. Even a thin shield significantly increased combat longevity. It also makes landing with low hull integrity less stressful.
  2. Shields: For this build’s frail shields, a Shield Generator’s regeneration (0% to 50%) time is more important than recharge (50% to 100%). Regular Shield Generators are ideal because bi-weaves’ faster recharge is not significant. Prismatic shields have a longer regeneration time. The Thermal Resistant blueprint also helps mitigate shields’ innate weakness to thermal weapons.
  3. Shielded blueprint: Given this build’s lack of power-guzzling shield boosters and most modules and hardpoints need additional integrity, this build uses the Shielded blueprint frequently.
  4. Strong armour and hull: Reactive Surface Composite bulkheads coupled with Hull Reinforcements, one with Thermal Resistant and the rest with Deep Plating, maximize integrity. The ratio of hull to module protection is a trade-off.
  5. Advanced Field Maintenance Unit (AFMU): The AFMU is engineered to grade four to not overload the Power Plant.

Variations

  1. Shieldless: Replace the 5A Shield Generator with another 5D Hull Reinforcement Package. The combat longevity shortens without a shield. However, you can place more pips in engines and weapons.
  2. ECM: Swap two of the Chaff Launchers for ECMs for missile protection. ECMs require effort to time but can be effective. Remember, ECMs affect all nearby missiles and limpets, including your teammates’ ones. Change the blueprint on the Power Distributor from Weapon Focused to Charge Enhanced to help power the ECMs.

Solo Tactics

  1. Point blank range: The Inertial Impact Pulse Laser’s massive jitter makes firing at anything over 500 m less effective. This build’s effectiveness is proportional to your ability to keep close to a target.
  2. Ram: Do not be afraid to ram your target, even if your shields are down. All but the most formidable NPC enemies will come off second best.
  3. Strobing shields: Your shields will go down and up frequently during the fight. The telltale ping of damage on weak shields and their subsequent falling evokes almost Pavlovian fear in many pilots. Fight that reflex. Your Power Distributor’s systems capacitor has just enough charge to regenerate your shields in thirty seconds with two pips to systems. 
  4. Live with damage: Seeing your hull on 50% integrity causes panic in most pilots. However, modules willing, this build is still capable until about 15%. Your hardpoints and canopy are the most likely to be damaged. Use your AMFU between fights to keep them above 80% integrity to prevent malfunctions.
  5. Fear missiles: All weapon and utility hardpoints are on the underside of the Federal Assault Ship except one large hardpoint. A ventral missile hit can affect all of them. Point Defense is ineffective due to the Federal Assault Ship’s hardpoints’ restricted fire arcs.
  6. Chaff: With 40 chaff refills spread across four launchers, you should chaff whenever the shields are down. Unfortunately, it does not help against missiles.
  7. Ideal targets: The ideal targets are large, less agile ships. You can get close and have a big target for the build’s inaccurate weapons, even if they chaff. Try to get above or below them because these are the most prominent profiles. Jitter makes targeting modules pointless. 
  8. No ammunition: Ammunition constrains the combat longevity of most builds. Module damage usually curbs this build.
  9. Power (pip) management: Put four pips in weapons and two pips in systems. However, the Weapon Focused Power Distributor means you will need to frequently shift pips from weapons into engines, particularly to boost frequently.

Team or Wing Tactics

  1. Get someone else to tank: You do not have the shields to tank, particularly against teams or wings. Having someone else draw attention means you can get close to the target and above or below it, maximizing the target’s profile. If you are not taking damage, this build can fight for as long as you can.
  2. Getting too close: Getting close to targets when fighting in a wing or team means you often get hit by friendly fire. It is an occupational hazard for this build.

Python Mining Build

An Elite Dangerous ship build.

Goals

Create a ship to:

  1. Subsurface (using a Sub-Surface Displacement Missile), surface (Abrasion Blaster) and core (Seismic Charge Laucher) mine asteroids.
  2. Reach distant stations and outposts to sell refined minerals at the best price. This goal requires a medium ship but is not relevant if you have a fleet carrier. 
  3. Be manoeuvrable enough to efficiently mine rotating asteroids. Subsurface mining a rotating asteroid is particularly challenging. This goal precludes most large ships. 
  4. Laser mine when a prospector limpet shows the asteroid contains desirable minerals. A large ship with its copious cargo capacity is better suited for laser mining. However, this goal can help before purchasing one or when being opportunistic.
  5. Survive a pirate attack long enough to outrun them or escape to supercruise. This goal does not include mining in a resource extraction site. It is more for accidents or logging back in during a mining session.
  6. Unlike previous builds, can require unlockable modules.

Build

Python Blueprint by CMDR-Arithon (https://swat-portal.com/forum/gallery/image/9457-python/)

Links: EDSY and Coriolis (have your preferred one open as you read the guide for easy reference)

Once again, the Python is the best general-purpose medium ship. Its additional size six slot over a Krait Mk II gives 64 T of extra cargo space when the Krait’s greater speed and agility are not needed. It has ample hardpoints for mining tools and optional internal slots for limpet controllers.

This build is not a good choice for mining in resource extraction sites. The Python cannot equip a fighter bay. The build would need to sacrifice some hardpoints for weapons, limiting the types of mining it could do.

Mining:

  1. Mining tools: This build has two mining lasers and one of everything else.
  2. Weapon Focused Power Distributor: Most mining tools cannot be engineered. However, a Weapon Focused Power Distributor allows Mining Lasers to fire longer. This reduces the time it takes to deplete an asteroid, meaning faster laser mining.
  3. Collector Limpet Controllers: Three collector limpets per large mining laser is a good “rule of thumb” for efficient fragment collection. This build has the slots for lighter, separate limpet controllers instead of a single multi-limpet controller.
  4. Cargo space: Use the larger slots for Cargo Racks and the smaller slots for limpet controllers and a refinery. The 196 T cargo space should be enough to exhaust the ammunition of the mining hardpoints.
  5. Refinery: Most mining is for a specific mineral, so this build uses a 2A Refinery. You do not need a large Refinery unless you mine for multiple minerals simultaneously.
  6. Detailed Surface Scanner: A Detailed Surface Scanner probes rings for hotspots or to see hotspots revealed previously.
  7. Fuel Scoop: Used to get to remote mining locations or sell at distant stations and outposts.

Defence:

  1. Prismatic Shields: Unless you slow down by hitting asteroids, this ship only needs shields when attacked. A Prismatic Shield Generator provides the best protection.
  2. Poor Armour: This build eschews bulkheads and hull reinforcements for agility and other internal modules.
  3. Run: This ship does not fight. It runs, using its shields to protect it long enough to high wake out or jump to supercruise. It boosts up to 474 meters per second with a full cargo hold, outrunning all NPC pirates.

Variations

  1. Mining tools: Adjust the hardpoints as needed. For example, if you plan to core mine only, replace the Sub-Surface Displacement Missile with a second Seismic Charge Launcher. Firing two provides no benefit, but switching from one to the other after exhausting the first’s ammunition keeps you mining longer.
  2. Lazy Engineering: You could use the guardian hybrid versions instead of engineering the Power Plant and Power Distributor. The Guardian Hybrid Power Distributor will not allow the Mining Lasers to fire as long. The Guardian Hybrid Power Plant will generate more heat, making fuel scooping harder. However, neither are critical for this build and it saves the engineering materials and effort.
  3. Sensors: If you want more visibility on pirates when you jump into a ring, consider upgrading the sensors to a class A.
  4. Short Range: Replace the 4A Fuel Scoop with a 4E Cargo Rack if you have a fleet carrier or will otherwise not be jumping far.

Tactics

  1. Fire groups: Have one fire group for laser mining. Put the Prospector Limpet Controller on one button and both the Collector Limpet Controller and Mining Lasers on the other. Putting both collector limpets and mining lasers together means collector limpets are released when you fire the mining lasers. Create fire groups for different mining activities, such as one with a Pulse Wave Analyzer and Prospector Limpet Controller, then one with an Abrasion Blaster and Seismic Charge Launcher.
  2. Mining: Mining is covered by guides from elsewhere. Mining with team- or wingmates can make the otherwise repetitive mining more enjoyable.
  3. Pip management: Mining is best with four pips to weapons and two in engines. You should not need shields. Just be careful not to outrun or crash into your prospector limpets.

Fer-de-Lance Fixed Weapon PvE Combat Build

An Elite Dangerous ship build.

Goals

Create a ship that:

  1. Relies on fixed weapons. Unaffected by chaff and with a higher damage output than comparable gimballed weapons, fixed weapons force the commander to earn kills by better piloting and shot timing.
  2. Unlike previous builds, can require unlockable modules.

Build

Fer-de-Lance Blueprint by CMDR-Arithon (https://swat-portal.com/forum/gallery/image/9459-fer-de-lance/)

Links: EDSY and Coriolis (have your preferred one open as you read the guide for easy reference)

The Fer-de-Lance’s close, centred hardpoints, collectively called “convergence”, and manoeuvrability make it ideal for fixed weapons. It is the archetypical dedicated combat ship. With styling reminiscent of the Flash Gordon era, its V8-like engine purr is unmistakable.

There are few comparable ships. The Mamba’s hardpoints are further apart, making landing all weapons on small targets difficult. It sacrifices the required agility for speed. The Vulture, Chieftain and Federal Assault Ship all have good hardpoint placement but are lighter ships.

When outfitting, use the two top medium hardpoints for Plasma Accelerators, not the lower ones. The two lower medium hardpoints are too wide. Use them for Rail Guns.

I demonstrate an early version of this build in a Low Intensity Conflict Zone below. The build shown in the video, about two years old complete with Horizons era graphics, had Long Range Rail Guns with Multi-Services for rapid, long range tagging and Bi-Weave shields. My pip management is also lacklustre.

Offence:

  1. Plasma Accelerators: As with the Python mission build, Plasma Accelerators are equally wonderful and frustrating weapons. They do a mix of thermal, kinetic and absolute damage. This mix means they damage shields and hull similarly. It is hard to mitigate their damage via increasing resistances. Plasma Accelerators have an “Armour Piercing” value of 100, meaning they do full damage to all existing playable ships. However, Plasma Accelerator shot speed is slow, requiring deflection shooting. Their reload times are long, and ammunition is limited and expensive. They generate lots of heat, making repeated firing dangerous, and pull a lot of energy from the Power Distributor.
  2. Efficient blueprint: Using the Efficient blueprint on Plasma Accerlators counters their heat and power problems while giving a slight damage increase. It means reload times constrain Plasma Accelerator use, not heat, so you can use them like more common weapons. They become beginner friendly.
  3. Rail Guns: Like the Plasma Accelerators, Rail Guns do thermal and kinetic damage and have an “Armor Piercing” value of 100. They require a short warm-up before firing but are “hit scan” weapons, meaning they hit whatever the gunsight points. They are similar to Guardian Gauss if you are used to sniping Thargoid Interceptor hearts.
  4. Short Range blueprint: Rail guns’ damage is comparatively low. Short Range increases their damage by around 75%, turning them into viable weapons. It limits their range, but this build already has to get close to be effective.
  5. Rail Gun experimental effects: Feedback Cascade disrupts the use of shield cell banks. Hitting a target’s shields using a shield cell bank damages the shield cell bank and decreases its regeneration time. Super Penetrator damages all modules on the shot’s trajectory on a breach, not just the first one. It is particularly effective when hitting the front or back of a target, usually when soloing.
  6. Thermal Conduit experimental effect: Plasma Accelerators with Thermal Conduit do more damage the hotter you are. Balancing heat and the resulting damage versus damage output is a challenging but rewarding metagame for this build.
  7. Power (Pip) management: Getting the most from the Fer-de-Lance requires active pip management, such as putting pips to engines when pursuing enemies, then into systems when not firing. Continuously firing the three Plasma Accelerators requires three pips in weapons. Otherwise, I use one pip in engines and the rest spread equally between systems and weapons.
  8. Graphics: This build demonstrates the different graphics used to show engineered weapons, such as the blue Feedback Cascade rounds or the sun-like plasma globes from hot Thermal Conduit Plasma Accelerators. Apart from looking cool, they help show which weapon hits or misses or when experimental effects occur.

Defence:

  1. Prismatic shields: Assuming you are not engaging too many wings or small ships, ammunition will usually run out before shields. A reinforced Prismatic Shield Generator with Hi-Cap is ideal.
  2. Resistances: Two Thermal Resistance Shield Boosters with Thermo Block counteract shields’ innate weakness to thermal weapons. The build is effectively immune to explosive and kinetic weapons.
  3. Chaff sparingly: Use chaff if you engage a wing, must disengage, or shields are low. Otherwise, your shields should protect you.
  4. Speed and agility: This build can boost to 540 meters per second. While not as fast as the Mamba build, it will still outrun most ships when things get hairy.

Variations

  1. Focused or Long Range Plasma Accelerators: Changing the blueprint on the Plasma Accelerators to one that increases shot speed is tempting. This change makes aiming easier. However, the increased heat build-up means repeatedly firing the Plasma Accelerators will quickly overheat the ship, causing lots of module damage. These blueprints risk turning the build into a single engagement build.
  2. Phasing Sequence: If you prefer not fighting at high heat levels needed to leverage Thermal Conduit, consider Phasing Sequence (10% damage bypasses shields). 
  3. Automated Field Maintenance Unit (AFMU) and Heat Sinks: If you regularly use high heat levels, consider swapping one of the Hull Reinforcement modules for an AFMU. This module can repair damaged modules between fights, increasing longevity. Replace a Heavy Duty Shield Booster with a Heat Sink for fast cooling, if needed.
  4. FSD Interdictor: Swap out the FSD Interdictor if you are not doing assassination missions or Power Play merit farming.
  5. Advanced Plasma Accelerators and Imperial Hammers: The Power Play versions of both weapons are interesting but not better. Advanced Plasma Accelerators have a higher rate of fire. Imperial Hammers are better if you must land an experimental effect. However, you must land all three shots to get the increased damage output.
  6. PvP builds: PvP is not my expertise. However, this build is not too far from a PvP build. You can use different experimental effects on the Plasma Accelerators, such as Dispersal Field (reduce gimballed weapons accuracy) and Target Lock Breaker (break target lock). 

Solo Tactics

  1. Different fire groups: Place the Rail Gains and Plasma Accelerators in separate fire groups. You rarely fire the hit scan rail guns and deflection shooting Plasma Accelerators simultaneously.
  2. Favour larger or less agile targets: Fixed weapons are harder to aim. The slow shot speed of Plasma Accelerators makes them impractical at long ranges. Choose targets that emphasize the build’s strengths. The Long Range Sensors can help find them.
  3. Close range brawler: Get close to the target, throttling up if they are far away, then down into the blue once they are in range. The closer you are, the less time your target has to dodge. Leverage the default jousting behaviour to line up a rail gun shot then a plasma shot each pass. If you cannot get a plasma shot off, pre-turn to reveal the target’s larger-profile top or below view. Getting behind a target and matching their speed is ideal but challenging to maintain.
  4. Same weapons against shields and hull: Unlike most ship builds, this build does not require using different weapons against shields and hulls. The Plasma Accelerators and Rail Guns have the same damage profile against both.
  5. Patience: Fixed weapons are more difficult to use than gimballed weapons. Plasma Accelerators have a long reload time, so only take shots when confident. You will improve with time. 
  6. Heat management: The Thermal Conduit experimental effect on the Plasma Accelerators gives you an option to increase damage output at the expense of heat and resulting heat damage. To increase your heat and, therefore Plasma Accelerator damage output, alternate rail gun and plasma rounds. If you do not hear heat warning sirens, your heat is too low. 
  7. Watch ammunition: All weapons on this build require ammunition, and Plasma Accelerators have a low ammunition capacity. For example, this build should have enough when soloing a low-intensity conflict zone but may be insufficient for soloing medium- or high-intensity ones. While synthesizing it is possible, the material cost is high. The Plasma Slug experimental effect is not worth it due to the Fer-de-Lance’s small fuel tank. 
  8. Shorter sessions: Many previous builds allowed an almost constant stream of fighting, like the Healing Krait Mk II PvE healing build. This build shifts to more intense sessions with frequent breaks between them. 

Team or Wing Tactics

  1. Damage dealer” role: Fixed weapons are less reliable than gimballed for damage output. Therefore, this build is better suited to damage dealing than tanking. A teammate can draw an enemy’s attention, allowing you to get above or below the target. This angle reveals their larger, easier to hit profile. Go full Thermal Conduit if your team engages one too many larger ships.
  2. Anti-shield cell bank: Teammates will appreciate you using the Feedback Cascade experimental effect against enemies using shield cell banks. 

Python Mission Build

Goals

Create a ship to handle solo mission running, usually to move minor faction influence or increase superpower reputation. This build needs to:

  1. Land at stations and outposts. This effectively requires a medium-sized ship.
  2. Handle cargo loads of at least 196 T. This size is the largest a non-wing cargo mission requires. It also makes a viable, if suboptimal, medium pad trader.
  3. Complete non-cargo missions, including smuggling, theft and scanning, in space and on planet surfaces. This means various limpet controllers and a planetary vehicle hanger. 
  4. Defeat pirates likely sent after a high-rank pilot. These are usually large, sluggish targets like Anacondas or Federal Corvettes. This requires weapons and shields, unlike many weapon-less and shield-less builds.
  5. Handle high-end assassination missions against the same targets as mentioned above. If you can defend against elite pirates, why not add a few assassination missions? This requires an FSD interdictor and, possibly, a wake scanner.
  6. Gather engineering materials, such as from High Grade Emission signal sources or scanning wake signals at Distribution Centres. This is a bonus use emerging out of the above requirements.

Build

Python Blueprint by CMDR-Arithon (https://swat-portal.com/forum/gallery/image/9457-python/)

Links: EDSY or Coriolis (have your preferred one open as you read the guide for easy reference)

The Python is an excellent choice. It can land on a medium pad but has ample optional internal slots, high firepower and strong armour. A Krait Mk II lacks a class six slot, hurting its cargo carrying capacity. Combat-focused medium ships lack sufficient internal space, such as the Fer-de-Lance or Mamba.

However, general or multi-purpose builds are more challenging than specific purpose builds. Prioritization is vital because you rarely can do everything. The missions available in your favourite systems or personal preference also may dictate change. 

Utility:

  1. Cargo: Cargo racks dominate the optional internal slots, totalling 200 T. This is enough to carry the required 196 T and a few limpets or extra cargo.
  2. Operations Multi Limpet Controller: Surprisingly, the cargo racks constrain the optional internal slots. The 3B Operations Multi Limpet Controller provides collector, hatch breaker and recon limpets in a single slot. It facilitates a broad range of missions and material gathering uses. The choice of 3B versus 3C is not clear cut, but I prefer the 3B for its longer range.
  3. Assassination: The 3A Frame Shift Drive Interdictor and 0A Frame Shift Wake Scanner allow pulling targets out of supercruise, such as for assassination or theft missions, and following them if they high wake out, respectively. The Expanded Capture Arc blueprint on the FSD interdictor can interdict targets from the side, but Longer Range can also be effective. Long Range on the Frame Shift Wake Scanner makes it much easier to scan wake signals with such a relatively slow ship, including encoded material gathering.
  4. Planetary Vehicle Hanger: SRVs are vital for surface missions or surface material gathering. Carry a spare or both a Scarab and a Scorpion.
  5. Advanced Docking Computer: This module is worth it when repeatedly docking or playing when distracted.
  6. Power Priorities: The fitted modules exceed the Power Plant’s capacity. This build moves the Planetary Vehicle Hanger, FSD interdictor and Advanced Docking Computer to the lowest priority, meaning deploying hardpoints shuts down modules not needed during combat.

Offence:

  1. Broad choice: Just about every weapon loadout is viable. However, given the intended targets, this is a chance to try out something fun and unusual. Adjust to taste or your place in the game’s progression. For example, consider a laser/multicannon build if you fight smaller or more agile opponents.
  2. Plasma accelerators: Plasma Accelerators with Efficient are highly effective at damaging large ships. The intended targets cannot dodge, chaff and ECM are ineffective, and plasma’s high Armour Piercing values negate their high armour. Plasma Accelerators are effective against turrets for surface missions but struggle against agile skimmers. Many Plasma Accelerator experimental effects are only consequential in PVP, so Oversized is a good fallback choice.
  3. Seeker missiles: This is an arbitrary but fun choice. High Capacity ensures it takes a while to run out of ammunition and the Thermal Cascade experimental effect does something impactful on a shield hit. Useful for smaller targets or at range. Remember that missiles take time to lock on and a have minimum range of 500m. Consider the double engineered versions from a technology broker. Drag Munitions are also a useful option.

Defence:

  1. Bi-Weave shields: Nothing special here. This build still has a class six shield generator, despite the temptation to use a smaller shield to free up larger slots for cargo racks.
  2. Weak without shields: This build lacks hull and module reinforcements. It is vulnerable when its shields drop, particularly to explosive damage. Flee if outnumbered or outgunned.

Variations

  1. Swap surface capability for longer operational range: Replace the planetary vehicle hanger with a 4A Fuel Scoop, then use the Plasma Slug experimental effect on the Plasma Accelerators. This change gives the build a longer reach, useful for long-distance cargo missions or accessing engineers. It also extends the build’s combat life and reduces ammunition costs. Use this variation if you have an alternate ship for surface missions.
  2. Plasma accelerators: Focused is an alternate blueprint, unincreasing their shot speed and, therefore, accuracy. However, heat management may be a problem.

Solo Tactics

  1. Choose when to fight: Apart from assassination missions, fighting is optional in most missions. NPC interdictions are easily escapable. However, combat can be fun or lucrative. Redeeming bounty vouchers improves minor faction influence. This build is not a dedicated combat ship but gives you options.
  2. Ignore lighter ships and fighters: Plasma accelerators will have difficulty hitting faster or more agile targets. Ignore them. Missiles can help but it takes a lot of missiles to take down even a small target.
  3. Batch missions to the same location for efficiency: For example, if you have a cargo mission delivering to a particular station, look for missions going to the same station to minimize travel time.
  4. Batch similar mission types for efficiency: For example, elections often spawn missions to capture cargo from other ships. Repeating the same mission type means you will not forget limpets and your time efficiency will increase.

Wing or Team Tactics

  1. None: This build is for running missions solo. Large ships are better for wing missions. This build does not need other commanders protecting it. You can wing up, such as for casual conversation or sharing trade dividends, but other builds are usually superior for the wing’s purpose.

Cobra Mk III On-Foot Support Build

Goals

Create a ship to:

  1. Get the commander to/from on-foot missions introduced with Odyssey. This requirement includes transporting an SRV (for mission support or raw material gathering) and a Detailed Surface Scanner (for finding points of interest).
  2. Endure a sustained assault from on-foot enemies. This requirement ensures you can complete mission goals rather than rushing back to defend your ship.
  3. Land at every surface settlement, outpost or station, effectively requiring a small ship. 
  4. Provide fire support to kill scavengers and other ground enemies.
  5. Have a fast boost speed. The build should reach supercruise distance quickly for material farming or escaping hostile ships.
  6. Have a reasonable jump range and a Fuel Scoop for travelling to on-foot engineers or distant missions.

Build

Cobra Mk III Blueprint by CMDR-Arithon (https://swat-portal.com/forum/gallery/image/9445-cobra-mk-3/)

Links: EDSY and Coriolis (have your preferred one open as you read the guide for easy reference)

An iconic Elite Dangerous ship, the Cobra Mk III tends to get left behind once bigger or more specialized ships are available. However, its small size, ample optional internal space and speed make it ideal.

If you lack a Diamondback Explorer, this build’s reasonable jump range (30 LY, more with the double engineered 4A FSD), high supercruise manoeuvrability, and ability to land anywhere make it a good “taxi” build. 

Defence:

  1. Prismatic Shields: This build will not need shields until it desperately needs them. A Prismatic Shield with Reinforced and Hi-Cap boosted with Guardian Shield Reinforcement Packages provides the highest protection. Engineered Shield Boosters counteract the usual shield thermal weakness. These give just under 1000 absolute shield strength, a behemoth for its size.
  2. Overcharged Power Plant: This build uses the Overcharged blueprint on the Power Plant to power the Prismatic Shields and, even then, only if many modules are unpowered when deploying hardpoints. Power priority management is essential.
  3. Heat: This build uses the Thermal Spead experimental effect on the Power Plant instead of Monstered to minimize heat when fuel scooping. However, avoiding overheating still requires care.
  4. Minimize weight: This is not a combat ship. While it uses a single 2D Hull Reinforcement package, Lightweight Alloy bulkheads maximize its speed.

Offence:

  1. Ground attack: The Advanced Missile Racks can provide area explosive damage when your ground mission area is swarming with scavengers or guards. The Cobra Mk III’s two medium hardpoints are surprisingly far apart, compared to a human scale, but usable. No experimental effects are consequential, but Flow Control can help with the power deficit.
  2. Beam Lasers: The beam lasers are helpful against skimmers or SRVs but little else. Grade 1 Long Range is all that is required to keep you out of range, but Efficient is also an option. No experimental effects are consequential, but Flow Control can help with the power deficit.

Utility:

  1. Double SRV bay: This can transport both a Scarab and a Scorpion or two of your favourite kind of SRV. Dropping down to a 2G does not give any significant advantage.
  2. Advanced Docking Computer: Odyssey added the ability to auto-land on planet surfaces. This module allows easy landing when distracted or on uneven terrain near surface points of interest.

Variants

  1. Attainability: This build is cheap at only around 12 million credits before any discount. Substituting a regular Shield Generator for the Prismatic Shield Generator and removing the Guardian Shield Reinforcement Package creates a build most commanders can attain.
  2. Collection missions: Swap one or both of the 2D Guardian Shield Reinforcement Packages for 2E Cargo Bays. While this build will never be an efficient cargo runner, you could use it for surface collection missions.
  3. Mines: Swap the 1E Beam Lasers for 1I Mine Launchers. These can rain mine “bombs” on surface targets. They are not as effective as missiles, but they can be fun.

Solo Tactics

  1. Flee: This build runs, not fights. Its prismatic shields protect it long enough for it to escape and, at 600+ m/s boost speed, this build will outrun almost everything. Most enemies will mass lock this build, so the high speed is welcome.
  2. Power (pip) management: Place four pips in systems and two in engines when landing to maximize shield protection. Otherwise, do the reverse to maximize boost frequency, speed and agility.

Wing or Team Tactics 

  1. Pairing: This build can transport two commanders to and from an on-foot mission location, providing each with an SRV.
  2. Rescue: This build can rescue an on-foot commander who has lost their ship or would otherwise wait for an Apex. Use missiles to kill any ground targets, land to pick the commander up, then boost to supercruise before enemy ships take down the shields.