Unknown's avatar

About Anthony Langsworth

I am a self-motivated, adaptable, outcome-focused enterprise and solution architect that gravitates toward technical leadership roles. I am adept at building relationships and translating between business and technology practices. My experience covers architecture, management, security and software development roles over 20 years, from multiple startups to global technology companies. I am a frequent innovator with many patents; maintain many architecture, agile and security certifications and contribute to open source software.

“Wednesday” Review

Many were curious when Netflix previewed Wednesday as a reboot of the 1960s black and white The Addams FamilyThe Addams Family poked fun at those who are different, subtly reinforcing American cultural superiority during globalism’s infancy. Recent versions softened this stance but reduced the central family to a travelling freak show. Would Wednesday repeat the same mistakes?

Wednesday begins as Wednesday Addams starts at a new boarding school, Nevermore Academy, after being expelled from yet another traditional American high school. Her parents, Gomez and Morticia, also went to Nevermore Academy. Their legacy threatens to smother Wednesday’s emerging identity under her parent’s shadow. Meanwhile, Wednesday struggles to define herself in a world that wants to force her into a mold. 

The first few episodes introduce the characters while entertaining the viewer with succinct and acerbic dialog, particularly from Wednesday herself. The main plot then starts to assert itself. A supernatural mystery threatens to overwhelm Nevermore Academy and the nearby town. Wednesday takes it upon herself to solve the mystery, guided by her psychic premonitions.

Jenna Ortega portrays the unblinking, monochrome titular character brilliantly. Wednesday outwardly revels in her isolation. She even convinces her nemesis that she cares little for others’ opinions. However, her black, frozen heart predictably melts after a visit from her uncle Fester, her feelings for Thing and young love.

Thing, Wednesday’s disembodied hand companion, is the most transformed character from the original The Addams Family, both by special effects and a new purpose. Thing moves from a recurring gag to the perfect companion and sidekick: loyal, competent, occasionally comedic but never taking the spotlight from Wednesday. 

Enid, Wednesday’s werewolf roommate, plays Wednesday’s foil. Enid represents everything that Wednesday is not: colourful, energetic, warm, forgiving, technically savvy and extroverted. This tug of war plays out in the not-so-subtle contrast of their shared dorm room between Enid’s rainbow and Wednesday’s gothic drabness.

Wednesday eschews almost all classroom scenes typical to the Harry Potter-like genre. Weems, the stoic, long-suffering headmistress played by Gwendoline Christie, vacillates between dominance, patience and political correctness. 

For original series fans, Wednesday subverts many tropes from The Addams Family, like snapping fingers twice or the adoring love between Morticia and Gomez. However, some merely lighten emotional moments and strengthen the bond between characters. Wednesday and Pugsley, her brother, casually fishing using hand grenades is a good example.

However, Wednesday has its frustrating flaws, too. Wednesday’s character sometimes veers into the Mary Sue trope. Her knowledge of macabre topics, archery or the cello is unmatched, dismissively besting others. Wednesday’s friends’ affection is unrequited and undeserved.

Wednesday also touches on the Chosen One trope. Her constant self-righteousness and lack of remorse grates. She would have been expelled and arrested for her actions in any other context. 

Wednesday will resonate with young adults. It deals with social status, love triangles, the struggle to find one’s identity, the bravado and self-righteousness of youth and the changing relationship with parents from a dependent child to a semi-independent teen.

Wednesday is unashamedly feminist. Women play most main roles. The series reduces Gomez from a 1960s-style family head to a love-struck doter. Pugsly is a pot-purri-eating weakling constantly needing Wednesday’s protection. However, the series loses little from doing so, and the new perspective is refreshing and fundamental to the story.

Underneath that, by moving the spotlight away from the Addams family and onto Nevermore Academy, Wednesday can examine diversity and inclusion. The ridicule of Nevermore’s student “freaks” by the nearby town’s “normies” will appeal to anyone bullied or victimized. 

The town’s financial dependence on Nevermore Academy forces an uneasy truce, preventing the resentment from escalating into open conflict. This arrangement gives more credibility and context while giving key characters more depth.

However, the series is sometimes one-sided. No one sympathizes with those Wednesday belittles or harms. The nearby townspeople are right to be wary, given the recent murders and Nevermore Academy’s students’ powers. 

Wednesday is aimed at a modern audience, who consider a show a competition between writers and viewers. The plot moves quickly, never dwelling on any scene or character more than necessary. It foreshadows enough for the audience to feel clever predicting the next event, only for the plot to swerve at the last moment.

Ultimately, the original series riffed on medieval or occult tropes for comedic effect. Wednesday uses a modern lens, crisp dialog and a fast-paced, economic plot to tell a different story. It appeals differently but successfully to both newer and older generations. However, the latter may find Wednesday a tad self-righteous and superficial.

Beginner Anti-Xeno (AX) Krait Mk II

An Elite Dangerous ship platform supporting multiple builds aimed at those new to Thargoid combat.

A detailed explanation of Thargoids and Thargoid combat is beyond the scope of this post. The Anti-Xeno Initiative (AXI) wiki has the best documentation about them, tactics, and ship builds.

Goals

Create a ship to:

  1. Perform one or more roles when fighting Thargoid Interceptors, Thargon Swarms and Thargoid Scouts, such as those found in AX Conflict Zones.
  2. Be self-sufficient, including removing the damage over time debuff from caustic missiles and neutralizing Thargoid shutdown fields. This means the ship can be viable solo or in random groups.
  3. Require no unlockable modules, reputation or rank. This makes it easier to build for newer players.
  4. Outrun and outmaneuver most thargoid interceptors, scouts and caustic missiles. This is unlikely to include the Basilisk interceptor, whose maximum speed is 530 m/s, but should include all others.
  5. Land on a medium-sized pad. This ensures it can land at all outposts and stations, including ones under active Thargoid attack. Medium-sized ships’ purchase and rebuy prices are also generally lower than large-sized ships.

Build

Krait Mk II blueprint by CMDR-Arithon (https://swat-portal.com/forum/gallery/image/9624-krait-mk-ii/)

The new large gimballed Enhanced AX Multi-Cannon is the best AX weapon that does not require unlocking. This replaces the turreted version. Unfortunately, the limit of four AX weapons still applies. The Python and Krait Mk II both have three large hardpoints, the most for a medium ship, but the Krait Mk II is faster and more agile, making it the best medium-size AX ship for new commanders.

That said, many ships make viable anti-xeno or anti-thargoid builds. For example, the Alliance Chieftain is also effective but more so against interceptors than scouts. It is more manoeuvrable but has less hull integrity and shields.

These builds are also guidelines. Feel free to experiment but note this build’s goals and motivations.

While you can run AX builds without engineering, Thargoids are intentionally difficult opponents. Unengineered ships are harder to use. Having to repair frequently may leave your team without a needed role. Unlocking engineers and grinding for materials is time-consuming but worth it. You do not need to max out the engineering to be viable, grade 3 or 4 is sufficient, but more engineering means an easier fight.

General:

  1. Maximize Hull: All thargoid damage is phasing, meaning a portion bypasses shields. All thargoid damage is Caustic, meaning traditional resistances like thermal, kinetic and explosive are useless. The damage over time debuff from caustic missiles directly damages hull irrespective of shields. Therefore, while shields help, maximizing hull integrity is imperative to survivability.
  2. Caustic Debuff: Being hit by caustic missiles or entering a destroyed scout or interceptor’s cloud will put a caustic debuff on the ship. Either use a decontamination limpet or overheat to at least 120% to eliminate it. Use the AFMU during downtime to repair malfunctioning modules.
  3. Thargoid Shutdown Field: Interceptors create a pulse that temporarily shuts down ships when (1) they enter the instance or (2) on their last heart. Use the Shutdown Field Neutralizer to prevent you and nearby allies from being shut down.
  4. Finding Targets: AX Conflict Zones tend to spawn scouts at long ranges. Interceptors can travel far away from the centre of a conflict zone during combat. Therefore, A-rated sensors help find scouts or interceptors at extended ranges. AX builds focusing on Non Human SIgnal Sources can operate well with D-rated.
  5. Lo-Draw Shield: The shield has Lo-Draw rather than Fast Charge. Fast Charge draws too much power if the shields ever drop, meaning there will be no power for the Shutdown Field Neutralizer or Decontamination Limpet Controller. However, Lo-Draw slightly decreases the recharge rate.
  6. Speed and Agility: While not as fast as a Basilisk interceptor, this build can outrun other Thargoids, including caustic missiles.

Anti-Scout

Build: Coriolis (Coriolis does not support the enhanced AX multi-cannons yet, so those slots are shown as turretted) or EDSY. Have your preferred one open as you read the guide for easy reference.

You can purchase the Enhanced AX Multi-Cannons from any Sirius megaship.

  1. Weapons: Three large and one medium Enhanced AX Multi-Cannons form the foundation for scout killing. The enhanced versions have a high shot speed. The gimbal allows limited auto-aiming, minimizing missing due to scouts’ manoeuvrability. The Long Range beam laser helps “tag” scouts and interceptors at long range. The Thermal Vent experimental effect reduces heat when striking a target or increases it when missing, helping to burn off the caustic debuff.
  2. Setup: Assign the multi-cannons and laser to the primary fire button and the decontamination to the secondary fire button in the same fire group. Assign a key to the Shutdown Field Neutralizer. This build’s Power Plant and Power Distributor are more than sufficient, meaning pip micro-management is optional.
  3. Target Selection: Engage regenerators first (because these heal nearby scouts), berserkers (because they buff nearby scouts and cause them to fire caustic missiles), inciters (because they buff nearby scouts) and then marauders last. The Xeno Scanner identifies scouts and their health.
  4. Engaging: Engage scouts at a range of one to two kilometres. This is within the AX multi-cannon minimum range but not close enough for scouts’ agility to make them hard to target.
  5. Swarms and Interceptors: Get a hit or “tag” on an interceptor to share in the bonds for killing it but avoid them if you are dealing with scouts. For interceptors, ensure someone in the wing gets a scan so you can target hearts effectively. Avoid using AX multi-cannons against shields, which may trigger the interceptor’s caustic missiles.

Mixed Anti-Swarm and Anti-Scout

As Anti-Scout, above, but replace two of the Enhanced AX Multi-Cannons with Remote Release Flak Launchers. Put the Remote Release Flak Launchers in side hardpoints to maximize the area covered by exploding flak.

  1. Setup: Put the Remote Release Flak Launchers in one fire button, the Enhanced AX Mutli-Cannons and Laser in another and the Decontamination Limpet Controller in another in a separate fire group.
  2. Scanning: Using the Xeno Scanner identifies the interceptor type and allows targeting of exerted hearts for you and everyone in your team. Once you get used to visually identifying interceptors and their hearts, you can replace the Xeno Scanner with another shield booster.
  3. Target Selection: Thargon swarms are your priority because only Remote Release Flak Launchers can meaningfully damage them. Prioritize swarms attacking other team members or, failing that, larger swarms first. Otherwise, prioritise scouts as mentioned above, particularly those attacking team members.
  4. Interceptors: Get a hit or “tag” on an interceptor to share in the bonds but prioritize other targets. While scouts are a nuisance, a single hit can destroy a needed attached limpet or stop an ammunition synthesis.

Anti-Interceptor

As Anti-Scout, above, but equip four 2B Guardian Gauss Cannons (or the salvation versions) and one 2D Long Range Beam Laser with Thermal Vent. Unfortunately, Guardian Gauss Cannons require unlocking.

Once you get familiar with interceptor combat, experiment with other Guardian weapons. However, Guardian Gauss Cannons are the most effective against Thargoid interceptor hearts.

  1. Setup: Placing all four Guardian Gauss Cannons on a single fire button and the Beam Laser on the other. While Guardian Gauss Cannons can fire frequently, they will spike your heat. Use the Beam Laser liberally to minimize heat but be careful not to exhaust the weapon capacitor. Avoid using gauss and other weapons against Thargoid shields, because it may trigger the firing of caustic missiles.
  2. Alternate Setup: Put two adjacent Guardian Gauss Cannons and the Beam Laser in one fire button and the other two Guardian Gauss Cannons and the Beam Laser in the other fire button. This reduces the heat impact of firing all four gauss cannons at once. Grouping the gauss canons into smaller groups with good convergence can make heart sniping easier. Hold the fire button to keep the laser firing to reduce heat.
  3. Range: Guardian Gass Cannons are most effective at the 1 to 1.5 kilometre range. The cannons still do maximum damage, the angular motion of interceptors is minimized and the slight auto-aim feature of fixed weapons is most effective.
  4. Engaging: Stay at least one kilometre from the interceptor unless you use the Xeno Scanner. This helps your Gauss Cannon accuracy, keeps you out of range of the lighting attack and helps any dedicated tanks keep the interceptor’s focus. Also, avoid using Gauss Cannons on shields. They are not very effective and can trigger an interceptor’s caustic missiles.
  5. Scouts: Leave scouts for those with AX Multi-Cannons. Targeting scouts with fixed weapons is harder than against the larger, slower interceptors and gauss cannon ammunition is limited.

Variants

  1. Unlockable modules: Replace the Module Reinforcement Package with the Guardian version to increase module protection. The double-engineered 5A Frame Shift Drive purchased from a Human Technology broker will slightly increase jump range. Replace the 4E Cargo Rack with the corrosive-resistant version if you want to scoop up hearts.
  2. Shieldless: I do not recommend running this build shield-less unless you focus on interceptors. Cold orbiting does not work against scouts or Thargon swarms. Missiling Thargons will quickly disable or destroy hardpoints without a shield. However, to do so, replace the 6C Bi-Weave Shield Generator with a 5D Module Reinforcement Package and the two 0A Shield Boosters with Heat Sink Launchers with Ammo Capacity, preferably the double-engineered versions.

Passenger Rescue and Robigo Mines Python Build

An Elite Dangerous ship build for evacuating passengers in bulk from outposts or settlements that lack a large landing pad. This includes the Robigo Mines to Sothis loop for credits or engineering materials.

Goals

Like the large pad, Anaconda version and the small pad, Type-6 Transporter version, create a ship to:

  1. Carry as many passengers as possible while landing on a medium pad. Evacuating passengers are happy with economy class.
  2. Make the 150+ LY trip to a rescue ship as quickly as possible. This means maximizing the jump distance and range to do the trip without refuelling. Failing that, outfitting a fuel scoop.
  3. Escape a Thargoid hyperdiction or interdiction. This means both the protection and speed to escape.

Build

Anaconda Blueprint by CMDR-Arithon (https://swat-portal.com/forum/gallery/image/9457-python/)

Links: EDSY and Coriolis (have your preferred one open as you read the guide for easy reference)

A comparison of medium ship economy passenger capacity is given below.

Ship23456+Smallest Shield Slot SizeTotal Economy Passengers (Shielded)Total Economy Passengers (Shieldless)
Type-6 Transporter2122035256
Asp Explorer2201135660
Alliance Challenger2200246876
Federal Gunship2001247684
Krait Phantom1303139094
Krait Mk II121223110114
Python121233142146
Medium Ship Economy Passenger Capacity

The Python carries the most passengers in economy class cabins, mainly due to its three size six slots. The Python does so with a 150+ LY jump range without refuelling, making it the ideal medium-sized bulk passenger ship.

Passengers:

  1. Passengers: Running passengers is straightforward. I prefer missions that reward engineering materials, especially ones with fewer passengers for five class five materials. The Advanced Docking Computer helps when repeatedly docking.
  2. Jumping: Even a non-double engineered 5A Frame Shift Drive using Increased Range with Mass Manager is sufficient. It gives a range of over 200 LY. Along with a 2H Guardian Frame Shift Drive Booster, this build does not need a fuel scoop to reach a rescue ship.

Defence:

  1. Speed and agility: Using the Dirty blueprint with the Drag Drives experimental Thrusters minimizes the time in danger during Thargoid encounters. Given the low power requirements, this build also uses a slightly smaller Power Plant and Power Distributor to give it that edge. It can boost every five seconds with four pips to engines and two pips to shields.
  2. Shields: While Thargoid damage is phasing, a Prismatic Shield Generator provides the best protection. Substitute for a regular Shield Generator if you do not have access to Prismatic Shields. It, with Shield Boosters, provides enough protection to comfortably escape Thargoid encounters. Eschew resistances because all Thargoid damage is Caustic.
  3. Armour: Favour speed over hull integrity with Lightweight Alloy.
  4. Cold: The Power Plant uses Low Emissions and Thermal Spread to minimize heat. This reduces Thargoid weapon accuracy and means heat sinks keep the ship under 20% heat for longer.
  5. No weapons: This build runs from fights.

Variations

  1. Robigo Mines: The passenger route from the output Robigo Mines in Robigo to the tourist beacon in Sothis used to be an excellent money earner. While the more lucrative missions now disappear from the mission board after an hour or so, passenger missions can still earn credits and engineering materials. Replace the three 6E Economy Class Passenger Cabins with 6D Business Class Passenger Cabins because some Robigo missions require them. Replace the 2H Guardian Frame Shift Drive Booster and even the 3A Prismatic Shield Generator with economy class passenger cabins because they are unnecessary. Unlike evacuation missions, some Robigo missions can take as few as two passengers and you are far away from any combat.
  2. Maximize range: Replace a smaller passenger cabin with an A-rated fuel scoop. This build will not scoop quickly but the low heat means you can take your time.
  3. Anti-Scout: Equip several turreted enhanced AX multi-cannons and a 7A Power Plant. Bring the fight to any scouts that interdict you or that attack you around stations! This variation can be fun but removing caustic damage from missiles is difficult. This build’s engineering makes overheating slow.

Tactics

This build uses the same tactics as the large pad, Anaconda version.

Passenger Rescue or Evacuation Anaconda Build

An Elite Dangerous ship build for evacuating passengers in bulk from damaged stations (before the events of Update 14) or stations in Thargoid Invasion systems (after Update 14).

Goals

Create a ship to:

  1. Carry as many passengers as possible. Evacuating passengers are happy with economy class.
  2. Make the 150+ LY trip to a rescue ship as quickly as possible. This means maximizing the jump distance and range to do the trip without refuelling. Failing that, outfitting a fuel scoop.
  3. Escape a Thargoid hyperdiction or interdiction. This means both the protection and speed to escape.
  4. (Optional) Collect engineering materials and commodities floating inside or around burning stations. Alternatively, transport critically injured evacuees in escape pods.

Build

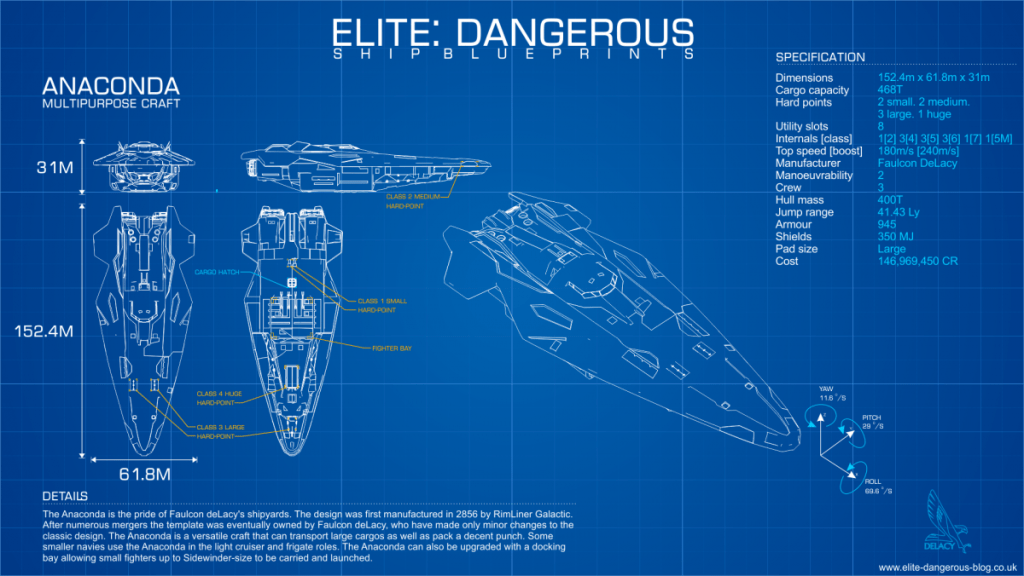
Anaconda Blueprint by CMDR-Arithon (https://swat-portal.com/forum/gallery/image/9472-anaconda/)

Links: EDSY and Coriolis (have your preferred one open as you read the guide for easy reference)

A comparison of large ship economy passenger capacity is given below.

Ship23456+Smallest Shield Slot SizeTotal Economy Passengers (Shielded)Total Economy Passengers (Shieldless)
Type-9 Heavy122145154170
Beluga Liner041245168184
Type-10 Defender122136106138
Anaconda103344194202
Federal Corvette012255196212
Imperial Cutter011255188204
Large Ship Economy Passenger Capacity

Given the largest passenger cabin is size 6, the Federal Corvette carries the most passengers in economy class cabins. However, the Anaconda is the second best when shielded and has almost a ten light year longer jump range with a similar build. The Imperial Cutter has a similarly crimped jump range, although its speed makes escaping mass locks easier. Therefore, the Anaconda is the best all-round choice.

Passengers and cargo:

  1. Passengers: Running passengers is straightforward. I prefer missions that reward engineering materials, especially ones with fewer passengers for five class five materials. The autodocking computer helps when repeatedly docking.
  2. Cargo: A small cargo rack and limpet controller can help collect floating engineering materials and commodities in damaged stations. You can pause inside a burning station, activate collector limpets and then use heat sinks to control your heat. Otherwise, it can help carry critically injured evacuees in escape pods from transport missions.
  3. Jumping: This build uses the double-engineered 6A Frame Shift Drive for maximum range. If you lack one, use Increased Range with Mass Manager. The 4A Fuel Scoop is small but sufficient. The build’s low heat means you can throttle to zero at the edge of a star’s exclusion zone without overheating.

Defence:

  1. Shields: While Thargoid damage is phasing, a Prismatic Shield Generator provides the best protection. Substitute for a regular Shield Generator if you do not have access to Prismatic Shields. It, with Shield Boosters, provides enough protection to survive several Thargoid encounters assuming you repair regularly.
  2. Armour: Favour speed over hull integrity with Lightweight Alloys, given the Anaconda already has a tough, strong hull.
  3. Speed and agility: While an Anaconda will never be able to outrun a Basilisk, maximizing the Dirty with Drag Drives engineering on the Thrusters minimizes the time in danger during Thargoid encounters. The Power Distributor engineering ensures it can boost every five seconds with four pips to engines and two to shields.
  4. Cold: Given the Anaconda’s massive size 8 power plant and minimal power requirements, engineering to minimize heat is appropriate. This reduces Thargoid weapon accuracy and makes fuel scooping easier.
  5. No weapons: This build runs from fights.

Variations

  1. Longer jump range: Replace the Cargo Rack with a Guardian FSD Booster. This reduces the jumps required to reach rescue ships.
  2. More passengers: Replace the Cargo Rack and Collector Limpet Controller with more economy-class passenger cabins for a small increase in passenger capacity. Remove the shields if you are happy to take some hull damage during Thargoid encounters.
  3. Anti-Scout: Equip several turreted enhanced AX multi-cannons in the large and huge hardpoints. Bring the fight to any scouts that interdict you or that attack you around stations! This variation can be fun but removing caustic damage from missiles is difficult. This build’s engineering makes overheating slow.

Tactics

  1. Surviving interdictions: Submit to interdictions, put four pips into engines, then boost every repeatedly. Scouts will be a pest until the FSD cools down. Basilisks will mass lock you, preventing you from low waking, but take up to 30 seconds to commence pursuit. That should be long enough to get the required five km to escape their mass lock. Use heat sinks liberally to keep your heat low and minimize thargoid accuracy.
  2. Surviving hyperdictions: Hyperdictions, even from Basilisks, are easier to survive than interdictions because their mass lock does not block high wakes. Boost, fire heat sinks, then high wake as soon as possible. Use the Shutdown Field Neutralizer when you get a message about the impending shutdown field.
  3. Run: This build runs from fights, notwithstanding the anti-scout variation above.

“Love, Death and Robots” Season 3 Review: Thought-Provoking and Bite-sized

Love, Death and Robots

I finally watched the third season of Love, Death and Robots on Netflix. For those unfamiliar with it, Love, Death and Robots is an animated science fiction anthology with no binding theme or premise.

The first episode, “Three Robots: Exit Strategies”, continues the tales of the delightful robot trio from Season One’s “Three Robots”. However, this season’s episode plays its hand heavily and unsubtly, the focus moving from the charming characters to the ridiculousness of humanity’s extinction. It pulls few punches, targeting the US tech elite and redneck preppers alike.

Some episodes struck a darker tone. “Swarm” was the most unsettling. It surmises that “intelligence is not a winning survival trait”, a theme touched other powerful science fiction like Starship Troopers.

“Mason’s Rats” and “Kill Team Kill” embodied compassion and heart. The former deals with the horrors of war and the inability to see each other as human, adopting a slightly stylized art style. The latter’s highlight was the banter between squad members, showing a macho love and mutual respect that can be hard to portray.

“Bad Travelling” was my favourite episode, mixing a desaturated palette, the isolation of Renaissance-era sea travel and Cthulhu-esque horror. Its aesthetics and premise reminded me of the Arkane series of computer games, but its unpredictable plot and clever writing made it the most satisfying episode of the season.

“In Vaulted Halls Entombed” also deals with Cthulhu-style horror but reminds humanity that our weapons and exploits pale compared to nature. There is much we do not understand.

“Jabiro”, the last episode, has a more contemporary, mundane theme. It is a tragedy, depicting a “toxic relationship” between a mythical, gold-scaled siren infatuated with a deaf knight she cannot call to his death and the knight that wants her for her treasure. This episode is sometimes confusing and confronting, with jarringly and intimately close camera shots and no dialog.

The animation quality is superb. Most went with a hyper-realistic representation, demonstrating how far animation technology has come. The sound design and foley are also excellent.

One exception to the realistic style is the “Night of the Mini Dead”, which is a refreshing contrast to the others’ sombre tones. It combines long, wide camera shots with shallow focal depth and sped-up motion and audio to turn a tragedy into a comedy, showing how most issues we deem important are actually irrelevant.  

Another exception is “The Very Pulse of the Machine”, which uses a traditional, cell-shaded art style. This style suits its examination of consciousness. It feels more at home in a Beatles or David Bowie music video, where the line between the real and imagined is hard to discern.

I enjoy anthologies because they demand little from the viewer but an open mind. In a time when many series have vast narrative arcs and exhaustingly complex characters, anthologies episodes are short and easily consumed. You lose little if you watch episodes separately. 

Moreover, without the pressure to fill umpteen episodes, the need to one-up previous arcs or huge budgets, anthologies are usually concise and succinct. There is no padding, no side stories and no fluff. Each exists as a statement and monument in itself.

Love, Death and Robots continues to deliver thought-provoking, albeit niche, material. It will not appeal to those looking for traditional stories or anything longer than about twenty minutes. However, it remains refreshingly different – a choc chip in the cookie. 

Laser Mining Type-9 Heavy Build

An Elite Dangerous ship build aimed at players in the middle game, who want to laser mine for profit or community goals but have not unlocked the Imperial Cutter or a fleet carrier.

Goals

Create a ship to:

  1. Laser mine Platinum, Painite and bulk community goal minerals in planetary rings for long periods.
  2. Be cheaper than and not require the Imperial rank unlock of the Imperial Cutter.
  3. Operate without a fleet carrier or nearby station.
  4. Avoid unlockable modules.

Build

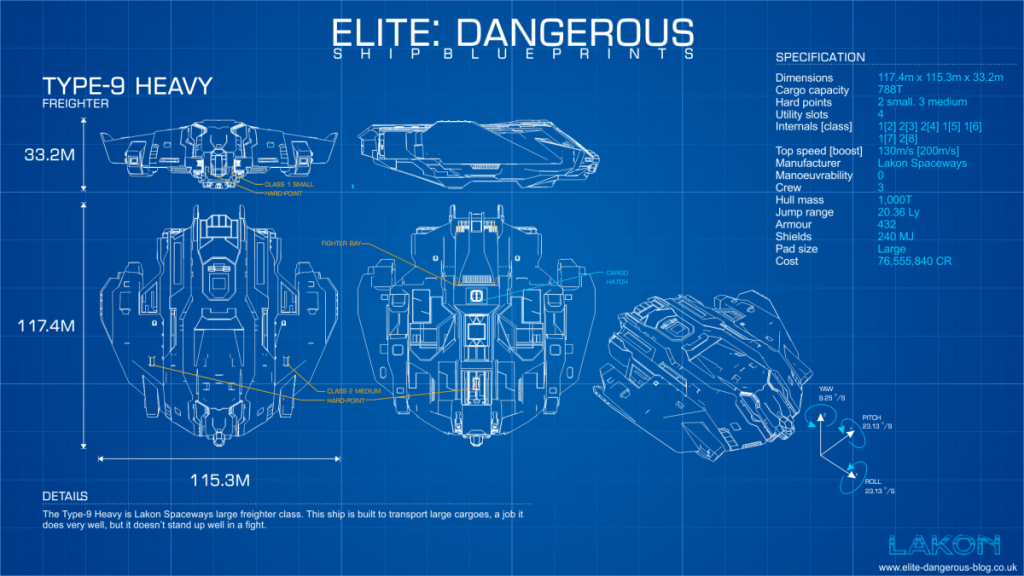
Type-9 Heavy Blueprint by CMDR-Arithon (https://swat-portal.com/forum/gallery/image/9473-type9/)

Links: EDSY and Coriolis (have your preferred one open as you read the guide for easy reference)

While a Type-9 Heavy is a cheap and effective bulk laser miner. However, it requires engineering to be usable, particularly on its Power Distributor, to avoid copious waiting for the weapon capacitor to recharge, and its Thrusters, to make moving from one asteroid to the next less painful.

A minor point, but the Type-9 Heavy’s open canopy gives a wonderful view of asteroid belts and Elite Dangerous‘s screenshot-worthy sunsets and sunrises.

The laser mining aspects of this build are similar to the Imperial Cutter and Python Mining builds I described previously.

Laser Mining:

  1. Fewer hardpoints and smaller Power Distributor: Most of the details for laser mining are identical to the Imperial Cutter build linked above. The fewer hardpoints and smaller Power Distributor means it will take longer to melt fragments off each asteroid.
  2. Wonderful size 7 slot: The size 7 slot provides wonderful opportunities. Ideally, this is either a 7A Collector Limpet Controller or a 7E Cargo Rack. Using the Lightweight blueprint on the Collector Limpet Controller reduces its weight by almost 100 T.
  3. Too many collector limpets: This build has slightly more concurrent active collector limpets than necessary, eleven when nine are required, but this helps offset the Type-9 Heavy’s poor handling.
  4. Slow and clumsy: The Type-9 Heavy is slow and hard to manoeuvre, even with engineered thrusters. Remember that its pitch and raw rates are identical, unlike most ships in Elite Dangerous, and its lateral and vertical thrusters are relatively strong.
  5. Refinery: A 2A Refinery is sufficient for most mining tasks, as you are usually looking for one or two minerals only.
  6. Fuel Scoop: Equipping a 4A Fuel Scoop allows this ship to reach remote mining spots or distant stations with the best prices. Its fully laden jump range is low but still more than sufficient to travel across the bubble or further. The Type-9 Heavy also has a large fuel tank, meaning it needs to refuel or fuel scoop rarely. If you jump frequently and do not mind weaker shields, consider swapping the Fuel Scoop and Shield Generator.

Defence:

  1. Shields and armour: The Type-9 Heavy is not known for heavy shields and armour. Its shields are there to give you time to jump out if pirates attack or prevent hull damage from asteroid impacts. Impact or “physics” damage is absolute so use the Heavy Duty blueprint on both the bulkheads and Shield Boosters and Reinforced with Lo-Draw on the Shield Generator. Use a Bi-Weave Shield Generator if you bump into asteroids frequently but, otherwise, a normal Shield Generator is fine. If you cannot fully engineer the Power Plant, remove or downgrade Shield Boosters.
  2. No additional weapons: This build leaves the Type-9 Heavy’s two small hardpoints empty. Its Power Distributor is not strong enough to mount additional mining lasers and a Type-9’s sluggishness means it is ineffective in combat against all but the lightest opponents.
  3. Point Defence: Equip one Point Defence in a utility mount on the lower side of the ship, closest to the cargo hatch. This will target hatch breaker limpets, preventing pirates from forcefully stealing your cargo. Disable this when mining with friends. Otherwise, it may target friendly limpets.

Variations

  1. Stronger defence: Consider a Prismatic Shield Generator and replacing a Shield Booster with a Chaff Launcher if operating in a pirate-heavy area or player interdictions are likely. Chaff then high-wake out when interdicted. However, the extra power demands of the Prismatic Shield will likely require an Overcharged Power Plant, which increases heat generation when fuel scooping or mining at a low power capacitor.

Tactics

  1. Run: Identical to the Imperial Cutter build discussed previously, but avoid Resource Extraction Sites and run from pirates.

Laser Mining Imperial Cutter Build

An Elite Dangerous ship build for end-game laser mining.

Goals

Create a ship to:

  1. Laser mine Platinum, Painite and bulk community goal minerals in planetary rings for long periods.
  2. Be fast and agile enough to escape pirates or manoeuvre around asteroids easily. Surviving in Low- or Medium-Intensity Resource Extraction sites is a bonus.
  3. Operate close to a fleet carrier or friendly station, and so does not require a fuel scoop.

Build

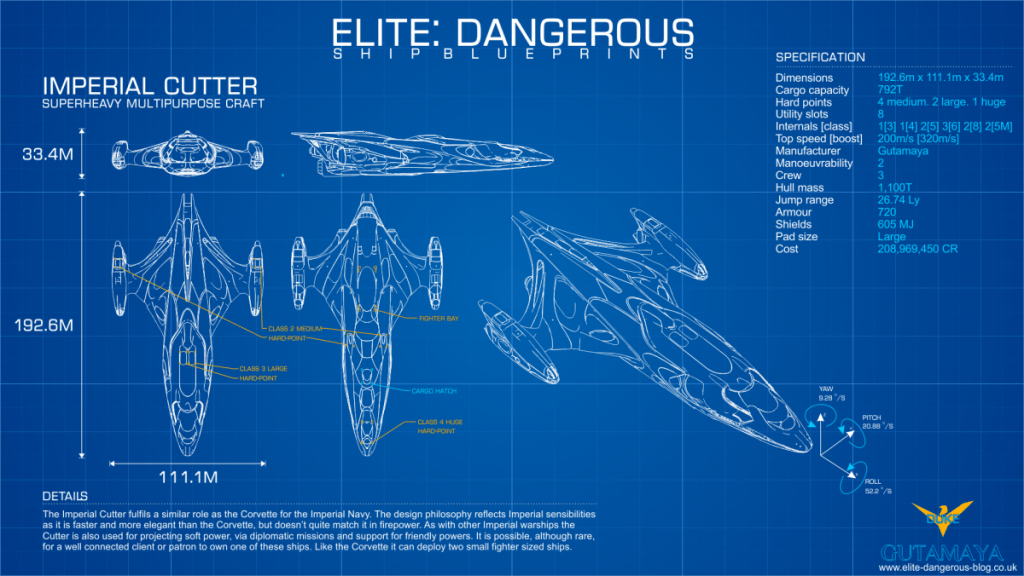
Imperial Cutter Blueprint by CMDR-Arithon (https://swat-portal.com/forum/gallery/image/9463-imperial-cutter/)

Links: EDSY and Coriolis (have your preferred one open as you read the guide for easy reference)

While a Type-9 Heavy is a cheap and effective bulk laser miner, the Imperial Cutter is faster, more agile, has a better Power Distributor and is in a different class regarding weapons, shields and armour. Unfortunately, the Imperial Cutter requires a mountainous rank unlock and comes with an eye-watering price tag.

Other contenders include the Federal Corvette, which has a better Power Distributor and better manoeuvrability but lacks the Imperial Cutter’s cargo space. The Anaconda is similarly light on cargo space.

The laser mining aspects of this build are similar to the Python Mining Build I described previously.

Laser Mining:

  1. Mining Lasers and Power Distributor: This build has four 2D Mining Lasers and uses a Weapon Focused blueprint on the Power Distributor. This means it can comfortably deplete an asteroid without exhausting its weapon capacitor. Equip the mining lasers in the top and bottom hardpoints and not the nacelle hardpoints to make mining smaller asteroids easier.
  2. Collector Limpet Controllers: Three collector limpets per 2D mining laser is a good guide for efficient fragment collection. A-rated Collector Limpet Controllers have a longer lifetime while B-rated have a longer range. A longer lifetime means fewer limpets are required. Most laser mining occurs at close range, so A-rated Collector Limpet Controllers are preferred. Use the Lightweight blueprint for a small boost to speed and agility.
  3. Prospector Limpet Controller: These tell you an asteroid’s composition and increase the number of fragments mining lasers can burn off. A-rated Prospector Limpet controllers provide more fragments than B-rated, B-rated more than C-rated and so on. Once again, use the Lightweight blueprint for a small boost to speed and agility.
  4. Avoid Mining Multi-Limpet Controllers: Multi-limpet controllers are great for multi-purpose builds or ships with constrained slots. However, dedicated limpet controllers are less effective for mining. Their lower rating means prospector limpets produce fewer fragments and their collector limpets have shorter lifetimes.
  5. Cargo space: Use the larger slots for Cargo Racks and the smaller slots for limpet controllers and a refinery. The 512 T cargo space should be ample. Fill it with between 25% to 75% capacity with limpets before heading out, with lower values if you are using a mining map or are otherwise familiar with the area.
  6. Refinery: A 4A Refinery is more than large enough for most mining tasks, particularly if you have to wait for the occasional “Refinery Full” bug to clear.
  7. Detailed Surface Scanner: A Detailed Surface Scanner probes rings for hotspots or to see hotspots revealed previously.

Defence:

  1. Shields and armour to taste: Mining does not require particularly strong shields. The eight utility slots coupled with a size six shield generator, the smallest an Imperial Cutter can practically fit, are overkill for mining. Impact or “physics” damage is absolute so resistances are not important. This build uses Bi-Weaves due to the lower power requirements and faster regeneration speeds when fighting in lower-intensity resource extraction zones.
  2. Military slots: Use Guardian Shield Reinforcement Packages to bolster shields. Hull and Module reinforcements are good substitutes if you have not unlocked those modules. The two military slots can be left empty if cost or mass are tight.
  3. Point Defence: Equip a Point Defence on the lower hull near the cargo hatch to protect against hatch breaker limpets. However, deactivate it if mining in a wing or with friends. Otherwise, it may target others’ collector and prospector limpets.
  4. Weapons to taste: The three remaining hardpoints can be left empty or filled with your preferred weapons. Medium Lasers and a Huge Multicannon are an effective pairing.

Variations

  1. Resource Extraction Site Mining: This build can handle itself against most pirates and in Low- and Medium-Intensity Resource Extraction zones. To improve the build’s effectiveness, consider replacing one of the 5A Collector Limpet Controllers with a fighter bay. Swap the sensors to Long Range A-rated Sensors to see what is coming. Wingmates are ideal. Flee if your shields drop.
  2. Fuel Scoop: If you want to operate without a carrier or in remote locations, swap one of the 5A Collector Limpet Controllers for a 5A Fuel Scoop.

Tactics

  1. Fire groups: Have one fire group for laser mining. Put the Prospector Limpet Controller on one button and both the Collector Limpet Controller and Mining Lasers on the other. Putting both collector limpets and mining lasers together means collector limpets are released when you fire the mining lasers.
  2. Laser Mining: Laser mining is covered by guides from elsewhere. To summarize, fly close to an asteroid then fire a prospector limpet at it. When it hits the asteroid, select the prospector limpet to see the asteroid’s composition in the info panel. If it contains sufficient minerals, move close to the asteroid near the pole of its rotation Fire mining lasers at it to melt off fragments, which the collector limpets will pick up. Open your cargo hatch for the limpets to drop the fragments into your refinery. When the asteroid is depleted, move to another asteroid and repeat. Ignore minerals you are not interested in. Abandon limpets in groups of 10 to 20 if your cargo racks are full.
  3. Pip management: Mining is best with four pips to weapons and two in engines. Unless you want to lazily boost into each asteroid instead of breaking, shields should only be needed for accidental bumps or pirates. Avoid boosting unless you are running from pirates or jumping out because an Imperial Cutter requires kilometers to slow down.
  4. Pirates: Waiting for the initial pirate to spawn, scan you and move on is the easiest plan. It may spawn outside sensor range so be patient. However, This build’s copious shields and huge hardpoint give the option of defeating most pirates if you are impatient.
  5. Resource Extraction Zones: Choose a resource extraction site within a hotspot if you want to mine a particular mineral. Start about 20 km away from the centre of the zone to avoid most of the traffic. Have the fighter deployed and set to “Defensive”.

Elite Dangerous Racing Builds: Eagles, Vipers, Couriers and More

This post outlines various Elite Dangerous ship builds for racing. Racing is an emergent gameplay loop in Elite Dangerous – there are no missions or similar activities requiring such a ship. However, many players create their own courses around settlements or canyons. The rules and location determine exactly what build you need so this post focuses on the fundamentals and design decisions.

Goals

The goals are:

  1. Build a ship for racing. This requires maximizing thruster speed and manoeuvrability. Like an exploration ship, this requires minimizing everything else down to the thruster’s minimum mass.
  2. Handle a few bumps. Racing along a course will often involve bumping into the sides or obstacles along the way. Strong shields or armour help survive a few of these.
  3. Assume that the ship can travel to the racing system via a fleet carrier or a shipyard on in-system station. Once the ship is outfitted and engineered, there is no need for a long jump range.

Build

Imperial Courier Blueprint by CMDR-Arithon (from https://swat-portal.com/forum/gallery/image/9483-imperial-courier/)

The table below lists racing builds for different ships, each designed to maximize their speed and agility:

NameSizeLinksMax Speed AT 2 pips/Boost
(m/s)
Boost Frequency (seconds)Pitch/Roll/Yaw
(degrees per second)
Comments
SidewinderSmallCoriolis EDSY373/7457.772/208/30Small core internals leaves lots of mass. A racing sidewinder needs to sacrifice little.
EagleSmalCoriolis EDSY489/8158.885/227/34The most manoeuvrable ship in Elite Dangerous.
Viper Mk IIISmallCoriolis EDSY606/9321162/170/28The fastest ship in Elite Dangerous.
Imperial EagleSmallCoriolis EDSY594/9321166/189/28Similar to the Viper Mk III in speed with slightly better manoeuvrability.
Imperial CourierSmallCoriolis EDSY582/8855.166/170/30A good compromise between speed and agility with frequent boosting, strong shields and strong armour.
Alliance ChieftainMediumCoriolis
EDSY
321/5575 (capped)59/152/27The most agile medium-sized ship, just pipping the Fer-de-Lance.
Fer-de-LanceMediumCoriolis
EDSY
405/5915 (capped)57/152/20A good compromise between speed and agility.
MambaMediumCoriolis EDSY524/6425 (capped)48/127/17The fastest medium-sized ship but has low manoeuvrability.
Imperial ClipperLargeCoriolis EDSY405/6425 (capped)59/135/30Very manoeuvrable for a large ship. Size 6 thrusters give a high minimum weight.
OrcaLargeCoriolis
EDSY
422/6425 (capped)38/92/30The fastest large-sized ship. However, its poor agility makes it unsuited for racing.
Imperial CutterLargeCoriolis
EDSY
304/5405 (capped)27/76/14Possibly good for a demolition derby but not much else.
Speed and Agility Comparison of Speed-Focused Builds

The Viper MK III is the fastest ship in the game at a maximum possible boost of 932 m/s. The Eagle is the most agile. They are bolded in the table above and, deservedly, get a lot of attention. The Imperial Eagle matches the Eagle’s boost speed but not the unboosted speed.

However, these Viper Mk III, Eagle and Imperial Eagle builds sacrifice just about everything else to attain those speeds. They have a minute jump range, heat problems, can boost infrequently and a modest bump will destroy them.

Getting these ships to engineers is also challenging. Using a fleet carrier to jump the ship to each engineer will be easier for those with patience. Otherwise, fitting a temporary Frame Shift Drive to jump to engineers is a good idea.

Heat is also a challenge. Grade 5 Overcharged on the Power Plant means the ship will often overheat when jumping, fuel scooping or boosting frequently. Use the lowest grade Overcharged on the Power Plant that you can get away with. Temporarily equipping more fuel tanks reduces the need to fuel scoop, too.

Instead, the Imperial Courier is a good compromise between speed and agility while sacrificing little. You can adjust the components to taste, like having a larger frame shift drive to get to engineers or racing tracks unaided or stronger shields. Heat management is also much better.

Outfitting and Engineering for Racing

  1. Thrusters and minimum mass: Thrusters in Elite Dangerous roughly follow a real-world physics model. They provide a certain amount of thrust that is divided by the ship’s mass to determine speed and agility. However, unlike frame shift drives, thrusters have a minimum mass, meaning reducing the ship’s mass below that value provides no benefit. Therefore, the design goal with a racing ship is to equip and engineer the best thrusters possible, reduce the mass as much as possible then add necessities and “nice to haves” until just below the minimum mass.
  2. Enhanced Performance Thrusters: Only available from engineers that provide thruster blueprints and only available in sizes 1 to 3, these thrusters provide the most thrust but have low minimum, optimal and maximum mass values.
  3. Lightest core internals: Fill every other core internal slot with the lightest component possible, usually the D-rated version of the lowest equipable class. Engineer Sensors and Life Support with Lightweight and everything else with the blueprints that do not increase mass and Stripped Down experimental effect. This means using Overcharged blueprint on the Power Plant and the Fast Boot blueprint on the Frameshift Drive. Lower engineering grades than 5 are viable for this build if materials are scarce or overheating is a problem with the Overcharged Power Plant.
  4. Power Distributor: The Power Distributor is the exception to minimizing core internals.. Using a larger Power Distributor reduces the time between boosts by a few seconds. Engine Focused or Charge Enhanced are both viable blueprints, although Charge Enhanced provides slightly faster recharge, meaning you can boost a tad more often. Charge Enhanced also helps with shield regeneration. Use the Super Conduits experimental effect instead of Stripped Down if you have the mass available.
  5. Fuel tank: If the mass is still too high, reduce the fuel tank size. While you do not have to completely fill your fuel tank, there is no easy way to vent fuel. Therefore, a smaller fuel talk is the easiest way to minimize fuel mass. This is normally a dangerous trade-off but acceptable for this build.
  6. Bump protection: You can apply the Heavy Duty blueprint and Deep Plating experimental effect to Lightweight Alloy without worrying about the mass multiplier. Lightweight Alloy has zero mass. A D-rated Shield Generator with the Enhanced, Lower Power blueprint and Stripped Down experimental effect gives reasonable protection at a negligible mass and power cost.
  7. Optional internals are optional: As long as you have sufficient power and they do not add mass, you can add whatever you want. A Fuel Scoop can help keep the small fuel tank topped up. An Advanced Docking Computer and Supercruise Assist are nice to have.
  8. Empty hardpoints and utility mounts: As with optional internals, nothing is required here. This build runs from fights and is well equipped to do so.

Variations

  1. Lots of tweaking: Expect to experiment with and adjust these builds a lot to match your play style and different racing tracks and environments.
  2. Too fast or fragile: These builds may be too quick or too brittle when hitting obstacles. Add Hull Reinforcement Package(s) to solve both problems.
  3. Mines and chaff launchers: Depending on the rules of your races, limited weapons may be equipped for a “Mario Kart”-style race. Mines and Proximity Mines are hazardous for those following you. Chaff can disorient those nearby or celebrate a win. Seeker Missiles can take out those ahead of you, assuming you can get a lock
  4. Wake scanning: Outside of racing, fit a 0D Wake Scanner and better sensors to make a ship for scanning wakes for encoded materials.
  5. Hit and Run: Make this into a hit-and-run ship, e.g. with torpedo tubes, but you are unlikely to destroy anything other than the lightest ships.
  6. Mosquito: Fit an FSD Interdictor then interdict pirates then stay out of their firing arc or boost away for a fun challenge.

Tactics

  1. Racing: Shift pips between engines and shields to control velocity and minimize the damage from hitting obstacles. Deploy the cargo scoop or landing gear temporarily for easier turns. Boost laterally to avoid or mitigate an impending collision or get around that tight corner.
  2. Practice: Racing is a skill. Without a course, the training simulations available under “Training” on the main menu can help.
  3. The thrill of speed: Casually boosting to 800+ m/s low over a planet’s surface or around a settlement is fun. This ship may also be effective a Buckyball racing (flying over a planet with flight assist off to find the fastest possible speed).
  4. Combat: If you are attacked, clearly racing ships are well equipped to escape.

“No Man’s Sky” Review

No Man’s Sky box art

Hello Games initially Kickstarted No Man’s Sky in 2016, promising a vibrant, life-filled universe to explore. Unfortunately, under-delivery led to an initial backlash, but Hello Games has since built it into a worthy and unique game.

No Man’s Sky is an exploration-focused, survival crafting game with space simulation elements, like Astroneer or Subnautica. You play as an unnamed “traveller” who wakes up on an alien planet with a damaged spacecraft and no memory. You initially explore, gather resources then craft things. Crafting first extends survival by refilling oxygen and recharging your exosuit’s components. Eventually, you repair your ship, construct bases and build vehicles to increase your exploration speed and range.

No Man’s Sky includes activities common to space simulation games like ground combat, space combat, piracy and trading. You can adopt, ride and breed pets. The brave can explore derelict freighters. Later in the game, you can also maintain a fleet and periodically send ships on distant missions, build and oversee a town or relax into daily quests for upgrades or cosmetic rewards.

No Man’s Sky provides quests to introduce players to new mechanics and provide context and purpose. The main quest line examines existentialism. However, unlike other survival crafting games, No Man’s Sky treats this solemn theme lightly. For example, the game lacks the conviction of Subnautica’s pacificism and environmentalism or Breathedge’s self-deprecating humour.

What sets No Man’s Sky apart is its massive procedurally generated universe containing quintillions of planets. Procedural generation is not new, but No Man’s Sky‘s scale and beauty are unique. Each planet has a biome (e.g. desert, marsh, paradise, volcanic), which determines the flora, fauna and geology populating it. Some planets have seas and caves, effectively different biomes on the same planet. The player earns credits by scanning specimens and gets a bonus for finding samples of all a planet’s fauna. 

Graphically, No Man’s Sky is a love letter to 1970s- and 1980s-era science fiction art. Those artists portrayed landscapes with recognizable terrain and creatures with recognizable limbs but in alien colours or orientations. No Man’s Sky harks back to the endless potential and wonder these artists captured, looking at the universe through nostalgia-coloured glasses.

A ring over a paradise planet in No Man’s Sky. This screenshot shows the beauty that Hello Games promised in 2016 but took a few more years to deliver. Captured by the author.
No Man’s Sky uses bioluminescence not just to allow the player to see at night but to create beautiful grass seas with luminescent waves. Captured by the author.
No Man’s Sky is also home to the bizarre, like the Giger-esque hive worlds. Some planets, like this one, use extreme palettes, emphasizing their alienness. Captured by the author.

All players share the same universe. However, it is a vast universe, so the chance of meeting another player outside the Anomaly (the central quest hub) or your friend list is remote. PVP combat is by mutual consent only. You can play offline but lose the ability to claim credit for first discoveries or interact with other players.

No Man’s Sky favours accessibility over challenge. For example, its space flight and combat are arcade-like and lack the atmospheric handling of flight simulators or Newtonian handling of more realistic space simulators. Ships have different inherent strengths and are upgradable, but the process lacks the depth and specialization found in other games. No Man’s Sky‘s simplistic trading uses static economies and routes. Landing and docking are automated.

Realism is out the window. Procedural generation sometimes produces gravity-defying floating rocks or improbable creatures. Planets do not orbit their stars. They are often close enough for their gravities to cause horrendous damage and collisions. The game’s chemistry is more comparable to alchemy than real-world chemistry, allowing easy conversion of one element to another or liquid water at high or low temperatures.

Neither of these are oversights. No Man’s Sky does not want to be a gritty, “realistic” universe like in Elite Dangerous, Eve Online or Star Citizen. It is not the game for those looking for complex ship outfitting, pouring over spreadsheets maximizing trade profit, elaborate joystick and HOTAS setups or ruthless PVP. 

Instead, Hello Games designed away anything distracting from the almost meditative play. They created a game where losing hours to the self-expressive joy of building bases or the “sense pleasure” of seeing the sunrise on yet another verdant or desolate world is easy. Internal consistency and beautifully varied landscapes are what matter.

While survival and permadeath modes are available to those looking for a greater challenge, No Man’s Sky also offers expeditions. These temporary game modes increase the difficulty and provide different main quests. They feel different enough to be novel without losing familiarity, keep experienced players engaged and give unique rewards.

The most significant criticism of No Man’s Sky is that, while Hello Games has worked hard in the last six years on survival and crafting mechanics, it is still a procedural generation engine looking for a game. The designers could have shrunk No Man’s Sky into several dozen unique planets spread across a few solar systems. This choice would expose all planet types while satisfying the limited curiosity of most players.

Meanwhile, No Man’s Sky wants to be a live-service game – an ongoing online entertainment service – but it lacks end game mechanics beyond intrinsic exploration or social interaction. It degenerates into daily or periodic quests once the shallow main quest line is complete. Some game loops also deteriorate into grinding. If you want to upgrade your freighter or find that perfect-looking ship, you must keep retrying until you fluke the right one. 

However, despite offering no paid expansions, Hello Games continues to expand the game with new features, including regular expeditions. They do so more frequently than comparable games like Elite Dangerous or Star Citizen. Along with the more casual appeal, these draw in a large and growing audience that loves No Man’s Sky

The name No Man’s Sky is a play on “No Man’s Land”, the unexplored part of old maps where no kingdom or empire holds sway. No Man’s Sky presents a universe full of the unknown, ready for players to explore but much safer than the early European explorers found it.

Those looking to satiate curiosity and meditative “sense pleasure” from exploration and self-expression from building bases will enjoy No Man’s Sky. You can finish the main quest in a few tens of hours, but the game will capture your imagination for much longer.

No Man’s Sky‘s low challenge also appeals to a broader audience and may help introduce new players to the space simulation genre. It is a welcome change to one often dominated by hardcore players and niche games. 

“Obi-Wan Kenobi” Review

Obi-Wan Kenobi is the latest Star Wars series streaming on Disney+ in their seemingly unending desire to explore the edges of Star Wars characters and canon. It follows the fan-favourite Obi-Wan Kenobi ten years after Revenge of the Sith, covering events between it and A New Hope.

The series starts with Obi-Wan watching over a young Luke Skywalker on Tatooine and a young Leia chaffing against the life of a princess on Alderaan. While Obi-Wan’s life appears necessarily humble to avoid drawing attention to Luke, Obi-Wan’s dreary routine is more a penance as he hides from his responsibilities and abandons others in distress. Still driven by revenge, Anakin Skywalker/Darth Vader orders his Sith inquisitors to kidnap Leia to draw Obi-Wan out from hiding. Bound by duty, Obi-Wan hesitantly embarks on a rescue.

The series focuses on two main characters: Obi-Wan Kenobi and Reva, one of the inquisitors. We know Obi-Wan, Darth Vader and Leia survive, so the drama focuses on interactions and character development.

Obi-Wan follows the well-trodden path of the “hero’s journey”. Initially reluctant, he battles his self-righteous guilt at Anakin’s downfall and the inquisitors. Obi-Wan rebuilds himself and reconnects with the Force while rescuing Leia and confronting his past, namely the scene-stealing Darth Vader.

Obi-Wan spends much time with the adolescent Leia, an unexpected but welcome introduction of naive kindness, childish stubbornness and adolescent bravado that blossoms into true courage and resolve at the series end. Her lines and acting are excellent, particularly the quiet, tender moments between her and Obi-Wan.

Reva has a more nuanced and subtle storyline. Initially, she is rebellious and attention-demanding like a whiney teenager, as a colleague put it. Reva’s defiant successes make her feared by the Jedi but ridiculed by her fellow inquisitors. 

Unfortunately, Obi-Wan Kenobi (the series) gets bogged down in its middle episodes. The series needed to either spend more time developing secondary characters and the setting or skip them. The Path, saving the now hunted Jedi, or Haja Estree, a lovable conman with a heart of gold, deserved more screen time, but perhaps these are for future series.

Similarly, the shaky camera focuses too close to the characters during action sequences like in the Fortress Inquistories and on Jabiim. It increases the emotional intensity but loses perspective and, therefore, cause and effect. People shooting blasters or waving lightsabers seemingly randomly is less compelling and credible.

However, the climactic lightsaber duels with Anakin Skywalker/Darth Vader are Star Wars at its best. The choreography is distinctly different from the stilted awkwardness of the original trilogy and the energetic and frantic fights of the second trilogy. 

Like the Japanese mythos that inspired it, lightsaber fights in Star Wars have always been personal battles of wisdom and focus, not just martial. The first duel between a timid, shattered Obi-Wan and vengeful Darth Vader shows Vader terrorizing, dominating and torturing. Darth Vader’s battle with Reva demonstrates how vastly he outmatches the tunnel-visioned Reva, toying with her like a cat with its prey. The flashback to the training fight between Anakin and Obi-Wan during Part V is a compelling allegory that Star Wars should use more.

The final confrontation is the series’ crux and emotional pay-off. Similar to the moment in Return of the Jedi where Luke refuses to fight Vader until Vader threatens Leia, Obi-Wan’s desire to protect finally empowers him.

The image of Anakin’s scarred but recognizable face beneath the shattered mask of Darth Vader, as he alternates between James Earl Jones’ distinctive voice as Darth Vader and the more human voice of Anakin, is horrifying and sympathetic. It personifies the battle within Vader that Anakin lost.

However, despite the satisfying gravitas, one wonders whether these events were better left to headcanon. Was this moment different to the one people expected or imagined? Does every character and moment in Star Wars need a different series and detailed explanation?

Similarly, much of Disney’s Star Wars seems to orbit the Skywalkers, fuelled partially by the current fixation on nostalgia. However, Star Wars has many more stories to tell. Reva, for example, presents a fascinating character for future development.

Many were ready to dismiss Obi-Wan Kenobi (the series). The need to unrealistically break the previously resilient Obi-Wan to give him character development, Reva’s annoying early character flaws and the slow middle threatened to render this series a profit-driven vanity project. However, the last two episodes provide the emotional punch, plot twists and satisfying albeit predictable resolution that the series and franchise deserve and fans craved. Hopefully, it will springboard new and varied stories set in the Star Wars universe.