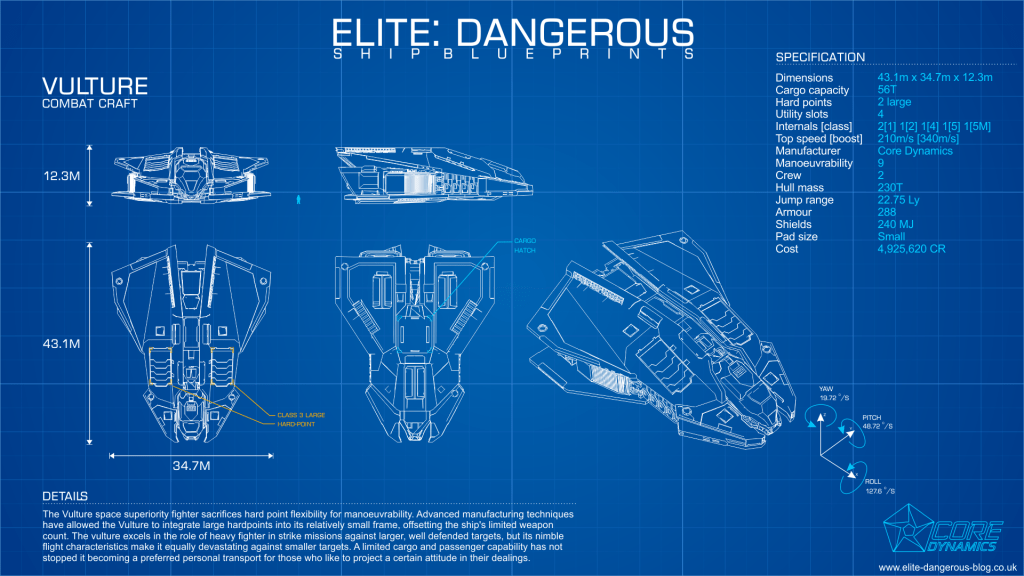
An Elite Dangerous ship build for more experienced players, effectively an end-game version of the Beginner PvE Combat Vulture Build.
Goals
The goals are:
- Create a build that uses the Vulture effectively for late-game PvE combat, such as Hazadous Resource Extraction Sites, High Intensity Conflict Zones and Threat 7 Pirate Activity signal sources.
- Use any module or engineering in the game to maximize effectiveness and the Vulture’s strengths.
Build

Links: EDSY (have it open as you read the guide for easy reference)
As mentioned in my Beginner PvE Combat Vulture Build, the Vulture is a wonderful small ship to learn PvE combat. It is cheap, packs oversized weapons and teaches good skills like pip (power) management.
However, the Vulture is rarely seen during end-game combat. Large ships like the Federal Corvette and medium ones like the Fer-de-Lance and Chieftain tend to dominate. They have more firepower, better hull and shields, speed and/or agility.
No clever engineering or obscure modules will change this balance. However, the Vulture is far from useless. Some even see its disadvantages as a challenge. Killing NPC pirates in a fully engineered Federal Corvette is relatively easy. Doing so in a Vulture requires more skill.
Offence:
- Intertial Impact: The Internal Impact experimental effect changes the damage from 100% thermal to 50% thermal and kinetic. This change means the Burst Lasers become effective against both shields and hull. However, it adds a 3% jitter, which is much larger than it sounds.
- Efficient: Some people use the Short Range Blaser blueprint to maximize damage output but this drains the distributor quickly. Using Efficient means you can fire indefinitely with four pips to weapons.
- Fixed: A small, nimble ship is the perfect platform for fixed weapons. The extra damage over gimballed weapons helps, as does the immunity to chaff or even needing to select your target.
- FSD Interdictor: An FSD Interdictor is useful for interdicting assassination mission targets, wanted ships for bounty vouchers or even powerplay ships for merits. Swap for another Guardian Module or Hull Reinforcement Package otherwise.
Defence:
- Resistance: This build focuses on high resistances for shields instead of raw strength. Unless you consistently fight plasma-armed enemies and cannot dodge the slow-moving projectiles, this focus gives a high effective strength with fast regeneration.
- Fast Charge versus Lo-Draw: Like most ships using Fast Charge on a Bi-Weave Shield Generator, the Power Distributor cannot supply enough power with two pips in systems to rebuild the ship at the optimal rate. This build’s shields should drop rarely but, if they go down often, replace the Fast Charge experimental effect on the shield generator with Lo-Draw.
- Reactive Surface Composite and Thermal Resistance: Reactive Surface Composite inverts the standard resistances for armour, making it strong against kinetic and explosive weapons but weak against thermal. To compensate, the build uses Thermal Resistant on one of the Hull Reinforcement Packages. This gives the build net positive resistances on the hull.
- Guardian Shield and Module Reinforcements: Guardian Module Reinforcement Packages provide slightly more protection than Module Reinforcement Packages but cost some power. Swap for normal Module Reinforcement Packages if you do not have them unlocked. The Guardian Shield Reinforcement Package is the only non-utility module that buffs a shield.
Variations
- Shieldless: A shieldless version (EDSY) reduces longevity but lets you put the system pips into engines for greater speed and agility. Consider it a challenge. Replace the Shield Generator and Shield Reinforcement Module with Guardian Module Reinforcement Packages and a Hull Reinforcement Package respectively. Replace the Shield Boosters with Shielded Point Defence and Chaff Launchers. Replace the Efficient blueprint on the Burst Lasers with Sturdy, giving them more protection and higher armour penetration. Sturdy costs more power but you have power to spare, even with an Armoured Thermal Spread Power Plant.
- Anti-Thargoid Scout or Hunter: To create an AX version (EDSY), take the shieldless version and replace the burst lasers with Azimuth Enhanced AX Multi-Cannons. Fill the utility slots with Caustic Sink Luanchers and an Enhanced Xeno Scanner. Replace the FSD Interdictor with a 1A AMFU and the Guardian Module Reinforcement Packages with normal Module Reinforcement Packages to reduce power use and prevent a Glaive field from damaging them. Replace the Reactive Surface Composite with Military Grade Composite, because the additional resistances are unnecessary. Once again, other ships fulfil this role better but this build can hold its own.
Tactics
- Finding targets: This build works best against wing-less large or less agile targets. Anacondas, Asps, Pythons and Type-10s are generally easy prey. Using fixed and jittery weapons against fast or agile targets, like Elite Vultures and Vipers, is doable but frustrating.
- Point blank: Get as close as possible to enemy ships, preferably above or below where their surface area is maximized. Avoid jousting as it reduces time on target. Instead, circle strafe, pre-turn and landing gear-turn to track ships as they pass by. Hold down fire. Even with only two pips to weapons, exhausting the distributor or overheating will take minutes.
- Power (pip) management: Two pips in systems and four in weapons are usually sufficient. Temporarily shift pips into engines to boost or run down fleeing ships. Ironically, power management is easier in this build than in the beginner version. An Overcharged Monstered Power Plant gives more than enough power. A Charge Enhanced Power Distributor gets it to where it needs to be.
