
An Elite Dangerous ship build for beginner players. See PvE Combat Vulture Build for an end-game version.
Goals
The goals are:
- Create a build that excels at early PvE combat, such as Low- and Medium-Intensity Resource Extraction Sites and Low-Intensity Conflict Zones.
- The build must be accessible to early-game commanders. It should be cheap and require no engineering, rank, reputation or unlockable ships or modules.
Build
Links: EDSY and Coriolis (have your preferred one open as you read the guide for easy reference)
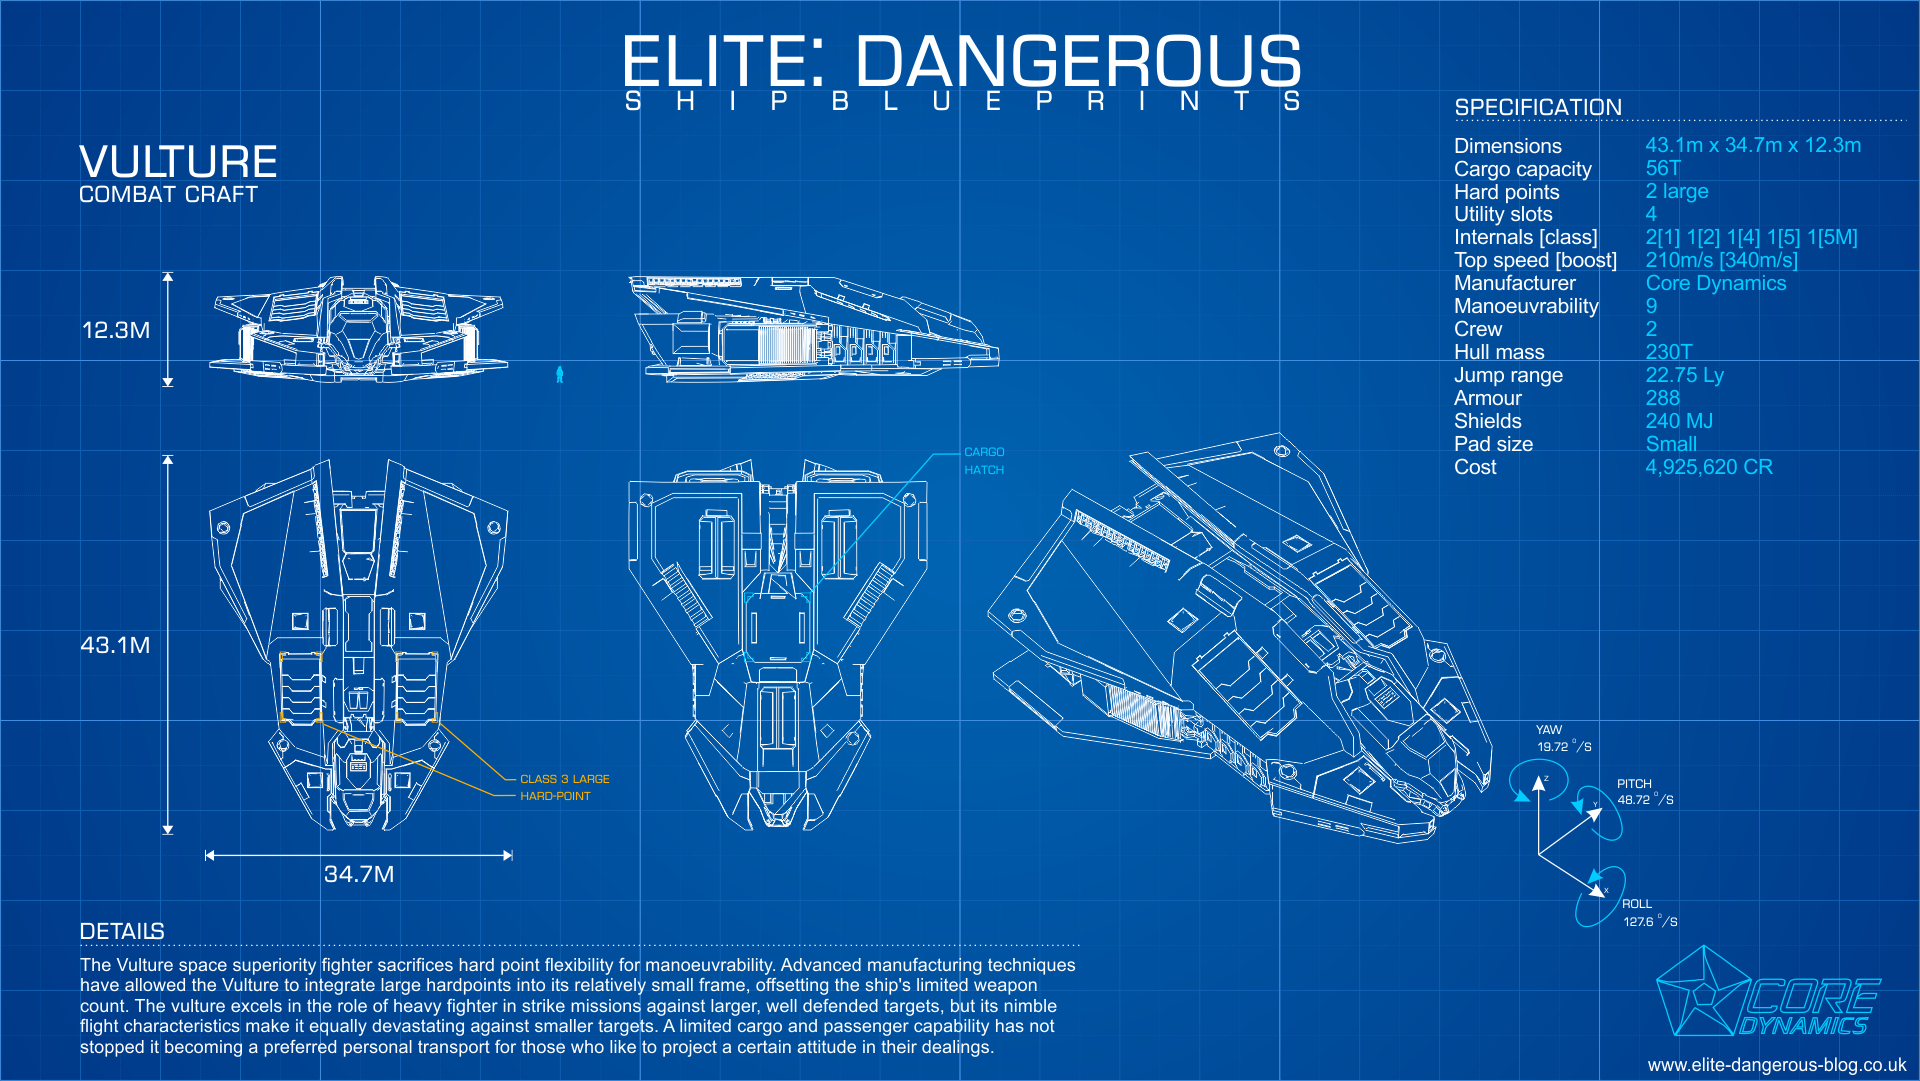
When only considering combat, the Vulture is a giant among small ships. An unengineered Vulture is faster, more agile, has better shields, harder and thicker armour and more firepower than any other similarly outfitted and unengineered small ship, including the Viper Mk III.
Unfortunately, this build costs around 20 million credits. This cost might seem high for a beginner build. You can outfit a combat Viper Mk III for 2.5 million credits, a figure much easier to attain for an early-game player. This Vulture build’s rebuy is also high at about 1 million credits.
However, you want the best odds when you are new to combat. A Viper Mk III will struggle against all but the weakest enemies. Its smaller hardpoints have lower Armour Piercing. It has fewer utility points, so you have to sacrifice shield boosters for chaff.
You also want to be established enough to afford rebuys. The Viper mentioned above is cheap but, at that stage, a new commander may not have the experience or ships to quickly earn it back. In this build, you can earn the Vulture’s rebuy cost in under an hour of fighting in a Low-Intensity Resource Extraction Zone.
If cost is a limiting factor, B-rating the Frame Shift Drive, Thrusters and Power Distributor saves 5 million credits. You can sell the B-rated modules with no loss and upgrade when you have the credits.
Finding a station that sells everything can be a challenge. Early- to mid-game players will not have access to Jameson Memorial station in Shinrarta Dezhra. Thankfully, both EDSY and Coriolis can locate nearby stations selling this build’s ship and modules in Inara.
This build is far from original. Unengineered Vulture builds go as far back as 2015. However, the discussion below should help new pilots understand why this build works and useful variations.
Offence:
- Gimballed weapons: Gimballed weapons auto-aim, but chaff confuses them. They are a good compromise between the more difficult aiming with fixed weapons versus the lower damage output of turreted weapons.
- Burst Lasers: Burst Lasers compromise between the low power, damage and heat Pulse Lasers and the high power, damage and heat beam lasers. They do not require ammunition, so you can focus on flying and combat instead of watching ammunition counts.
- Heat management: With four pips to weapons, these Burst Lasers can fire for 18 seconds. This time is usually more than long enough for the enemy to pass by. The weapons’ heat build-up is slow, making them quite forgiving. It is difficult to self-inflict heat damage with this build.
- FSD Interdictor: An FSD Interdictor is useful for interdicting assassination mission targets, wanted ships for bounty vouchers or even powerplay ships for merits.
- Kill Warrant Scanner: A Kill Warrant Scanner gives about 25% bonus credits for each kill. It generates additional, needed cash early on. Assign it to the same fire group as your Burst Lasers. The scan takes ten seconds, and the range of the 0E version is only 2000 m. However, this build fights best when up close, so that range is acceptable.
Defence:
- Power management: The biggest challenge with outfitting a Vulture is its small Power Plant. It is a class too low given the power demands of its other modules. Without the Overcharged engineering blueprint, you need to make tradeoffs with your outfitting. This build moves the Frame Shift Drive and Cargo Hatch to a low power priority. They are unpowered when deploying hardpoints, meaning you have to stow them before scooping engineering materials or jumping out. The Fast Boot engineering blueprint on the Frame Shift Drive would also help with fast get-a-ways.
- Shields: Bi-weave shields are generally weak when unengineered. However, they are sufficient given this build’s power constraints and the likely weak enemies. Two D-rated shield boosters give the best shield increase considering the remaining available power.
- Chaff: A Chaff Launcher is the best choice for the remaining utility slot. It requires minimal power and works against all gimballed weapons.
Variations
- Laser and Multi-cannons: Burst Lasers are sufficient for weaker enemies. However, Expert and better NPC pilots have noticeably better armour. This build’s pure thermal damage from lasers is less effective against them. Replace one Burst Laser with a 3C Multi-Cannon to swap some thermal for kinetic damage. Keep everything on the same fire button for simplicity or use separate fire buttons to micromanage ammunition.
- Fixed weapons: If you back your flying skills, replace the gimballed weapons with fixed versions. It can be frustrating at first, particularly against smaller or agile craft, but you will improve with practice.
- More hull: Replace the FSD Interdictor with a 1D Hull Reinforcement Package if you do not plan to use it. However, it is worth experimenting on a few wanted targets at supercruise, if not just to familiarise yourself with how interdictors work.
- Fighting without life support: Equip a 3A Life Support, then give it a low power priority. Deploying hardpoints means fighting without oxygen. However, A-rated life support gives you 25 minutes of oxygen, which is more than long enough for an engagement. It means you have more power for better Shield Boosters or whatever you prefer. This change is an interesting take on power management, but I find no life support’s altered soundscape distracting.
Solo Tactics
- Finding targets: The short sensor range required more flying around to locate targets than builds with better sensors. Look for telltale distant laser fire or explosions or follow system authority ships. Scan potential targets first to ensure you only fire on wanted ships.
- Point and shoot: Flying this build is pretty basic. Speed up to get close to the target, throttle down to 50% when they get within one km, and then fire. Pulse lasers are most effective within 800 m. Turn as they fly past, then repeat the process. Experiment with thrusters and pre-turning to increase time on target.
- Power (pip) management: This build works fine with the default two pips in every category. However, it comes alive when you actively manage your pips, moving points into what you need at the time.
- Shield management: Start every fight with shields at 50% or better integrity. Put four pips in systems to maximize the shield protection and rebuild/regeneration rate between fights or when not firing. Putting pips in systems is faster than doing a reboot/repair when shields are down for this build.
- Chaffing: Chaff when shields get low, multiple targets engage you, or you need to escape.
- Fun: Once I reset my expectations for an unengineered ship, I found flying this Vulture surprisingly fun. It can almost continually kill Novice-piloted or easier ships. The multi-cannon variant can take down wings of Expert- or Master-piloted NPC ships without too much hassle.
- Upgrade path: Consider the Alliance Chieftain or, reputation willing, the Federal Assault Ship or Imperial Clipper as the logical next step in combat ships. See PvE Combat Vulture Build for an end-game version of this build.
Team or Wing Tactics
- Unchanged: Fly in a wing or team as you would in solo. Whether you tank depends on your teammate’s ships and builds.
