
A departure from my normal reviews, this post and the next few will focus on interesting Elite Dangerous ship builds, as requested by my squadron mates. Please indulge me.
Goals
Build a ship with the following aims:
- General-purpose, engineered PvE combat ship.
- Require no unlockable modules, reputation or rank.
- Effective against all targets, from small, nimble fighters to lumbering Anacondas.
- Effective in any non-Thargoid combat, from a Navigation Beacon to a Pirate Attack.
- A fuel scoop to access remote combat community goals or engineers.
Build
Links: Coriolis and EDSY (have your preferred one open as you read the guide for easy reference)
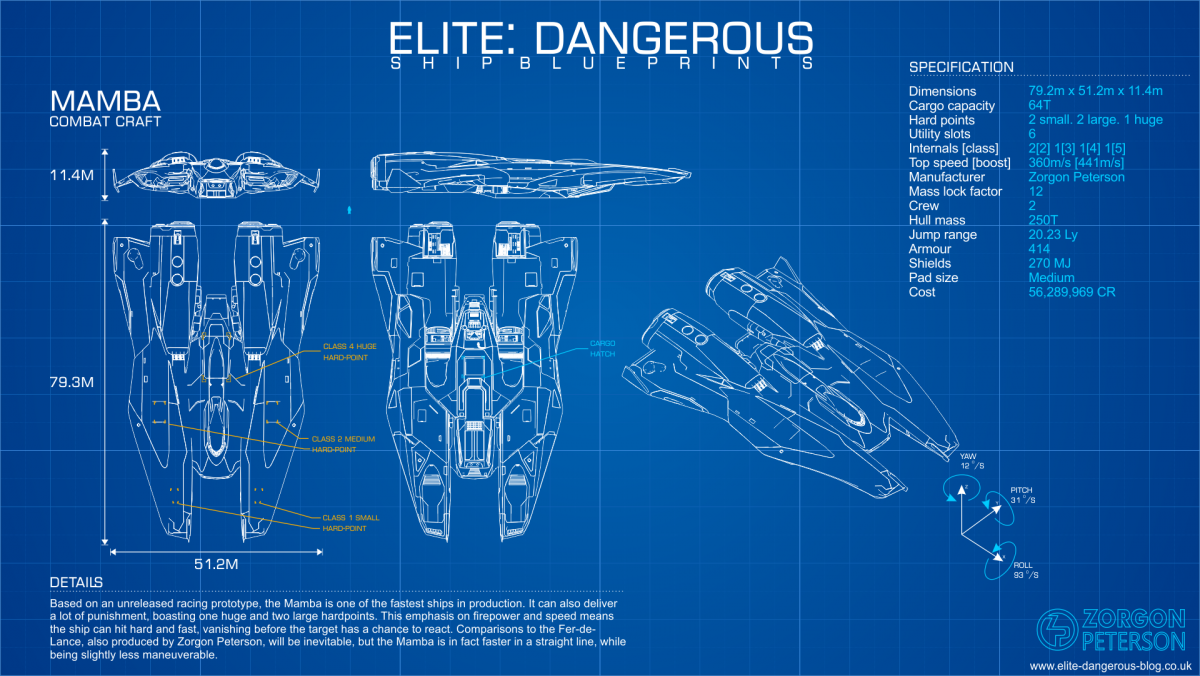
The Mamba combines the firepower of a Fer-de-Lance, the modest manoeuvrability of a Krait Mk II and an Eagle’s speed on arguably Elite’s best-looking ship. It requires no reputation or rank unlock. I also have a soft spot for playing less popular ships.
Offensively, this build relies on the tried-and-true lasers and multicannons formula:
- Gimballed weapons: Perhaps obvious but gimballed weapons are the ideal trade-off between damage and accuracy. It makes it easier to hit small or fast-moving targets, frees you up to manoeuvre more freely and makes hitting modules on larger ships easier.
- Huge hardpoint: This build’s Huge Multicannon has Overcharged (blueprint) with Oversized (experimental effect), giving a 70% damage increase. Simple but effective.
- Large hardpoints: The large beam lasers have Long Range with Thermal Vent. Long Range means the beam lasers can hit targets up to 3.6 km away with no damage loss. Otherwise, lasers’ damage starts to drop at 800m. The Thermal Vent experimental effect decreases instead of increasing heat on a hit, eliminating heat issues.
- Avoid over-engineering: The large beam lasers only have grade 1 Long Range. Higher grades have diminishing returns due to gimballed weapons’ increasing inaccuracy at range. Engineering everything to grade 5 is not always the best solution.
- Small hardpoints: Compared to the other hardpoints on a Mamba, the small hardpoints are there to apply experimental effects instead of doing damage. This build uses Emissive and Corrosive. Neither effect stacks. Both are available on Small Multicannons. This build uses the High Capacity blueprint to double their ammunition capacity, almost matching the firing time of the Huge Multicannon. Unfortunately, Small Multicannons churn through ammunition quickly. Corrosive also decreases the ammunition capacity by twenty percent.
- Emissive experimental effect: Emissive increases gimballed weapons’ accuracy against that target for a few seconds. This accuracy increase is most evident when the target’s heat drops, like when using a heat sink.
- Amour piercing and hardness: When a weapon hits a ship, the weapon’s “Armour Piercing” is compared to the ship’s “Armour Hardness”. When the Armour Piercing is lower than Armour Hardness, some of the damage is diverted to the ship’s “Armour” value until “Armour” ablates to zero. Larger ships generally have higher Armour Hardness and Armor values. Larger weapons also tend to have higher Armour Piercing values. That is why large ships are harder to damage with small weapons. That is also why most builds put high Armour Piercing weapons in the largest hardpoint slots, like the Huge Multicannon in this build.
- Corrosive experimental effect: Corrosive reduces a ship’s Armour Hardness value for a few seconds. This allows this build’s weapons to do more damage to heavier ships’ hulls. Even the Huge Multicannon benefits against ships with the hardest armour (Fer-de-Lance, Mamba, Imperial Cutter, Federal Corvette and Type-10 Defender).
- Sensors: The 4A Sensors with Long Range are essential. The best weapons are only effective if you can find suitable targets in large Conflict Zones, Resource Extraction Sites or Navigation Beacons.
Defensively and ignoring speed, this build relies on Bi-weave shields and strong armour:
- Bi-weave shields: Bi-weave shields sacrifice raw strength for a fast rebuild (recharge from nothing to 50%) and regenerate (50% to 100%). This build emphasizes the recharge speed using Reinforced (increase strength) and Fast Charge (increase regeneration rate). You can engage weak to moderate targets without pause.
- Shield boosters: The shield boosters use two Heavy Duty (increase strength), two Thermal Resistance (counter shield’s innate weakness against thermal weapons like lasers) and one Resistance Augmented blueprint. This build is resistance-heavy, further emphasizing the recharge rate without losing too much to resistance’s diminishing returns.
- Armour: This build uses Reactive Surface Composite with Heavy Duty and Deep Plating, both increasing strength. Reactive Surface Composite inverts the usual strengths and weaknesses of armour, resisting explosive (missiles) and kinetic (multicannons) damage but weakening against thermal damage (lasers).
- Hull and module reinforcement: This weakness against thermal damage is corrected with Thermal Resistant engineering on the 4D Hull Reinforcement Package. The 2D Module Reinforcement Package protects against module damage when weapons breach the hull and potentially damage the core internal modules.
- Power priorities: Power priorities are not required for this build but keep core internals and Shields operating if the Power Plant is ever significantly damaged.
Variations
- Guardian modules: Replace the Module Reinforcement Package with a Guardian Module Reinforcement Package if you have access to that module. It has slightly better module protection.
- Cost: If cost or rebuy is a factor, replace the Reactive Surface Composite with Military Grade Composite. Adjust the engineering on Hull Reinforcement Packages accordingly. A Mamba’s Reactive Surface Composite costs around 120 million credits before any discount, over half the initial purchase cost. This ratio is the same for most ships, so this advice is helpful for any build.
- Prismatic Shields: If you prefer Prismatic Shields, replace the 5C Bi-Weave Shield Generator with a 5A Prismatic Shield Generator with Reinforced and Hi-Cap. You will need to replace the engineering on the Power Plant with Overcharged grade 2 or higher to ensure sufficient power.
Solo Tactics
This build works fine for simple “point and shoot” but you can do a lot more with it:
- “Circle Strafe” tactic: The ideal tactic is circle-strafing the target, keeping a 1 to 1.5 km distance. Fly toward the target at 50% throttle, thrust down while gently turning the nose up. It can be difficult initially, but practice helps. Dodge slow, unguided munitions like plasma accelerator shots and non-seeker missiles using lateral or vertical thrusters.
- “Reverski” tactic: Fly to long range, match the speed of an enemy, toggle flight assist off, turn toward the target, and then blast away with impunity. This tactic is cheesy but effective against slow targets. Unless the target has long range weapons, you will do more damage than they will.
- Pursuit and fleeing: If you need to chase down a fleeing enemy or disengage, put four pips in engines and two in shields, then boost. While faster ships are possible, such as some Imperial Clipper or small ship builds, none will match this build’s shields or firepower.
- Weapon use: Use lasers on shields or chaffing targets, then everything against ships’ hulls. Avoiding multicannons on shields conserves ammunition. Corrosive only works when hitting a ship’s hull.
- Power (Pip) management: Put two pips in systems and four pips on weapons to permanently keep at least one Large Laser firing. A Mamba is fast and manoeuvrable enough to generally not need pips in engines when engaged. Boosting tends to overshoot the target. Just keep the SYS capacitor topped up and the throttle in the blue.
- Large target tactics: Get closer to large, lumbering targets. You can circle strafe faster than they can turn when close, staying out of their firing arcs. Target sensitive modules like Power Plants.
- Small target tactics: Combat with smaller, faster ships will often revert to jousting. Use your Long Range weapons to damage them for most of the attack run, then pre-turn or “landing gear turn” to maximize time on target as they fly past.
- Chaff sparingly: Chaff when facing an enemy wing because sufficient fire will exceed the Bi-Weave Shield Generator’s regeneration rate. While this build has strong armour, sustained explosive damage on the hull will start to render hardpoints inoperable (when their integrity drops below 80%).
- Hardpoint placement: All of a Mamba’s weapons are on top of the ship. Pitch the nose down slightly when engaging a target. This preempts a ship diving underneath the Mamba. It also keeps the target visible through the Mamba’s copious canopy.
Wing or Team Tactics
- “Pulling” role: Use the Long Range, A-rated sensors to find suitable targets, boost to them, “tag” targets with the Large Lasers, and then flee back to the wing. The enemies will follow, allowing better-shielded ships to engage and draw enemy attention. Time the pull to keep a constant stream of enemies engaged.
- “Tanking” role: Even without heavier ships in the wing, the Mamba is still in the top tier of combat ships and more than capable of tanking (getting enemy attention and taking the damage).
- “Rescue” role: Put pips into engines, then boost to a wingmate in trouble. Draw the attention of enemy ships by doing lots of damage when closest to the target.
- Experimental effects: After everyone engages, the Corrosive and Emissive experimental effects on the small multicannons buff everyone’s damage output, not just this ship. However, they do not stack, so consider other experimental effects if you frequently wing with others that use them.
